
How to Remove Fences from Zoo Photos with AI: Get Clean Wildlife Shots
Learn how to remove fences, mesh, wire barriers, and glass reflections from zoo and wildlife park photos using AI tools. Transform obstructed animal photos into clean, expert-looking wildlife images.
SEO & Growth
Reviewed by Magic Eraser Editorial ·
Table of Contents
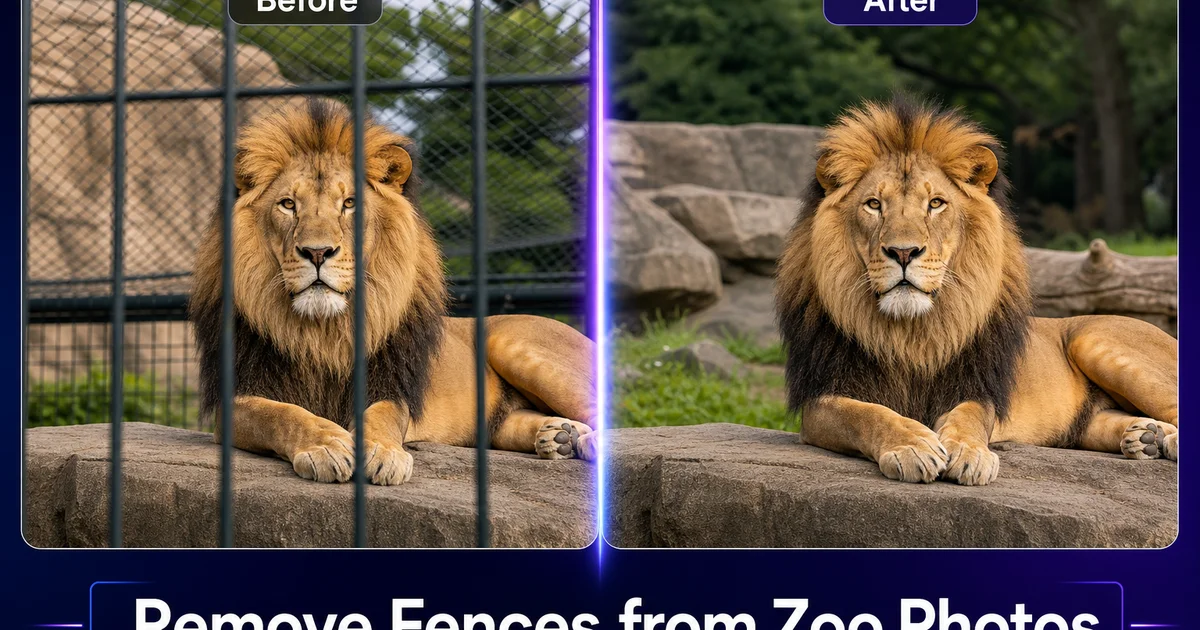
Every photographer who has visited a zoo knows the frustration of capturing a perfect moment with an animal only to find the image dominated by chain-link fencing, wire mesh, metal bars, or glass barriers. The animal's expression, pose, and behavior are exactly what you wanted. The photo is unusable for anything beyond a personal memory because the enclosure barrier occupies more visual attention than the subject. This is the single most common complaint in zoo photography. It affects everyone from casual visitors with smartphones to experienced wildlife photographers with expert lenses.
Traditional approaches to minimizing fences in zoo photos involve expensive equipment and precise technique. Using a long telephoto lens at maximum aperture pressed against the fence can optically blur the barrier. This requires carrying heavy expert gear and finding perfect positioning that is often impossible with crowd barriers, viewing platforms, and enclosure geometry. Even with optimal technique, traces of the fence usually remain visible in the image as soft-focus lines or color shifts that reveal the artificial setting.
AI-powered removal tools solve the fence problem from the opposite direction. Instead of trying to prevent the fence from appearing, you let it appear and then remove it digitally. Modern AI inpainting algorithms can analyze the pattern of a chain-link fence, wire mesh, or railing, identify which pixels belong to the barrier and which belong to the animal and background, then reconstruct what the scene would look like without the obstruction. This guide covers the complete workflow for turning fenced zoo photos into clean wildlife images that look like they were shot in open habitat.
- AI inpainting removes chain-link fences, wire mesh, metal bars, and glass reflections from zoo photos.
- Shooting close to the fence with a wide aperture pre-blurs the barrier, reducing AI workload significantly.
- Magic Eraser handles thin wire patterns while AI Fill reconstructs animal detail behind thicker obstructions.
- The final AI Enhance step evens out tonal differences between original and reconstructed image areas.
- The technique works on photos from zoos, wildlife parks, sanctuaries, aviaries, and aquarium glass tunnels.
Camera techniques that make AI fence removal easier
The quality of your final fence-free image depends partly on how you shoot the original photo. While AI tools can remove fences from almost any image, giving the algorithm a head start with smart shooting technique produces greatly better results. The most important principle is proximity: position your camera lens as physically close to the fence as possible. When your lens is pressed against or nearly touching the mesh, the fence elements fall so far out of focus that they become faint, transparent overlays rather than sharp, opaque obstructions. The AI then has less material to remove and more of the background animal detail preserved in the original pixels.
Aperture selection is the second critical factor. A wide aperture like f/2.8 or f/4 creates a shallow depth of field that blurs the fence into near-invisibility when you are shooting close to it. Smartphone cameras achieve a similar effect with portrait mode, which computationally blurs foreground elements. The animal, positioned meters behind the fence, remains in sharp focus while the fence wire closest to the lens dissolves into transparent smudges. When you later apply Magic Eraser, you are removing faint blurred lines rather than sharp, high-contrast wire patterns, which produces smoother reconstructions.
Timing and patience matter as much as camera settings. Animals move constantly, and the position of the animal relative to fence elements changes with every step. Wait for moments when the animal's face and key features are visible through the largest gaps in the fence mesh. Shoot in burst mode to capture multiple frames per second, then select the frame where the animal is least obstructed. A photo where thick fence bars cross the animal's eyes is much harder to reconstruct convincingly than one where the eyes are clearly visible through a gap. Taking fifty photos to find five good candidates is normal and expected in zoo photography.
- Press your lens as close to the fence as possible to blur wire into transparent overlays rather than sharp lines.
- Use a wide aperture or smartphone portrait mode to throw the fence out of focus while keeping the animal sharp.
- Shoot in burst mode and wait for moments when the animal's face is visible through the largest mesh gaps.
- Selecting the least-obstructed frame before editing dramatically improves AI reconstruction quality.
Removing chain-link and wire mesh patterns with Magic Eraser
Chain-link fencing is the most common barrier in zoo enclosures. Its regular diamond-shaped wire pattern is both visually unwanted and geometrically complex for manual editing. Magic Eraser handles this pattern well because the AI recognizes the repeating wire structure and distinguishes it from the organic shapes of the animal and natural background. Brush across the fence wire systematically, working from one side of the image to the other rather than jumping around randomly. Methodical coverage ensures you do not miss intersections or stray wire ends that become very obvious in the final image.
The key to clean chain-link removal is matching your brush size to the wire thickness. Using a brush that is too wide removes good background detail along with the wire, creating unneeded reconstruction areas that may introduce artifacts. Using a brush that is too narrow misses the full width of the wire and leaves faint ghost lines. Zoom in to fifty or seventy-five percent view so you can see individual wire strands clearly, set your brush width to just slightly wider than the wire, and paint along each strand. This precise approach gives the AI the clearest possible signal about what to remove and what to keep.
For very fine-gauge wire mesh — the thin metal screen used in aviaries and small-animal exhibits — a different approach works better. Instead of tracing individual wires, which would take hours on a fine mesh, use a broader brush to paint over the entire mesh area. The AI detects the regular mesh pattern across the brushed region and removes it in one pass, reconstructing the bird or animal behind it from the partial information visible through the mesh openings. This works surprisingly well when the mesh gauge is fine enough that major animal detail shows through between the wires.
- Work systematically from one side of the image to the other to avoid missing wire intersections.
- Match brush width to wire thickness — slightly wider than the strand for clean removal without artifact creation.
- For fine-gauge aviary mesh, use a broad brush to let the AI remove the entire mesh pattern in one pass.
- Zoom to fifty or seventy-five percent for precise wire tracing that gives the AI clear removal signals.
Reconstructing animal detail with AI Fill
Thin wire removal with Magic Eraser handles most of the fence, but thicker elements like railing posts, cage bars, and mesh knot intersections cover enough of the animal's body that simple inpainting leaves noticeably blurry or texturally inconsistent patches. This is where AI Fill becomes key. Unlike basic inpainting that smears surrounding pixel colors into the gap, AI Fill generates new detail that matches the specific texture, pattern, and coloring of the surrounding area. For a tiger's fur, it generates stripes that continue naturally across the filled region. For a gorilla's face, it reconstructs skin texture and shadowing that matches the surrounding facial structure.
Use AI Fill specifically on areas where thick barrier elements crossed high-importance features of the animal. A cage bar that crossed the lion's mane should be filled with generated mane fur that matches the surrounding hair direction and color gradient. A railing post that obscured part of a flamingo's neck should be filled with feather texture that continues the natural pink coloring and fine feather pattern. Focus your AI Fill work on the areas that draw the most visual attention. Prioritize eyes, faces, and distinctive markings because these are where reconstruction quality matters most for a convincing final image.
After AI Fill reconstruction, compare the filled areas with the surrounding original detail at full zoom. The generated texture should match the original in color temperature, contrast level, and textural grain. If any filled region looks subtly different — slightly smoother, slightly more saturated, or texturally flatter — run the entire image through AI Enhance with sharpness and tone-matching improvement. This final pass normalizes the tonal and textural traits across the whole image so that reconstructed areas blend invisibly with the original capture.
- AI Fill generates texture-accurate detail for thick obstructions that basic inpainting would leave blurry.
- Prioritize filling areas that cross high-attention features like eyes, faces, and distinctive markings.
- Generated fur, feathers, and skin textures match the direction, color, and pattern of surrounding originals.
- Run AI Enhance after filling to normalize tonal differences between original and reconstructed regions.
Handling glass barriers and reflections in aquarium photos
Glass enclosures at aquariums, reptile houses, and primate exhibits create a different category of obstruction that requires adapted techniques. Instead of wire that can be traced and removed, glass barriers introduce reflections of the viewer, overhead lights, and other visitors that overlay the animal scene. These reflections are semi-transparent, blending with the image behind the glass in ways that make selective removal challenging. However, AI tools have become remarkably effective at distinguishing between the transmitted image of the animal and the reflected image of the viewing area.
For photos where reflections are the primary problem, use Magic Eraser to brush over the reflected elements specifically. Brush over the ghost image of your own hand holding the camera, the reflection of an overhead fluorescent fixture, or the mirror image of the crowd behind you. The AI identifies these as overlay elements and removes them while keeping the animal detail beneath. This works best when the reflection is partial and the animal behind the glass has strong color and texture contrast with the reflected elements. Darker reflections on brightly colored tropical fish remove more cleanly than reflections on dark-colored animals.
For glass that shows smudges, fingerprints, or water spots from cleaning, Magic Eraser cleans these up in a single pass. Brush over the visible smudge marks and the AI reconstructs the clean view of the animal and habitat behind the glass. If the glass has a visible green or blue tint from thickness or lamination, run the cleaned photo through AI Enhance with color correction to neutralize the tint and restore the animal's natural coloring. The combination of reflection removal, smudge cleanup, and color correction can transform a murky aquarium photo into a clear, vibrant wildlife image.
- Glass barriers create semi-transparent reflections that AI tools can distinguish from the animal scene.
- Brush over reflected hands, lights, and crowd images to remove them while preserving animal detail.
- Smudges, fingerprints, and water spots are cleaned in a single Magic Eraser pass over the marks.
- AI Enhance color correction neutralizes green or blue glass tinting to restore natural animal coloring.
Ethics and best practices for edited zoo photography
Removing fences from zoo photos raises legitimate questions about photographic ethics and representation that every photographer should consider. The National Press Photographers Association code of ethics emphasizes honest representation. There is a meaningful difference between removing a fence to create a cleaner portrait of an animal you observed firsthand and passing off a zoo photo as a wild habitat encounter. If you share edited zoo photos publicly, transparently disclosing that the image was captured at a zoo and digitally edited respects both your audience and the conventions of wildlife photography.
Context matters enormously when deciding how to present fence-free zoo photos. Personal photo collections, family albums, educational materials, and artistic projects are all appropriate uses where the editing serves the aesthetic purpose without misleading anyone about the animal's circumstances. Social media posts benefit from brief captions noting the zoo location. Photography competitions and editorial submissions generally require disclosure of major digital manipulation. The editing technique itself is ethically neutral — the ethical dimension lies fully in how you represent the resulting image.
There is also a positive ethical dimension to zoo photography when done thoughtfully. Clean, strong images of zoo animals can support conservation awareness, educational programming, and fundraising for accredited facilities that participate in species survival plans. The Association of Zoos and Aquariums notes that visitor photography contributes to public engagement with conservation missions. Producing high-quality edited images of zoo animals and sharing them with right context contributes to a visual conversation about wildlife that reaches audiences who may never visit the animals' natural habitats.
- Disclose that images were captured at a zoo and digitally edited when sharing publicly on social media.
- Personal collections, educational materials, and artistic projects are fully appropriate uses of fence removal.
- Photography competitions and editorial contexts generally require disclosure of significant manipulation.
- Quality zoo photos with honest context support conservation awareness and educational programming.
How to do it
- 1
Photograph animals at the zoo with fence removal in mind
Position your camera lens as close to the fence or mesh as possible and use a wide aperture to blur the barrier naturally. Shoot through the largest gaps available and take multiple shots as the animal moves. The closer your lens is to the fence, the more the barrier will blur, giving AI tools less material to remove.
- 2
Select the fence lines and mesh with Magic Eraser
Open your zoo photo in Magic Eraser and brush over all visible fence wires, mesh patterns, and barrier elements. Work methodically from one edge of the image to the other, ensuring you cover every wire intersection and stray strand. The AI will reconstruct the animal and background behind each removed element.
- 3
Use AI Fill to reconstruct obscured animal details
For areas where thick fence bars or mesh knots covered major portions of the animal's body, face, or fur texture, use AI Fill to regenerate natural-looking detail. The tool analyzes the surrounding fur pattern, coloring, and texture to fill gaps that simple inpainting might leave blurry or inconsistent.
- 4
Enhance the final image for natural wildlife quality
Run the cleaned-up photo through AI Enhance to restore sharpness, correct color, and balance the exposure across the entire image. This step evens out any subtle tonal differences between the original areas and the AI-reconstructed sections, producing a seamless result.
- 5
Review and touch up any remaining artifacts
Zoom in to one hundred percent and scan the entire image for any remaining fence shadows, wire fragments, or reconstruction artifacts. Use Magic Eraser on any small remnants. Pay special attention to areas where fence wires crossed the animal's eyes, nose, or other high-detail features.
Sources
- Image Inpainting for Irregular Holes Using Partial Convolutions — arXiv / NVIDIA Research
- Association of Zoos and Aquariums: Photography Best Practices — Association of Zoos and Aquariums
- Wildlife Photography Ethics and Representation Standards — National Press Photographers Association