
Genealogy Photo Restoration: Rescue Family History from Faded, Damaged Photographs
Family photographs are often the most emotionally significant artifacts in a genealogy research project — they put faces to the names on census records, give physical context to the immigration stories, and connect living family members to ancestors they never met. But the physical photographs that carry this connection are deteriorating in shoeboxes, albums with acid-adhesive pages, and envelopes passed between relatives over decades. Fading, water damage, foxing, torn edges, and surface scratches make many of these photos difficult to share in their current condition. AI Enhance and Magic Eraser restore scanned family photos to a quality that can be shared with relatives, published in family history books, displayed at reunions, and preserved digitally for generations that will never see the physical originals.
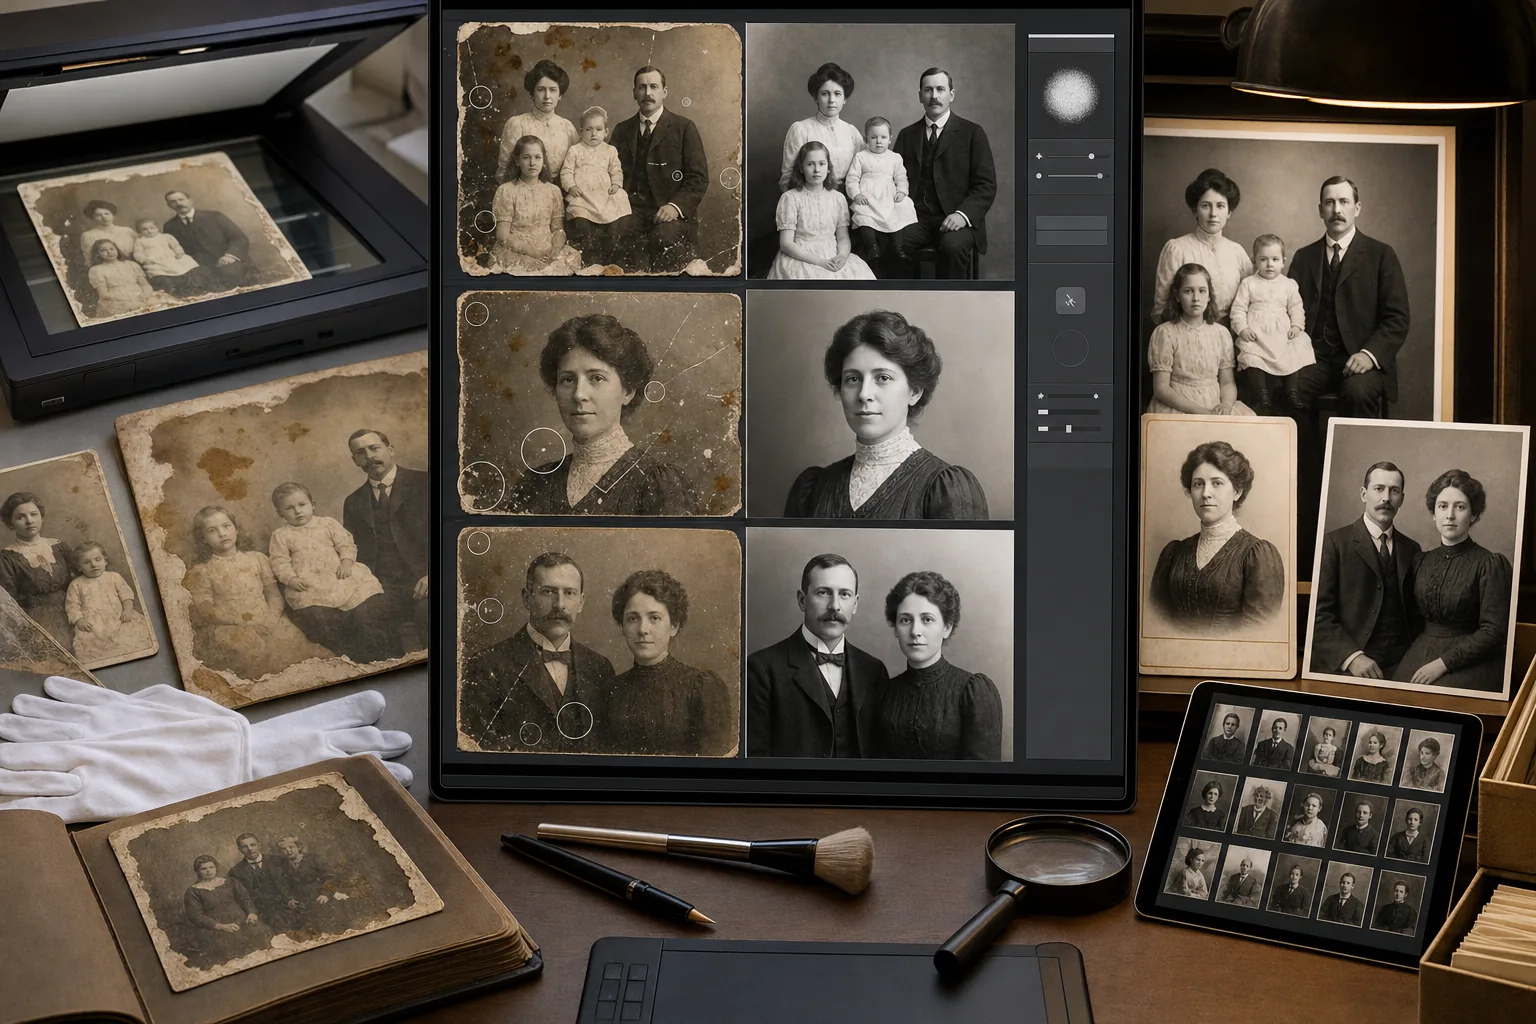
Decades of improper storage have degraded the photographs beyond casual recognition
Family photos stored in attics, basements, and non-archival albums for 40-100+ years exhibit predictable deterioration patterns: emulsion fading that reduces the tonal range to a narrow band of light browns, yellowing from acid in the paper and album adhesive, water damage from flooding or humidity that causes staining and emulsion separation, foxing spots from fungal growth in humid storage conditions, and surface scratches from handling without protective sleeves. When great-grandmother's wedding portrait is a faded brown rectangle with water stains obscuring the faces, it can't fulfill its role as a family-history artifact — the emotional connection requires the subjects to be recognizable.
Scanning introduces its own artifacts on top of the physical damage
Home flatbed scanning of deteriorated photographs adds scanning artifacts to the existing physical damage: moiré patterns from scanning halftone-printed photos (common for newspaper clippings and some commercial prints), dust and fiber specks magnified from the scanner glass, Newton rings from glossy prints making uneven contact with the scanner bed, and color-cast shifts from the scanner's light source interacting with the yellowed emulsion. These scanning artifacts layer on top of the physical deterioration, creating a compounding quality problem that makes the raw scan even less usable than the physical photo appears to the naked eye.
Professional restoration is priced per-image at rates that don't scale to a full collection
Professional photo-restoration services charge $25-75 per standard image and $75-200+ for heavily damaged photographs. A genealogy researcher who has collected 50-200 family photographs spanning four to six generations faces a restoration budget of $2,500-$15,000+ at those rates — an investment that few hobbyist genealogists can justify, even when the emotional and historical value is significant. The result is that most genealogy photo collections remain unrestored, shared only as raw scans with apologetic captions about the condition, and the visual dimension of the family history remains inaccessible to relatives who would otherwise engage with it.
How Magic Eraser fits the genealogy photo restoration workflow
Scan the physical photographs at high resolution before any restoration
Scan each photograph at 600 DPI minimum (1200 DPI for small-format originals like wallet-size prints and cabinet cards) on a clean flatbed scanner. Handle the originals with cotton gloves or clean dry hands. For photographs stuck in albums with acid adhesive, scan them in the album rather than risking damage by removing them — the scanner captures the photo as-is, and restoration will address the adhesive yellowing and page-edge artifacts digitally. Save each scan as a TIFF or maximum-quality JPEG. This scan becomes your preservation master — the digital record of the physical artifact's current condition.
Run AI Enhance to restore faded tonal range and correct color deterioration
Open each scanned photo in AI Enhance to address the most impactful deterioration effect: fading. The AI restores the tonal range that has compressed over decades — bringing back the full spectrum from deep blacks to bright highlights in black-and-white photos, and correcting the yellow-brown color shift in originally black-and-white photos that have browned with age. For color photographs from the 1960s-1980s, correct the characteristic magenta or cyan dye-fade that affects different color-print processes at different rates. The result is a photo that shows the faces, clothing, and setting details that decades of fading have obscured.
Use Magic Eraser to remove physical damage artifacts
After tonal restoration makes the image legible, use Magic Eraser to remove the localized physical damage: water stain borders and discoloration, foxing spots, scratch lines, tape marks from previous amateur repair attempts, scanner dust and fiber artifacts, album-adhesive residue marks, torn-edge artifacts, and any creases visible in the scan. The AI reconstructs the damaged areas from surrounding image context. For faces — the highest-priority area in genealogy photos — work carefully around facial features to ensure the reconstruction looks natural and recognizably like the person.
Share restored photos with family and preserve for future generations
Export restored photos at multiple resolutions for different sharing contexts: full-resolution files for the family archive and future printing, 2000px web-resolution for family-history websites (FamilySearch, Ancestry galleries, personal genealogy sites), 1080px for sharing in family group chats and social media, and 300 DPI at the target print size for family-history books, reunion displays, and framed prints. Accompany each restored photo with whatever genealogy metadata you've established — names, dates, location, relationships, and the source of the original photo — so the visual and documentary records travel together.
Frequently Asked Questions
Should I keep the original unrestored scan alongside the restored version?
+
Absolutely — always preserve the unmodified scan as the archival record. The original scan documents the photograph's physical condition and carries information that the restoration modifies (the exact shade of fading, the location of damage, the original tonal range). Future generations or professional archivists may want to assess the physical artifact's condition through the scan or apply future restoration technology that exceeds current capabilities. Store both versions with clear file-naming conventions: 'smith-wedding-1923-original-scan.tiff' and 'smith-wedding-1923-restored.tiff'.
Can AI restoration make faces recognizable in severely faded photographs?
+
In many cases, yes — AI enhancement can recover facial detail that is physically present in the photographic emulsion but visually suppressed by fading to the point where the face appears nearly blank to the casual viewer. The AI amplifies the remaining tonal differences in the faded emulsion to reconstruct the visible contrast that was originally there. However, if the emulsion has chemically deteriorated past a threshold — if the silver or dye has literally detached from the paper — there may not be enough tonal information remaining for any technology to recover. Enhancement works best on gradually faded photographs rather than chemically destroyed ones.
How should I handle photos where I don't know who the subjects are?
+
Restore them anyway — restored photos are far more likely to be identified by family members than deteriorated ones. A faded brown rectangle elicits no recognition; a restored image showing clear facial features, clothing style, setting, and period details gives relatives the visual information they need to make an identification. Share restored unknown-subject photos in family group communications with whatever contextual clues you have (which relative's collection the photo came from, any writing on the back, the approximate era based on clothing or photographic format). More family photos are identified after digital sharing than sitting in a single relative's shoebox.
What's the best way to organize a large genealogy photo collection digitally?
+
Organize by family line and generation, with a consistent file-naming convention that embeds the key genealogy information: 'surname-firstname-year-occasion-format.tiff' (e.g., 'johnson-margaret-1945-wedding-cabinet-card.tiff'). Create a parallel spreadsheet or database with additional metadata for each photo: subject names, estimated date, location, event, photographer if known, original-photo dimensions and format, physical condition, source relative, and restoration status. Cloud storage (Google Drive, Dropbox, iCloud) with shared folders enables distributed family access while maintaining a single organized archive. Back up to at least two independent storage locations.
Bring your family history into focus
AI Enhance restores the faded tonal range that hides your ancestors' faces, and Magic Eraser removes the water stains, foxing, and scratches that decades of storage have left behind — so your family photographs can be shared, printed, and preserved for the generations who will never see the originals. Free tier on web, iOS, and Android.
Try Magic Eraser freeRelated use cases
See how professionals use these tools in real-world workflows.
Listing photos cluttered with personal items, parked cars, or construction equipment can turn buyers away. Magic Eraser uses AI to clean up your property photos instantly — no Photoshop skills required.
Product listings need clear images before shoppers can judge the item. Magic Eraser helps sellers remove messy backgrounds, table edges, labels, props, glare, and other distractions so each product photo is easier to review before publishing.
Photobombers ruining your travel pics? Messy backgrounds killing your selfie game? Stop wasting hours in Photoshop. Magic Eraser removes distractions, cleans up cluttered shots, and expands your photos to fit any platform format — all in one tap.
Related comparisons
See how Magic Eraser compares to similar tools.
TouchRetouch is a popular paid mobile app for removing objects and blemishes. Magic Eraser offers free AI-powered editing on any device with no install required. See how they compare across features, pricing, and ease of use.
Cleanup.pictures is a free web tool with one generic eraser brush. Magic Eraser gives you 100+ purpose-built removal tools — one for emoji, glasses, watermarks, sky, power lines, and dozens more — plus background removal, AI enhance, and mobile apps, in 16 languages. See how breadth changes the result.
remove.bg is the market leader for background removal, offering a powerful API and integrations with Photoshop and Figma. Magic Eraser goes further with eight AI-powered editing tools — from object removal and generative fill to AI enhance and design — all in one editor.
Two powerful AI photo editors with different strengths. Magic Eraser offers a broader set of generative AI tools for creative editing, while Photoroom excels at e-commerce product photography and batch processing. See which fits your workflow.
Related guides
Explore more guides and editorial content related to this workflow.
Learn how to use Magic Eraser to remove objects, people, text, and distractions from photos with cleaner AI editing results.
Learn how to remove people from photos using AI in seconds. Step-by-step guide for travel photos, real estate shots, and product images.
Step-by-step guide to removing watermarks from your own photos using AI. Learn when it is appropriate, the best techniques, and how Magic Eraser handles it.