
Interior Design Portfolio: Clean Rooms, Correct Lighting & Extend Compositions
An interior designer's portfolio is the primary sales tool for landing new clients — prospective homeowners and commercial clients evaluate design sensibility, style range, and attention to detail entirely through project photography. The challenge is that completed projects are photographed in occupied spaces where client belongings, everyday clutter, power cords, and personal items compete with the design work for visual attention. Magic Eraser removes the distractions that undermine design photography, AI Enhance corrects the mixed-lighting conditions endemic to interior spaces, and AI Fill extends tight compositions to show the full spatial context of the design.
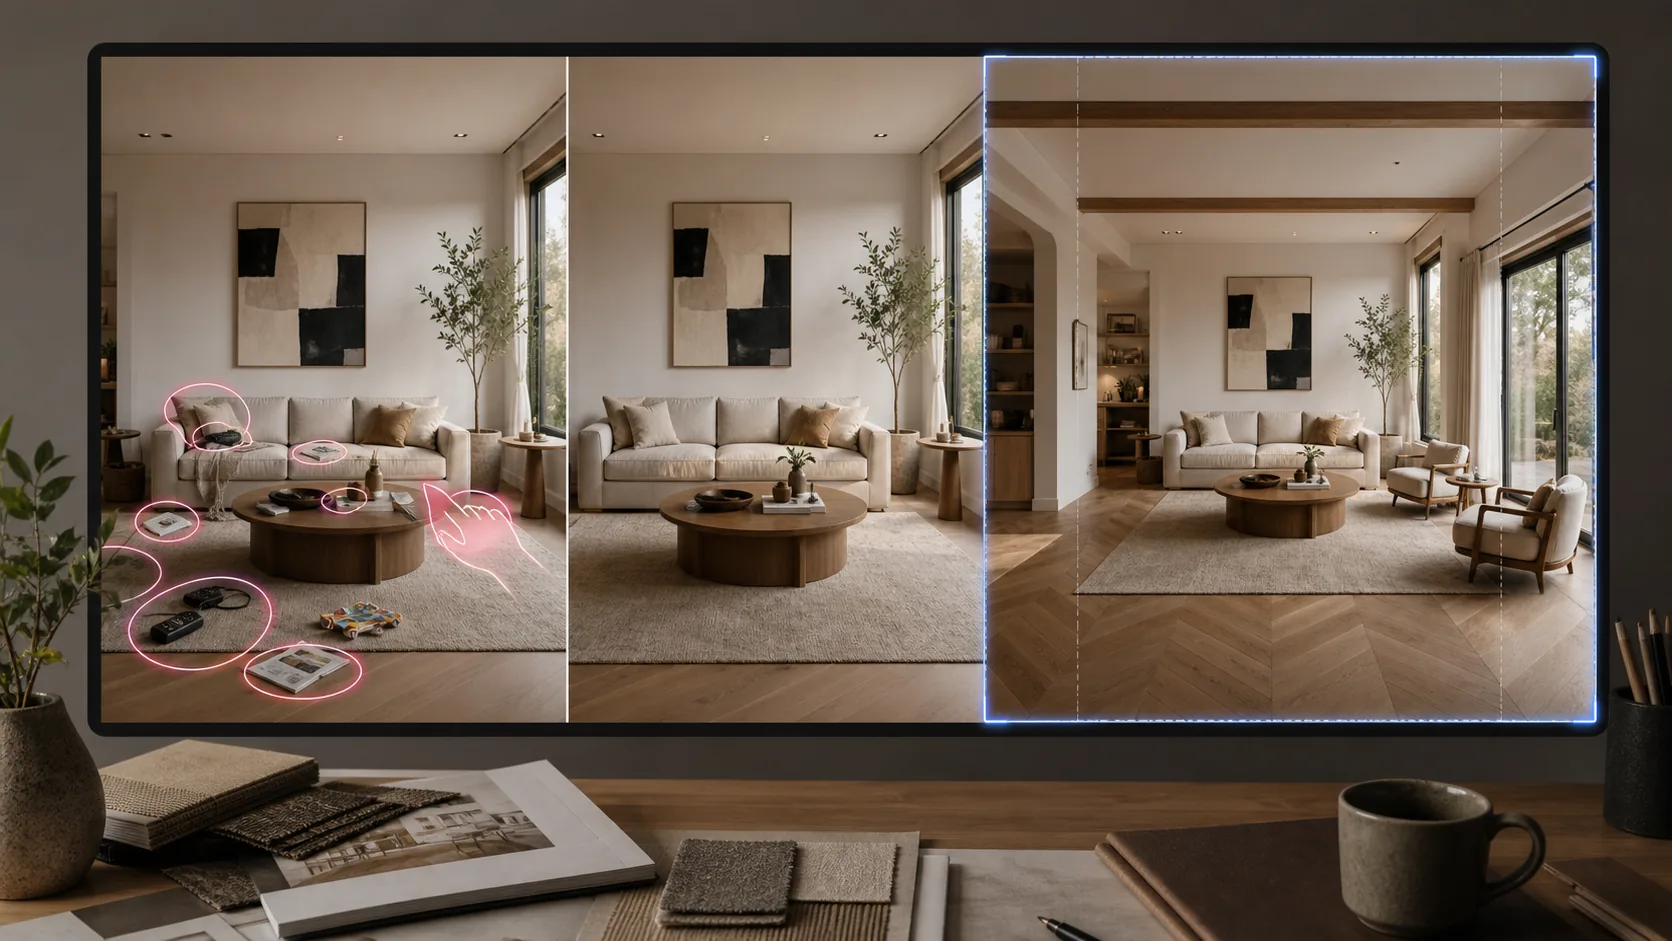
Client belongings and everyday clutter obscure the design work
The installed design — the custom millwork, the curated color palette, the furniture arrangement, the lighting scheme — gets buried under the client's daily life: mail on the console table, toys on the living room floor, phone chargers on the nightstand, toiletries on the bathroom vanity, and coats hanging by the door. Professional staging before a photoshoot helps, but clients often can't fully vacate their space for a shoot day, and commercial projects (restaurants, offices, retail) can rarely close for dedicated photography. The result is portfolio photos where the designer's work is visible but not showcased.
Interior lighting creates color casts and exposure challenges that flatten the design
Interior spaces combine multiple light sources — warm-temperature incandescent or halogen fixtures, cool-temperature LED downlights, daylight from windows that shifts color temperature throughout the day, and accent lighting with its own spectral characteristics. Smartphone and even DSLR cameras struggle to white-balance across these mixed sources, producing photos with warm yellow casts in lamp-lit areas and cool blue casts near windows in the same frame. These color inaccuracies misrepresent the designer's carefully chosen paint colors, fabric tones, and material finishes.
Room dimensions constrain the camera position and crop the design context
Small and medium rooms — bathrooms, kitchens, bedrooms, home offices — physically constrain where the photographer can stand, often resulting in tight crops that show only a portion of the designed space. The wide-angle lenses that solve this problem introduce barrel distortion that warps furniture proportions and makes the room look unnatural. Designers frequently need to show how a space flows and how design elements relate to each other across the room, but the available camera positions can't capture that relationship in a single undistorted frame.
How Magic Eraser fits the interior design portfolio workflow
Photograph the completed project with attention to composition, not perfection
Capture each room from multiple angles — the primary hero shot from the corner that shows the most design surface area, supporting angles that highlight specific features (the custom built-in, the tile detail, the lighting scheme), and detail close-ups of material and finish choices. Use a tripod for stability and shoot with the widest undistorted focal length available. Don't delay the shoot waiting for the client to fully clear the space — capture the design as-is and handle the cleanup in post-production.
Run Magic Eraser to remove client belongings and visual distractions
Open each room photo in Magic Eraser and systematically remove the elements that compete with the design work: personal items on surfaces, visible power cords and chargers, pet bowls, trash cans, everyday toiletries, stacked mail, and anything else that wasn't part of the design intent. The AI reconstruction fills the cleared areas with contextually appropriate surface — the countertop material, the flooring pattern, the wall color — so the removal looks natural and the design work occupies the full visual frame.
Run AI Enhance to correct mixed lighting and represent materials accurately
Apply AI Enhance to each cleaned photo to address the interior-lighting challenges: neutralize the yellow cast from incandescent fixtures, balance the cool daylight areas with the warm accent-lit areas, lift shadow detail in corners and under furniture where the camera underexposed, and sharpen material textures (fabric weave, wood grain, stone veining, tile grout lines) that are critical to communicating the design's tactile quality. Accurate color and material representation is non-negotiable for portfolio work because clients are evaluating your material and finish selections.
Use AI Fill to extend tight compositions and show full spatial context
For rooms where the camera position couldn't capture the full design, use AI Fill to extend the frame — outpaint the edges to show the full wall-to-wall composition, extend the ceiling line to show crown molding or lighting fixtures that were cropped, or widen the floor plane to show the rug placement in context. AI Fill generates the extension by inferring from the existing content — matching the wall color, continuing the flooring pattern, and maintaining the perspective — so the extended composition looks like it was captured from a wider angle.
Export for portfolio website, social media, and Houzz or Architectural Digest submissions
Export each finished photo at multiple resolutions: high-resolution 3000px+ for portfolio website galleries and print submissions, 1080x1350px for Instagram portfolio posts, 1000x1500px for Pinterest (the highest-value social platform for interior design client acquisition), and the specific dimensions required by Houzz, Architectural Digest, or other industry publications. Consistent export quality across all platforms ensures the portfolio makes the same professional impression wherever a prospective client encounters it.
Frequently Asked Questions
Should I tell clients that portfolio photos were edited to remove their belongings?
+
Most clients expect and appreciate that portfolio photos showcase the design work rather than their daily life — the portfolio photo is a representation of the designer's work, not a documentary record of the client's home. Standard practice is to discuss during the project that completed-project photography is part of the deliverable process and that photos will be edited for portfolio presentation. Clients generally prefer that their personal items aren't visible in publicly shared portfolio images.
How does AI Fill extension compare to using an ultra-wide-angle lens?
+
Ultra-wide lenses (14-20mm full-frame equivalent) capture more of the room but introduce barrel distortion that warps furniture proportions — chairs look wider near the edges, tables appear to tilt, and straight lines curve. AI Fill extends a photo taken at a natural focal length (24-35mm equivalent), maintaining accurate proportions and perspective throughout the frame. The result looks like the photographer had more room to step back, not like they used a fisheye lens. For portfolio work where furniture and spatial proportions must look accurate, AI Fill extension is often the more professional-looking option.
Can I use this workflow for in-progress project documentation?
+
Yes, and in-progress documentation is actually a high-value application. Design clients appreciate seeing the transformation from before to after, and before-during-after sequences perform extremely well on Instagram and Pinterest for attracting new clients. Use AI Enhance to make the before photos clear enough to read (construction sites are often poorly lit) and Magic Eraser to clean up the after photos. The contrast between the raw before and the polished after is the visual proof of the designer's value.
What's the best approach for photographing small bathrooms and kitchens?
+
Small rooms are where this workflow delivers the most value. Shoot from the doorway or the widest corner using a 24-28mm equivalent lens to avoid heavy distortion. Capture what you can without forced perspective tricks. Then use AI Fill to extend the composition outward — adding 10-20% to each edge recovers the spatial context that the tight shooting position cropped out. Combined with Magic Eraser removing the clutter that makes small rooms look even smaller, the result is a portfolio photo that represents the design's spatial intelligence rather than the room's size limitation.
Let your design work speak without the distractions
Magic Eraser removes client clutter, AI Enhance corrects interior lighting for accurate material representation, and AI Fill extends tight compositions to show the full spatial context of your design. Free tier on web, iOS, and Android.
Try Magic Eraser freeRelated use cases
See how professionals use these tools in real-world workflows.
Listing photos cluttered with personal items, parked cars, or construction equipment can turn buyers away. Magic Eraser uses AI to clean up your property photos instantly — no Photoshop skills required.
Product listings need clear images before shoppers can judge the item. Magic Eraser helps sellers remove messy backgrounds, table edges, labels, props, glare, and other distractions so each product photo is easier to review before publishing.
Photobombers ruining your travel pics? Messy backgrounds killing your selfie game? Stop wasting hours in Photoshop. Magic Eraser removes distractions, cleans up cluttered shots, and expands your photos to fit any platform format — all in one tap.
Related comparisons
See how Magic Eraser compares to similar tools.
TouchRetouch is a popular paid mobile app for removing objects and blemishes. Magic Eraser offers free AI-powered editing on any device with no install required. See how they compare across features, pricing, and ease of use.
Cleanup.pictures is a free web tool with one generic eraser brush. Magic Eraser gives you 100+ purpose-built removal tools — one for emoji, glasses, watermarks, sky, power lines, and dozens more — plus background removal, AI enhance, and mobile apps, in 16 languages. See how breadth changes the result.
remove.bg is the market leader for background removal, offering a powerful API and integrations with Photoshop and Figma. Magic Eraser goes further with eight AI-powered editing tools — from object removal and generative fill to AI enhance and design — all in one editor.
Two powerful AI photo editors with different strengths. Magic Eraser offers a broader set of generative AI tools for creative editing, while Photoroom excels at e-commerce product photography and batch processing. See which fits your workflow.
Related guides
Explore more guides and editorial content related to this workflow.
Learn how to use Magic Eraser to remove objects, people, text, and distractions from photos with cleaner AI editing results.
Learn how to remove people from photos using AI in seconds. Step-by-step guide for travel photos, real estate shots, and product images.
Step-by-step guide to removing watermarks from your own photos using AI. Learn when it is appropriate, the best techniques, and how Magic Eraser handles it.