
Travel Photo Editing for Trip Recaps and Memory Books
Travel photos are the most-edited and most-shared images on most cameras — and the hardest to fix manually. Crowds at every landmark, harsh midday sun, lens glare from phone cameras pressed against bus windows, dim interiors, and decades-old film scans that finally need restoration. Magic Eraser handles every common travel-photo failure mode in seconds, on the same phone you took the photo with.
Every landmark photo has strangers in the frame
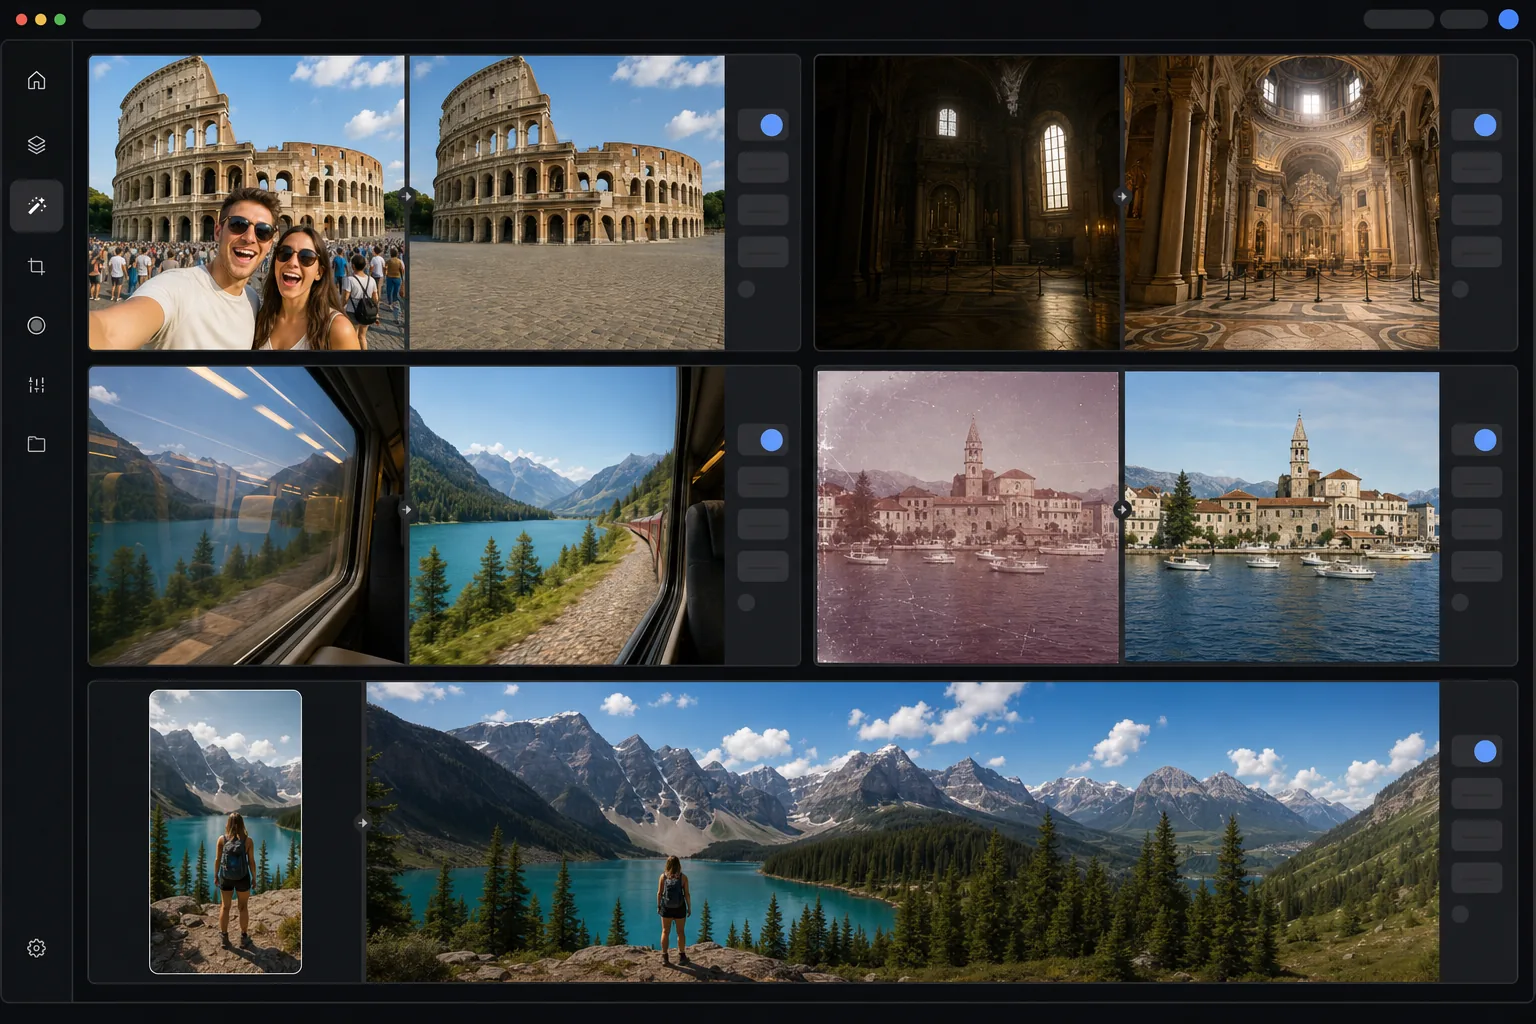
The Eiffel Tower has 25,000 visitors per day. The Trevi Fountain has 4,000+ tourists at peak hour. The Taj Mahal limits daily entry to 40,000 but every photo angle still includes 15-30 strangers in the background. Waiting for an empty frame at any popular landmark is impossible — the only choice is to take the photo with the crowd and edit it out afterward, or live with strangers permanently lodged in your vacation memory.
Phone cameras lose detail in low-light interiors
Cathedrals, museums, caves, night markets, candlelit restaurants, and most evening street scenes push phone cameras past their dynamic-range limits. The result is shadow detail that gets crushed to flat black, highlight detail that blows out around windows or candles, and color noise across the whole frame. Manual editing in mobile Lightroom can recover some of this, but only at the cost of 5-10 minutes per photo and a steep learning curve on shadow / highlight / texture sliders.
Reflections and glare ruin window-seat shots
Train windows, plane windows, tour-bus windows, glass-bottom boat decks, and museum display cases all introduce reflections that compete with the actual subject. Phone cameras can't focus past the glass cleanly when the reflection is bright, so the result is a photo where the cathedral interior or the alpine pass below is half-obscured by an indoor light fixture or the photographer's own arm. Polarizing filters help on dedicated cameras but aren't an option on most phones.
Older scanned trips need decades of dust and color shift removed
Most travelers have a shoebox of pre-2010 photos from trips taken when film was the only option. Scanning these in 2026 reveals decades of accumulated dust, scratches, color shift (cyan magenta and yellow casts depending on the film stock and storage conditions), and edge fading. Restoring a single 36-exposure roll in Photoshop or Affinity Photo is a 3-4 hour project. The reason most travelers never digitize their old film: the restoration step is the wall.
How Magic Eraser fits the travel photo workflow
Sort photos by edit category before opening any tool
Spend 10-15 minutes sorting a trip's photos into three buckets: needs-people-removed (landmark and street shots with strangers), needs-light-recovery (cathedral interiors, night scenes, caves), and needs-restoration (scanned older film, water-damaged prints). Sorting first makes the editing pass 2-3x faster because you're running the same workflow on similar photos in succession instead of context-switching every photo.
Remove strangers from landmark and street photos with Magic Eraser
Upload each landmark photo and brush over the tourists, photobombers, traffic, scaffolding, and any other distractions. Magic Eraser fills the cleaned area with reconstructed background that matches the surrounding texture (stone, sky, water, vegetation). For densely-crowded scenes (Trevi Fountain, Times Square), do 2-3 passes — first pass for the largest figures, second pass for the medium-distance crowd, third pass for any remaining background distractions. Total time: 30-90 seconds per photo.
Recover low-light interiors with AI Enhance
Run AI Enhance on cathedral interiors, night markets, dim restaurants, and any low-light shot where detail got crushed. The AI recovers shadow detail in stone walls and architectural elements, controls highlight blowout around windows and candles, and reduces color noise without over-smoothing texture. Unlike a manual Lightroom edit, AI Enhance applies all three corrections in a single pass with no slider tuning — useful when you're editing 40-60 interior shots from a single cathedral or museum visit.
Brush away window reflections with Magic Eraser
For train / plane / tour-bus / display-case shots where reflections compete with the subject, brush over the reflection — the indoor light fixture, the photographer's silhouette, the camera flash bounce, the reflection of another passenger. Magic Eraser reconstructs the actual subject (the landscape outside, the museum artifact) from the unblocked edges of the frame. This works best when the reflection covers less than 30% of the frame; for heavier reflections, the cleaner path is to retake the shot with the phone pressed flat against the glass.
Restore scanned older film with the dust-and-glare workflow
For pre-2010 scanned trips, run the photos through /remove/dust first to clear accumulated dust and scratch lines, then run AI Enhance to correct the cyan / magenta / yellow color cast back to natural skin tones and sky color. For photos with hot-spot glare from reflective scanning, follow with /remove/glare. The full restoration is 90 seconds per photo instead of 60-90 minutes in Photoshop — which is what makes digitizing a 36-exposure film roll a one-evening project instead of a one-week project.
Outpaint vertical phone shots to landscape with AI Fill
Most travel photos are shot vertically (because phones are held vertically), but trip recap albums and slideshow apps display horizontally. AI Fill outpaints vertical phone shots to 16:9 landscape orientation by extending the existing scene above and below the original frame — the AI generates additional sky, foreground ground, or background landscape that matches the original photo. The result is a properly-framed landscape composition without the manual crop-and-fill work that traditional editing requires.
Frequently Asked Questions
Can I really remove tourists from a busy landmark photo?
+
Yes, even from extremely crowded scenes. Magic Eraser handles single photobombers in one brush pass and dense crowds in 2-3 brush passes. For the Trevi Fountain, the Mona Lisa room at the Louvre, or Times Square at peak hour, plan on 60-90 seconds per photo with multiple passes. For solo travelers and couples photos in front of medium-traffic landmarks (the Pantheon, Notre Dame exterior, the Spanish Steps), single-pass removal in 30-45 seconds is typical. The reconstructed background uses the surrounding stone, sky, water, or vegetation as reference, so the cleanup is invisible at typical viewing distance on phones and laptops.
What about photos where the tourist is overlapping with the landmark architecture?
+
For partial-occlusion cases — a tourist standing in front of an arch column, a stranger crossing in front of a fountain edge — brush over the person and use a text-prompted AI Fill on the cleaned area: 'stone column matching the surrounding limestone,' 'fountain basin edge with travertine texture.' The text prompt steers the reconstruction toward the correct architectural element instead of generic fill. This is the same workflow that handles partial-occlusion photobomb cleanup on wedding and group photos.
Does AI Enhance work on photos taken in true darkness?
+
AI Enhance recovers detail from photos where the shadows are crushed but not from photos where there was no light to capture in the first place. For cathedrals, candlelit restaurants, night markets, and city night scenes, AI Enhance produces dramatically better results — recovering ceiling detail in dim cathedrals, food texture in candlelit dinners, sign typography on neon-lit streets. For photos taken in conditions where the phone camera was already maxed out on ISO and the exposure was over 1 second, the source image doesn't have the detail to recover, and AI Enhance can't generate detail that wasn't captured.
How does this work on scanned old film photos?
+
The restoration workflow combines three tools in sequence. First, /remove/dust handles the accumulated dust and scratch lines that decades in a shoebox produce on the film surface. Second, AI Enhance corrects the color cast — most pre-2000 film has shifted cyan or magenta depending on the stock and storage conditions, and AI Enhance returns skin tones and sky color to natural values. Third, /remove/glare handles any hot-spot reflections from the scanning process (especially common with glossy prints scanned at home). The full sequence runs in 60-90 seconds per photo, which makes digitizing an entire shoebox a one-weekend project instead of a one-month project.
Can I edit these on my phone during the trip?
+
Yes. Magic Eraser's iOS and Android apps support the full workflow (Magic Eraser, AI Enhance, AI Fill, Background Eraser) on the same device you took the photos with. Many travelers edit the day's best 5-10 shots from the hotel room each evening, post the cleaned versions to Instagram or family groups that night, and save the bulk-restoration trip-recap pass for after returning home. The mobile workflow is fast enough that editing-during-the-trip doesn't eat into actual travel time.
Does this approach work for travel video stills?
+
Yes, with one constraint. Frame stills extracted from travel video (vacation cinematics, drone footage, GoPro clips) work with the same Magic Eraser / AI Enhance / AI Fill workflow as native photos. The constraint is that video frames are typically lower-resolution than photos — a 4K video frame is 3840×2160 versus a phone photo at 4032×3024 or higher. For social media output that's fine; for printing, run AI Enhance with the upscale option to recover printable resolution.
What about photos where I want to remove myself or a travel companion?
+
Same workflow as tourist removal. Brush over the figure and Magic Eraser reconstructs the surrounding background. This is useful for solo travelers who want a clean landmark shot without the asking-a-stranger-to-take-the-photo step, or for posting separate solo shots of each travel companion from the same vacation. For group photos where one companion's eyes are closed or expression is off in an otherwise-great shot, AI Fill with a text prompt ('eyes open, soft smile') can sometimes salvage the photo without a full reshoot.
Edit your trip photos in seconds, not hours
Magic Eraser handles every common travel-photo failure mode: removing strangers from landmarks, recovering low-light interiors, brushing away window reflections, and restoring scanned older film. The same workflow runs on your phone or laptop, anywhere in the world.
Try Magic Eraser freeRelated use cases
See how professionals use these tools in real-world workflows.
Listing photos cluttered with personal items, parked cars, or construction equipment can turn buyers away. Magic Eraser uses AI to clean up your property photos instantly — no Photoshop skills required.
Product listings need clear images before shoppers can judge the item. Magic Eraser helps sellers remove messy backgrounds, table edges, labels, props, glare, and other distractions so each product photo is easier to review before publishing.
Photobombers ruining your travel pics? Messy backgrounds killing your selfie game? Stop wasting hours in Photoshop. Magic Eraser removes distractions, cleans up cluttered shots, and expands your photos to fit any platform format — all in one tap.
Related comparisons
See how Magic Eraser compares to similar tools.
TouchRetouch is a popular paid mobile app for removing objects and blemishes. Magic Eraser offers free AI-powered editing on any device with no install required. See how they compare across features, pricing, and ease of use.
Cleanup.pictures is a free web tool with one generic eraser brush. Magic Eraser gives you 100+ purpose-built removal tools — one for emoji, glasses, watermarks, sky, power lines, and dozens more — plus background removal, AI enhance, and mobile apps, in 16 languages. See how breadth changes the result.
remove.bg is the market leader for background removal, offering a powerful API and integrations with Photoshop and Figma. Magic Eraser goes further with eight AI-powered editing tools — from object removal and generative fill to AI enhance and design — all in one editor.
Two powerful AI photo editors with different strengths. Magic Eraser offers a broader set of generative AI tools for creative editing, while Photoroom excels at e-commerce product photography and batch processing. See which fits your workflow.
Related guides
Explore more guides and editorial content related to this workflow.
Learn how to use Magic Eraser to remove objects, people, text, and distractions from photos with cleaner AI editing results.
Learn how to remove people from photos using AI in seconds. Step-by-step guide for travel photos, real estate shots, and product images.
Step-by-step guide to removing watermarks from your own photos using AI. Learn when it is appropriate, the best techniques, and how Magic Eraser handles it.