
Restaurant Menu Photo Editing
Turn phone photos of real dishes into clear, consistent menu images. Remove prep-table distractions, enhance visible detail, replace the background when needed, and prepare crops for delivery listings and social posts. Keep the food itself accurate so customers can recognize what they will receive.
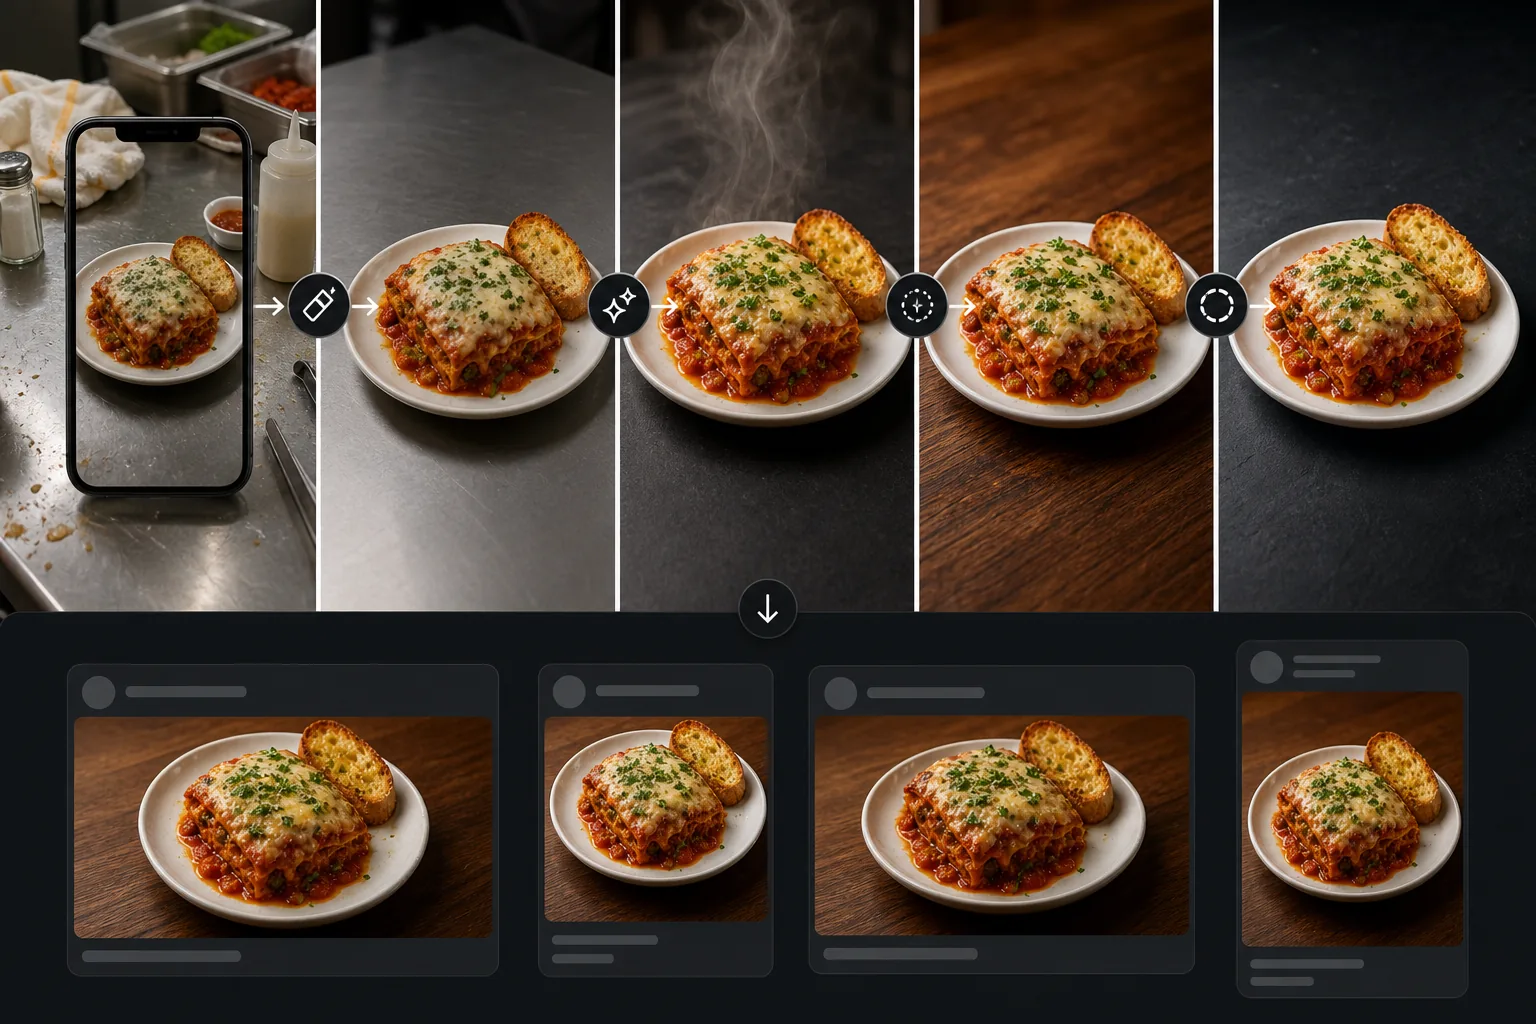
Phone food photos look amateur next to competitors
On DoorDash and Uber Eats, your dish sits in a grid next to other restaurants' professionally-shot food. Yours is the iPhone shot taken on the prep table under fluorescent kitchen light. Browsers scroll past in under a second. The dish is fine; the photo is what's costing the order.
Hiring a food photographer is $500–$2,000 per shoot
Professional food photography fixes the problem but doesn't scale to a 40-item menu, doesn't capture rotating specials, and doesn't fit the budget for most independent restaurants. Half-day shoots produce 8–12 hero dishes, leaving the rest as kitchen-light phone shots that drag down the listing.
Cluttered backgrounds compete with the dish
Phone food photos taken on the prep line capture more than the dish — salt shakers, towels, prep containers, condiment bottles, partially-visible utensils. Each item pulls attention away from the food and signals 'amateur listing' to the browsing customer.
Each platform wants a different aspect ratio
DoorDash wants 4:3 hero images. Uber Eats wants square. Yelp wants landscape. Instagram wants square for the grid and 9:16 for Stories and Reels. Manually cropping a phone shot for each platform loses important parts of the dish or leaves awkward whitespace.
How Magic Eraser fits into the restaurant photo workflow
Shoot dishes next to a window with natural light
Place the plated dish on a clean surface within 3 feet of a window, ideally during 10am-2pm soft daylight. Shoot from a 30-45° angle for plated entrees and pizza, straight down for flatbread and sushi. Take 3-4 shots per dish to give yourself selection options. This is the 'enough' camera setup; AI handles the rest.
Clean up the prep-area clutter
Upload the dish photo to Magic Eraser. Brush over salt shakers, towels, prep containers, condiment bottles, partial-visible utensils, kitchen receipts, smudges on the surface, and any stray garnish that fell off the plate. The AI rebuilds the surface underneath in seconds.
Enhance dish detail and recover color
Run AI Enhance to recover detail in the dish — texture on the bread, the sheen on the sauce, the steam rising off a hot entree. This is the step that separates amateur food photos from delivery-ready images. Phone sensors compress the dynamic range under indoor light; AI Enhance lifts the shadows and recovers the highlights.
Replace the background for consistency (optional)
If you want a brand-consistent look across your menu (every dish on the same warm wood, every dish on the same matte black), use Background Eraser to isolate the dish and composite onto your standard surface. This is the highest-effort step but ties the menu together visually on the platform listing.
Export per-platform from one master
Save a high-resolution master, then derive each platform crop from it: DoorDash 4:3 (1600×1200 minimum), Uber Eats 1:1 square (1600×1600 minimum), Yelp 4:3 landscape, Instagram grid 1:1 (1080×1080), Instagram Reels 9:16 (1080×1920). Per-platform crops from one master is worth 5–15% conversion lift on its own versus letting the platform crop a single image.
Add FTC-required transparency to specials and modifiers
If a photo shows a dish with optional modifiers (an extra protein, a premium add-on, a Mediterranean-style version of the base dish), make sure the customer-facing caption indicates which version is photographed. FTC Endorsement Guides require the depicted item to match what's served at the base price; modifier disclosure is standard practice.
Frequently Asked Questions
How much does AI photo editing improve delivery-platform conversion?
+
Tracked cases on DoorDash and Uber Eats show item-level CVR rising from 3.1% to 5.3% on newly photographed items versus items that kept their old photos as the control. The lift comes from three compounding effects: cleaner background, enhanced dish detail, and per-platform aspect ratios derived from one master shot. A 24-dish menu refresh typically takes about 40 minutes including the shoot itself, of which the AI editing is 12 minutes.
Do I need a DSLR camera or is iPhone OK?
+
iPhone is fine for delivery-platform photos. Modern phone cameras (iPhone 12 and up, Pixel 6 and up, Galaxy S21 and up) shoot enough resolution and dynamic range that AI Enhance can recover detail and produce a delivery-ready image. The differentiator is window light, not camera body. A DSLR shot under bad light still looks worse than a phone shot under good light.
What's the right aspect ratio for each platform?
+
DoorDash: 4:3 hero (1600×1200 min). Uber Eats: 1:1 square (1600×1600 min). Grubhub: 4:3 (1024×768 min). Yelp: 4:3 landscape (4032×3024 ideal). Instagram grid: 1:1 (1080×1080). Instagram Reels and TikTok: 9:16 (1080×1920). Derive each from one master rather than letting the platform crop a single upload — manual crops respect the dish geometry, platform auto-crops often cut off important plating.
Should I match background style across the whole menu?
+
Yes, where practical. A consistent background style (same surface, same lighting tone) makes the listing feel like a designed menu rather than a collection of one-off snapshots. DoorDash's recommendation system and the platform's UX both reward consistency: customers browsing a visually-coherent menu order more items per visit. The simplest path is to shoot every dish on the same surface from day one; the AI path is to Background-Eraser-isolate the dish and composite onto a brand-standard surface.
What about FTC food advertising rules?
+
FTC Endorsement Guides require advertising to accurately represent what the customer receives. The standard practice is: shoot the actual menu item at standard portion size, on standard plating, with no props that wouldn't be served. Adding garnishes that aren't on the dish, scaling the portion to look larger, or photographing a premium modifier version while charging the base price all violate the FTC guidelines. AI cleanup of the background is fine; AI alteration of the dish itself is not.
Can this workflow work for a 40+ item menu?
+
Yes. The math: 40 dishes at ~3 minutes editing per dish is about 2 hours of editor time. Shooting takes another 60-90 minutes if you batch the shoot. Total: under 4 hours of work for a full menu refresh, vs. a half-day food-photographer shoot at $800-1,500 that produces fewer hero dishes. Most restaurants run this once a quarter and update for new specials in between.
How does this compare to using stock food photos?
+
Stock photos are explicitly prohibited by most delivery platforms (DoorDash, Uber Eats, Grubhub all require photos of the actual dish as served at the restaurant). They also under-perform: customers recognize stock images and trust them less than imperfect-but-authentic photos of the real food. AI-cleaned real food photos win on both compliance and performance.
Prepare restaurant menu photos for every channel
Use Magic Eraser to remove background distractions, enhance dish photos, and create a consistent menu look. Review each edit for an accurate representation of the food before publishing it.
Try Magic Eraser freeRelated use cases
See how professionals use these tools in real-world workflows.
Listing photos cluttered with personal items, parked cars, or construction equipment can turn buyers away. Magic Eraser uses AI to clean up your property photos instantly — no Photoshop skills required.
Product listings need clear images before shoppers can judge the item. Magic Eraser helps sellers remove messy backgrounds, table edges, labels, props, glare, and other distractions so each product photo is easier to review before publishing.
Photobombers ruining your travel pics? Messy backgrounds killing your selfie game? Stop wasting hours in Photoshop. Magic Eraser removes distractions, cleans up cluttered shots, and expands your photos to fit any platform format — all in one tap.
Related comparisons
See how Magic Eraser compares to similar tools.
TouchRetouch is a popular paid mobile app for removing objects and blemishes. Magic Eraser offers free AI-powered editing on any device with no install required. See how they compare across features, pricing, and ease of use.
Cleanup.pictures is a free web tool with one generic eraser brush. Magic Eraser gives you 100+ purpose-built removal tools — one for emoji, glasses, watermarks, sky, power lines, and dozens more — plus background removal, AI enhance, and mobile apps, in 16 languages. See how breadth changes the result.
remove.bg is the market leader for background removal, offering a powerful API and integrations with Photoshop and Figma. Magic Eraser goes further with eight AI-powered editing tools — from object removal and generative fill to AI enhance and design — all in one editor.
Two powerful AI photo editors with different strengths. Magic Eraser offers a broader set of generative AI tools for creative editing, while Photoroom excels at e-commerce product photography and batch processing. See which fits your workflow.
Related guides
Explore more guides and editorial content related to this workflow.
Learn how to use Magic Eraser to remove objects, people, text, and distractions from photos with cleaner AI editing results.
Learn how to remove people from photos using AI in seconds. Step-by-step guide for travel photos, real estate shots, and product images.
Step-by-step guide to removing watermarks from your own photos using AI. Learn when it is appropriate, the best techniques, and how Magic Eraser handles it.