
How to Fix Barrel Distortion in Photos — Magic Eraser
Fix barrel distortion and wide-angle lens bowing in photos using AI. Step-by-step guide covering lens correction, perspective straightening, and edge recovery for architecture, real estate, and landscape photography.
SEO & Growth
Reviewed by Magic Eraser Editorial ·
Table of Contents
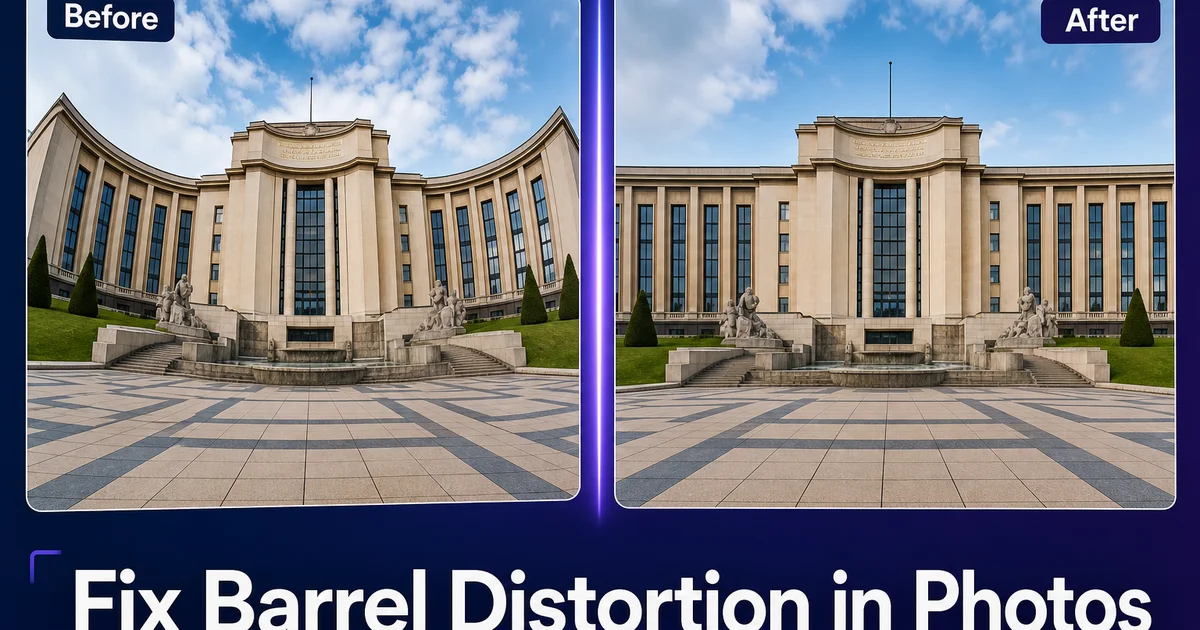
Barrel distortion is the optical aberration that makes straight lines bow outward toward the edges of a photograph, giving the image a subtle — or not so subtle — bulging look that looks like the scene is being viewed through a curved glass surface. It is an inherent physical property of wide-angle lens designs, caused by the way short focal lengths bend light through multiple glass elements to achieve their wide field of view. Every wide-angle lens produces some degree of barrel distortion, from the barely perceptible bowing of a 24mm rectilinear lens to the extreme fish-eye warping of a 10mm ultrawide. The effect is mainly problematic in architecture, real estate, and interior photography where straight walls, door frames, and ceiling lines are prominently visible and any curvature right away looks wrong.
For decades, correcting barrel distortion required either specialized software with lens-specific distortion profiles or tedious manual adjustment of distortion sliders until the lines looked straight to the eye. Lightroom and Photoshop offer lens correction profiles for thousands of camera-lens combinations, but these profiles must be manually selected, they do not exist for every lens, and they apply a one-size-fits-all correction that does not account for focus distance, aperture, or the specific optical traits of an individual lens copy. Manual correction using distortion sliders gives more control but requires the photographer to judge straightness by eye, which is surprisingly difficult when the distortion is subtle and the image contains few reference lines.
AI-powered distortion correction takes a fundamentally different approach by analyzing the actual content of the image rather than relying on pre-built lens profiles. The AI identifies elements that should be geometrically straight — building edges, window frames, horizon lines, fences, and bookshelves — and calculates the precise correction needed to render them straight. This content-aware approach works with any lens, any camera, and any focal length, and it automatically adapts to the specific distortion traits present in each individual image. This guide walks through using AI Enhance, AI Expand, and Magic Eraser to fix barrel distortion and recover the clean, expert geometry that architecture, real estate, and landscape photography demands.
- AI analyzes actual image content — building edges, horizon lines, window frames — to calculate distortion correction rather than relying on pre-built lens profiles that may not match your specific setup.
- Correction strength is adjustable from partial correction that preserves slight wide-angle perspective to full correction that produces mathematically straight lines throughout the frame.
- AI Expand fills the empty corners left by distortion correction with AI-generated content, preserving the full composition without resolution-reducing crops.
- The technique is essential for architecture, real estate, and interior photography where curved walls and bowing door frames immediately look unprofessional.
- AI Enhance handles both barrel distortion and its cousin pincushion distortion, automatically detecting which type is present and applying the appropriate correction direction.
Understanding barrel distortion: why wide-angle lenses bend straight lines
Barrel distortion is a geometric optical aberration that occurs when the magnification of the image decreases with distance from the optical axis. In simpler terms, the center of the image is magnified more than the edges, causing the image to bulge outward like the side of a barrel. This is a fundamental consequence of wide-angle lens physics rather than a manufacturing defect. When a lens designer creates a wide-angle optic, they must bend light rays from a very wide field of view onto a flat sensor. The mathematical relationship between the curved light path and the flat sensor plane introduces radial distortion. Correcting it fully in the optical design would require extra lens elements that add weight, cost, and other optical compromises like reduced sharpness or increased chromatic aberration.
The severity of barrel distortion correlates directly with focal length: shorter focal lengths produce more distortion. A typical 24mm wide-angle lens on a full-frame camera might show one to two percent barrel distortion, which is barely noticeable in nature scenes but clearly visible when architectural lines cross the frame edges. A 16mm ultrawide might show three to five percent distortion that is obvious in any scene with straight lines. A 10mm fisheye can show twenty percent or more distortion that greatly curves everything near the frame edges. Smartphone cameras, which often use very short focal length lenses equivalent to 24mm to 28mm, also produce barrel distortion, though many phones apply automatic software correction before saving the image.
There is a related but opposite distortion called pincushion distortion, where lines bow inward rather than outward. It often appears with telephoto lenses. A third type, mustache or complex distortion, combines barrel distortion in the center with pincushion distortion at the edges, creating a wavy line pattern that is harder to correct with simple slider tools. AI distortion correction handles all three types because it works from the image content rather than applying a fixed radial change. It straightens lines wherever they curve, regardless of whether the curve is barrel, pincushion, or the more complex mustache pattern.
- Barrel distortion results from the center of the image being magnified more than the edges — a fundamental property of wide-angle lens physics, not a manufacturing defect.
- Severity scales with focal length: 24mm lenses show one to two percent distortion, 16mm ultrawides show three to five percent, and 10mm fisheyes can exceed twenty percent.
- Smartphone cameras also produce barrel distortion at their typical 24mm to 28mm equivalent focal lengths, though many phones apply automatic software correction before saving.
- AI correction handles barrel, pincushion, and complex mustache distortion because it straightens lines based on image content rather than applying a fixed radial transformation formula.
AI-powered correction vs. traditional lens profiles: why content analysis wins
Traditional distortion correction relies on lens profiles — mathematical models of each specific lens's distortion traits stored in a database. When you import a photo into Lightroom and enable lens corrections, the software reads the EXIF metadata to identify the camera and lens, looks up the matching profile, and applies the pre-calculated correction. This system works well when a profile exists and the lens performs always across its range. It fails in several common scenarios. Third-party lenses may lack profiles. Adapted lenses on mirrorless cameras lose their metadata. Zoom lenses show different distortion at different focal lengths, and a single profile cannot capture every position. Older film-era lenses have no digital profiles at all.
AI-powered correction eliminates the dependency on lens databases by analyzing what is actually in the image. The AI identifies geometric primitives — lines, rectangles, circles, regular patterns — and evaluates whether they exhibit the radial curvature trait of lens distortion. A building edge that curves outward near the frame edge is identified as a line that should be straight. The AI calculates precisely how much radial correction is needed at that distance from the center to straighten it. By analyzing multiple lines at different positions throughout the frame, the AI constructs a distortion map that is specific to the actual image, accounting for the lens, focal length, focus distance. Any other factor that influenced the distortion in that particular shot.
The practical advantage is immediate: you do not need to know what lens was used, you do not need to check whether a profile exists. You do not need to manually adjust sliders until lines look straight to your eye. The AI correction is also more accurate in many cases because it adapts to the specific image rather than applying a generic profile. A lens might show slightly different distortion at different focus distances. More barrel distortion when focused at infinity than when focused at one meter — and a single profile cannot capture this variation. The AI sees the actual distortion in the actual image and corrects it precisely, regardless of how the lens was configured when the photo was taken.
- Traditional lens profiles fail when the lens lacks a profile, the metadata is missing from adapted lenses, or the zoom position does not match the profile's sampled focal lengths.
- AI correction analyzes geometric primitives in the image — building edges, window frames, regular patterns — and calculates the specific radial correction needed to straighten each line.
- Content-based analysis adapts to the actual distortion present in each image, accounting for focus distance, aperture, and other variables that a single lens profile cannot capture.
- No metadata dependency means the AI works equally well on photos from unknown cameras, adapted vintage lenses, scanned film images, and screenshots with stripped EXIF data.
Recovering lost edges: using AI Expand after distortion correction
Barrel distortion correction works by mathematically remapping pixels from their distorted positions to their correct positions on a rectilinear grid. This remapping pulls pixels from the bulging center of the image outward toward the edges. Means the corners of the corrected image extend beyond the original frame boundaries. The result is a corrected image with empty triangular areas in the corners. Black wedges where no original pixel data exists. The traditional solution is to crop the image to the largest rectangle that fits within the corrected boundary. This reduces resolution and may eliminate important compositional elements that were near the frame edges.
AI Expand provides an alternative by generating content to fill those empty corner areas. After the distortion correction is applied, AI Expand analyzes the visible content near each empty zone. Sky gradients, wall textures, ground surfaces, foliage patterns — and generates new pixels that seamlessly continue the existing scene into the missing areas. For many common subjects, the generated content is indistinguishable from real captured content. A blue sky with scattered clouds continues naturally into the corner. A brick wall extends its pattern without visible seams. A grass lawn fills the corner with consistent texture and color. The result is a distortion-corrected image that maintains its full original composition without the resolution loss of cropping.
The technique is mainly valuable for real estate photography where wide-angle shots of rooms are taken at the widest available focal length to make spaces appear larger, producing major barrel distortion that requires aggressive correction. After correction, the empty corners might cut into critical parts of the room. The edge of a window, the corner of a ceiling, the side of a doorway. Cropping away these elements reduces the perceived size of the room, defeating the purpose of the wide-angle shot. AI Expand fills the corners with the wall, ceiling, or floor texture that would naturally be there, keeping both the geometric accuracy of the correction and the spatial impression of the wide-angle composition.
- Distortion correction creates empty triangular areas in the corners where pixel data was pulled inward during the remapping. In the past resolved by cropping, which reduces resolution and may cut composition.
- AI Expand generates seamless content to fill empty corners by analyzing nearby textures — sky gradients, wall surfaces, ground patterns — producing natural-looking extensions of the existing scene.
- Real estate photography benefits most because wide-angle room shots require aggressive correction that would otherwise crop critical architectural elements like windows, ceilings, and doorways.
- The combined correction-plus-expansion workflow produces geometrically accurate images that maintain full original composition without resolution loss or compositional compromise.
Practical applications: architecture, real estate, and product photography
Architecture photography has the strictest needs for geometric accuracy because buildings are defined by their straight lines, right angles, and precise proportions. A photograph of a building where the walls appear to bow outward looks at its core wrong. It undermines the very quality that architecture photography is meant to showcase. Expert architectural photographers use tilt-shift lenses specifically to control perspective and distortion. These specialized lenses cost two thousand dollars or more and are impractical for the vast majority of photographers. AI distortion correction achieves comparable geometric results from any lens, making expert-quality architecture photography accessible to real estate agents, property managers, construction companies. Anyone else who photographs buildings without specialized equipment.
Real estate photography is the highest-volume application for barrel distortion correction because every listing needs wide-angle interior shots. Every wide-angle interior shot exhibits distortion. A single real estate listing might include fifteen to twenty interior photos, all shot at wide angles between 10mm and 24mm equivalent. Without correction, these images show bowed walls, curved countertops, and warped door frames that make spaces feel distorted and unreliable. Exactly the opposite of the trustworthy, inviting impression that a listing needs to convey. Batch-processing all listing photos through AI distortion correction produces straight, expert geometry across every image, establishing visual credibility that supports buyer confidence.
Product photography encounters barrel distortion primarily when shooting larger items from close distances with moderate wide-angle lenses. A photograph of a rectangular table, a flat-screen television, or a piece of framed art taken with a 35mm lens from a few feet away will show visible bowing along the edges of the rectangular subject. For e-commerce listings where buyers need to accurately assess product shape and proportions, this distortion is more than cosmetic — it misrepresents the product geometry. AI distortion correction straightens the product edges to show the true rectangular form. The correction also improves the look of product labels, text, and patterns that are distorted by the lens curvature when they appear near the frame edges.
- Architecture photography requires the strictest geometric accuracy — AI correction achieves tilt-shift-quality results from any lens, eliminating the need for two-thousand-dollar specialized optics.
- Real estate listings need fifteen to twenty wide-angle interior photos per property, all requiring distortion correction. Batch AI processing produces consistent expert geometry across every image.
- Product photography distortion misrepresents rectangular objects and distorts labels and text near frame edges — correction shows true product proportions that support accurate buyer assessment.
- All three applications benefit from the combined correction-plus-expansion workflow that maintains full compositions while achieving geometrically accurate straight-line rendering throughout the frame.
How to do it
- 1
Identify the type and severity of barrel distortion in your photo
Examine your image for the telltale signs of barrel distortion: straight lines near the edges of the frame that bow outward, a bulging center that makes the middle of the image appear closer than the edges. Stretched or curved objects along the periphery. Barrel distortion is most visible in images with strong horizontal and vertical lines. Architecture, interior rooms, bookshelves, fences, and horizon lines. The severity increases with shorter focal lengths. Ultrawide and fisheye lenses produce the most extreme distortion while standard and telephoto lenses produce little to none.
- 2
Upload the image and apply AI lens distortion correction
Open the photo in AI Enhance and select the lens distortion correction tool. The AI analyzes the geometry of the entire image, identifying straight lines that should be straight and curved surfaces that should be flat. It then applies the precise mathematical correction needed to un-bend those lines without the trial-and-error slider adjustment that manual correction tools require. The AI often detects the lens model from EXIF metadata and applies the known distortion profile for that specific lens, producing optimal corrections on the first pass.
- 3
Adjust the correction strength for your creative intent
After the initial AI correction, evaluate whether the result looks natural. In some cases, completely removing all barrel distortion creates an image that feels sterile or over-corrected, mainly if the viewer expects some natural perspective in the scene. Reduce the correction strength to eighty or ninety percent if you want to preserve a slight sense of wide-angle perspective while eliminating the most objectionable bowing. Conversely, increase the correction if the AI's initial pass did not fully straighten the lines nearest the frame edges. This can happen with extreme wide-angle or fisheye captures.
- 4
Crop or expand the corrected image to fill the frame
Distortion correction necessarily changes the geometry of the image. This often leaves empty areas at the corners where the original frame edge pulled inward during the straightening process. You have two options: crop the image to exclude the empty corners. Cropping reduces resolution and may cut important compositional elements, or use AI Expand to fill those empty areas with AI-generated content that seamlessly continues the scene. AI Expand is mainly effective for landscape and architecture photos where the fill content — sky, wall texture, or ground surface — follows predictable patterns.
- 5
Verify the correction by checking straight lines and natural proportions
Overlay a grid or straight-line guide on the corrected image to confirm that horizontal and vertical lines in the scene are now rendered straight. Pay particular attention to lines near the frame edges, which are the most affected by barrel distortion and the most visible when the correction is incomplete. Also check that the correction has not introduced unnatural proportions. Objects near the frame edges should look naturally sized relative to objects in the center, and human faces or bodies near the periphery should not appear stretched or compressed by the correction mathematics.