
Remove glare from a photo
Clean up glare on eyeglasses in portraits, reduce reflections on glass-framed art, and soften bright hotspots on glossy products. Brush the glare and Magic Eraser AI Fill can rebuild a plausible area underneath. Review edges and preserve realistic lighting because results vary by image.
Last updated
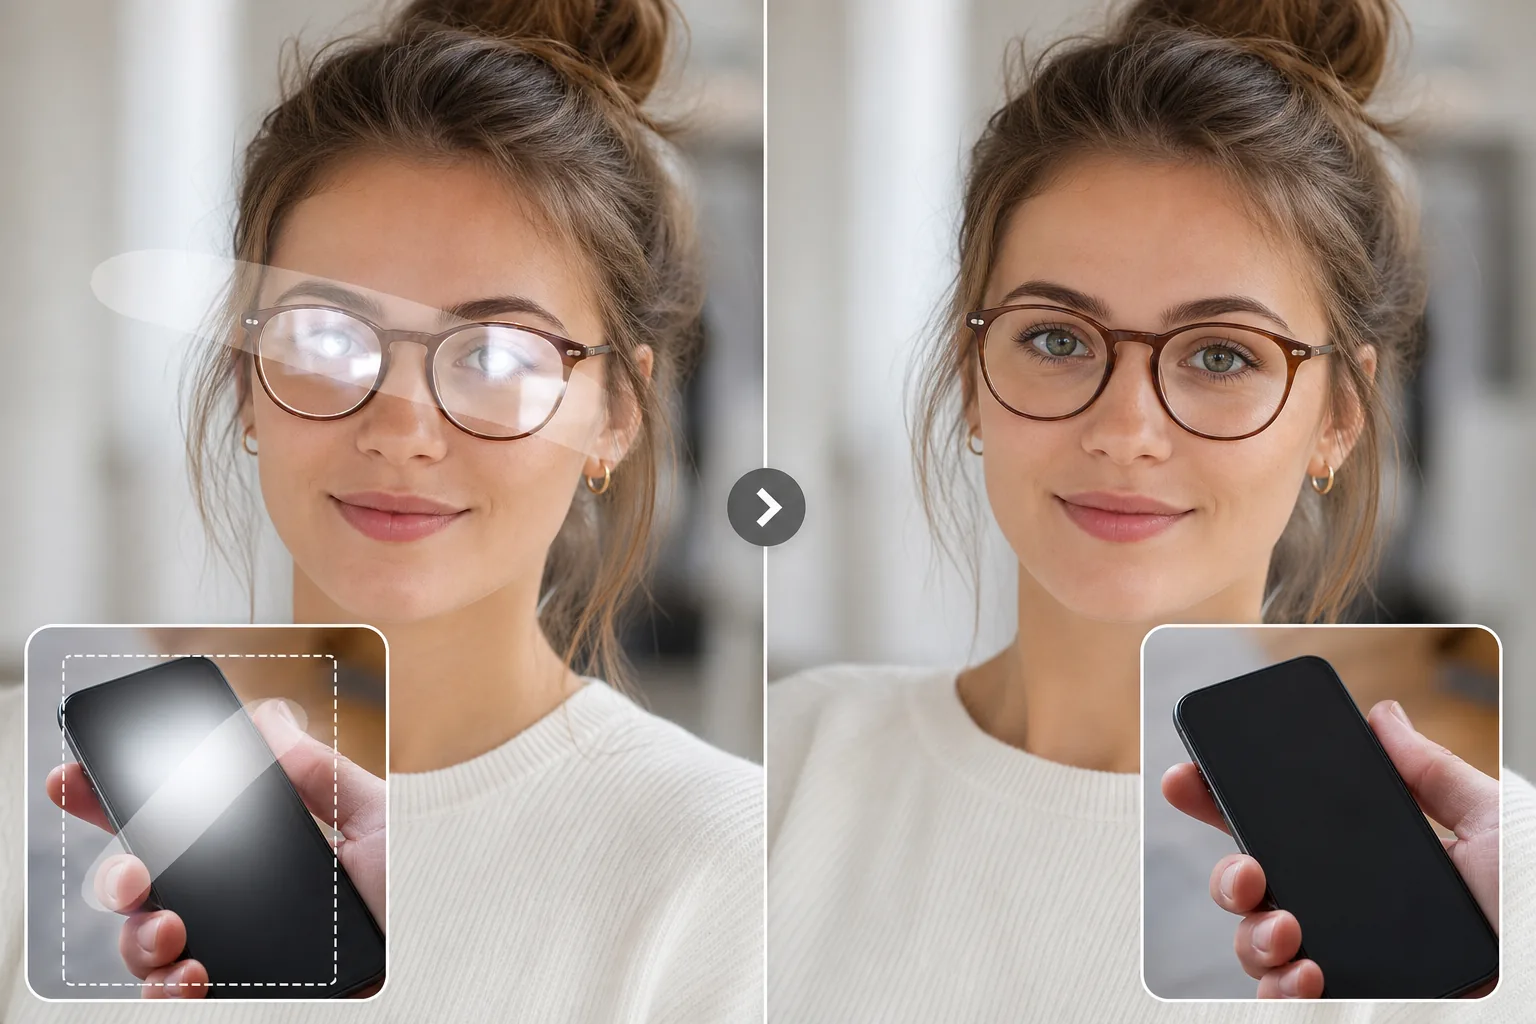
How to remove window glare and reflections from a photo
Reduce glare by masking the bright patch, including the soft halo, then review the filled area at full size. Results vary when glare has clipped eyes, text, labels, or other fine detail, so preserve realism and use a reshoot for identity-critical or catalog-accuracy work. To can reduce window glare from a photo, open Magic Eraser AI Fill, brush over the blown-out bright patch on the glass — including the soft halo around it — and tap Fill. The AI can reconstruct what was behind the reflection, whether that's a view through the window, framed art, or a person's eyes behind glasses, using the surrounding pixels as context. It includes limited free edits after sign-in and runs on web, iOS, and Android. The same brush-and-fill workflow can reduce sun glare on cars and water, screen glare on devices, and hotspots on glossy products and laminated labels. Glare is the photograph problem you usually do not see until you are already home. The shot looked fine on the phone screen, but the kitchen window has blown out to a white sheet, the subject's glasses have two bright ovals where their eyes should be, and the laminated menu you photographed for a listing is half-erased by an overhead light. Glare is local overexposure: light bounces off a glossy surface so intensely that the sensor clips it to pure white and the detail that was there, an iris, a brushstroke, a line of print, simply is not recorded in the file. That is what makes glare harder than removing an object. With an object you delete something and rebuild background; with glare the information you actually want is gone, and tools like clone stamp or healing brush need a matching clean area to copy from, which rarely exists for a unique face or a one-off product. Magic Eraser's AI Fill takes a different route: you brush the bright patch and the model infers what plausibly belongs there from everything around it, facial symmetry and the other eye, neighboring areas of the same artwork, the continuation of a glossy curve. It is a convincing reconstruction, not the original hidden pixels, so for casual portraits, product shots, and creative edits it works fast, while anything that must be literally accurate deserves a re-shoot.
Remove glare in three steps
- 1
Upload your photo
Open Magic Eraser AI Fill on web, iOS, or Android and upload the photo. Use the largest available JPEG, PNG, or WebP so AI Fill has more surrounding detail for portraits, product shots, and reflective surfaces.
- 2
Brush over the glare
Paint over the bright spot. Cover the entire glare including any halo or bloom around the brightest part. For glasses lens glare, brush across the full reflective patch and nearby reflection edge even if some detail seems visible.
- 3
Run AI Fill and review
Tap Fill. The AI can reconstruct a plausible underlying area, then you review the result before export. Review at 100%; for eyes behind glasses or text under glare, check carefully because the reconstruction is a best guess based on surrounding context. Review edges, surface texture, and lighting before export.
Best for
- Eyeglass glare in portraits and headshots
- Reflections on glass-framed photos, art, or certificates
- Bright hotspots on glossy product surfaces (phones, jewelry, glassware)
- Reflections on screens and monitors in product photography or app screenshots
- Sun glare on car bodies, sunglasses, and reflective signs
- Sun hotspots and flat white patches on water, lakes, pools, and wet pavement where the surface has blown out
- Skin shine and forehead, nose, and cheekbone hotspots from on-camera flash or harsh overhead lighting in portraits
- Laminated menus, glossy book covers, trading cards, and magazine pages photographed under ceiling lights for listings or catalogs
Honesty notes for ID and document photos
Glare cleanup is a reconstruction, not a guaranteed recovery of hidden pixels. Use smaller passes, check eyes and text carefully, and leave natural highlights when they explain the surface shape. Brush wider than the bright core. Glare almost always has a soft bloom or halo feathering out from the hottest point, and if you leave that fringe behind the fill has to blend into a glowing edge and the seam shows. Cover the entire affected region in one mask. For eyeglass glare, paint the full lens even where some eye is faintly visible through it; a half-cleaned lens reads worse than a fully reconstructed one because the AI has to reconcile two conflicting versions of the same eye. Work in passes rather than one giant stroke: clean the largest patch, review at 100%, then touch up any leftover hotspots, which keeps the model focused and the lighting consistent. Set expectations by surface. Smooth, predictable areas, skin, painted walls, plain glossy plastic, may clean up well. The hard cases are fine high-contrast detail that lived under the glare: small text on a label, an engraved logo, an intricate pattern. There the AI is genuinely guessing and may smooth detail away, so plan a touch-up or, better, prevent it at capture with diffused light, a polarizing filter, or a slight angle change.
Frequently asked questions
- Does it work on eyeglasses glare?
- Often. Upload the portrait, brush across the full reflective patch on the lens, and the AI can reconstruct the eye area using facial symmetry and surrounding context. Review closely before exporting.
- Can it remove reflections from picture frames?
- Often. For glass-framed art or photos, brush over the reflection and the AI can reconstruct the artwork below using the visible parts of the same artwork as context.
- What about screen glare in product photos?
- Screen glare on phones, monitors, and TVs in product shots is a common case. The AI can rebuild the screen content if you have enough visible context, or you can swap in a clean screen image as a composite.
- Will the rebuilt area match the rest of the photo?
- Color, brightness, and texture are matched to the surrounding pixels automatically. Very high-contrast detail in tiny areas (text under glare, fine patterns) is the hardest case and may need touch-up.
- Can AI Fill bring back the eyes under heavy glasses glare?
- It can reconstruct the eye area from facial symmetry and the visible eye, so the result is usually convincing for everyday portraits and social photos. It is a best-guess reconstruction, not your actual eye color or gaze direction recovered from the file, so for anything identity-critical check it closely or re-shoot with the light source moved off-axis.
- How do I reduce glare before I shoot so there is less to fix?
- Move the light source so it is not bouncing straight back into the lens: shoot at a slight angle to glass and screens, tilt eyeglasses down a few degrees, and use diffused or window light instead of direct flash. A circular polarizing filter cuts reflections on water, glass, and foliage dramatically. Less glare in the original always beats reconstructing it afterward.
- Will removing glare change the overall exposure or color of my photo?
- No. AI Fill only can rebuild the area you brush and matches its brightness, color, and texture to the surrounding pixels, so the rest of the photo is untouched. If the whole image is overexposed rather than just a glare spot, that is a global exposure fix better handled with your editor's exposure and highlight sliders, not by brushing.
- How do I remove glare from a window in a photo?
- Brush over the blown-out section of the window glass, including the soft bloom that fades out from the brightest part, then tap Fill. If the glare hid a view through the window or framed art behind it, the AI can rebuild that from the visible portions of the same scene. Window glare is often large and high-contrast, so work in passes — clean the worst patch first, review, then touch up any remaining hotspots rather than masking the whole pane in one stroke.
- Can it remove sun glare from outdoor photos and water?
- Often. Sun glare on car bodies, sunglasses, reflective signs, and blown-out hotspots on water, pools, or wet pavement all reconstruct well because the surrounding surface gives the AI a clear pattern to extend — paint, sky, and rippled water are predictable to rebuild. Fully clipped, pure-white sun reflections are the hard case since no detail was recorded there; the AI fills a plausible continuation of the surface rather than recovering specific lost texture.
- Will it work on glare on a glossy product or laminated label?
- Yes, with a caveat. Bright hotspots on phones, jewelry, glassware, and glossy packaging flatten convincingly because the surface curve is smooth and predictable. The harder case is fine detail that lived under the glare — small print on a laminated menu, an engraved logo, or barcode lines — where the AI is genuinely guessing and may smooth it away. For catalog or listing shots where the text must be accurate, plan a touch-up or re-shoot at an angle with diffused light.
- Is the glare remover free, and does it work on my phone?
- Yes to both. Glare removal runs on Magic Eraser's free tier with sign-in required and no watermark — upload, brush the glare, and export the cleaned image at no cost. It works in any mobile browser and as dedicated iOS and Android apps, so you can fix glare directly from camera-roll photos, with the same AI and results as the desktop web version.