
Remove glasses from photos
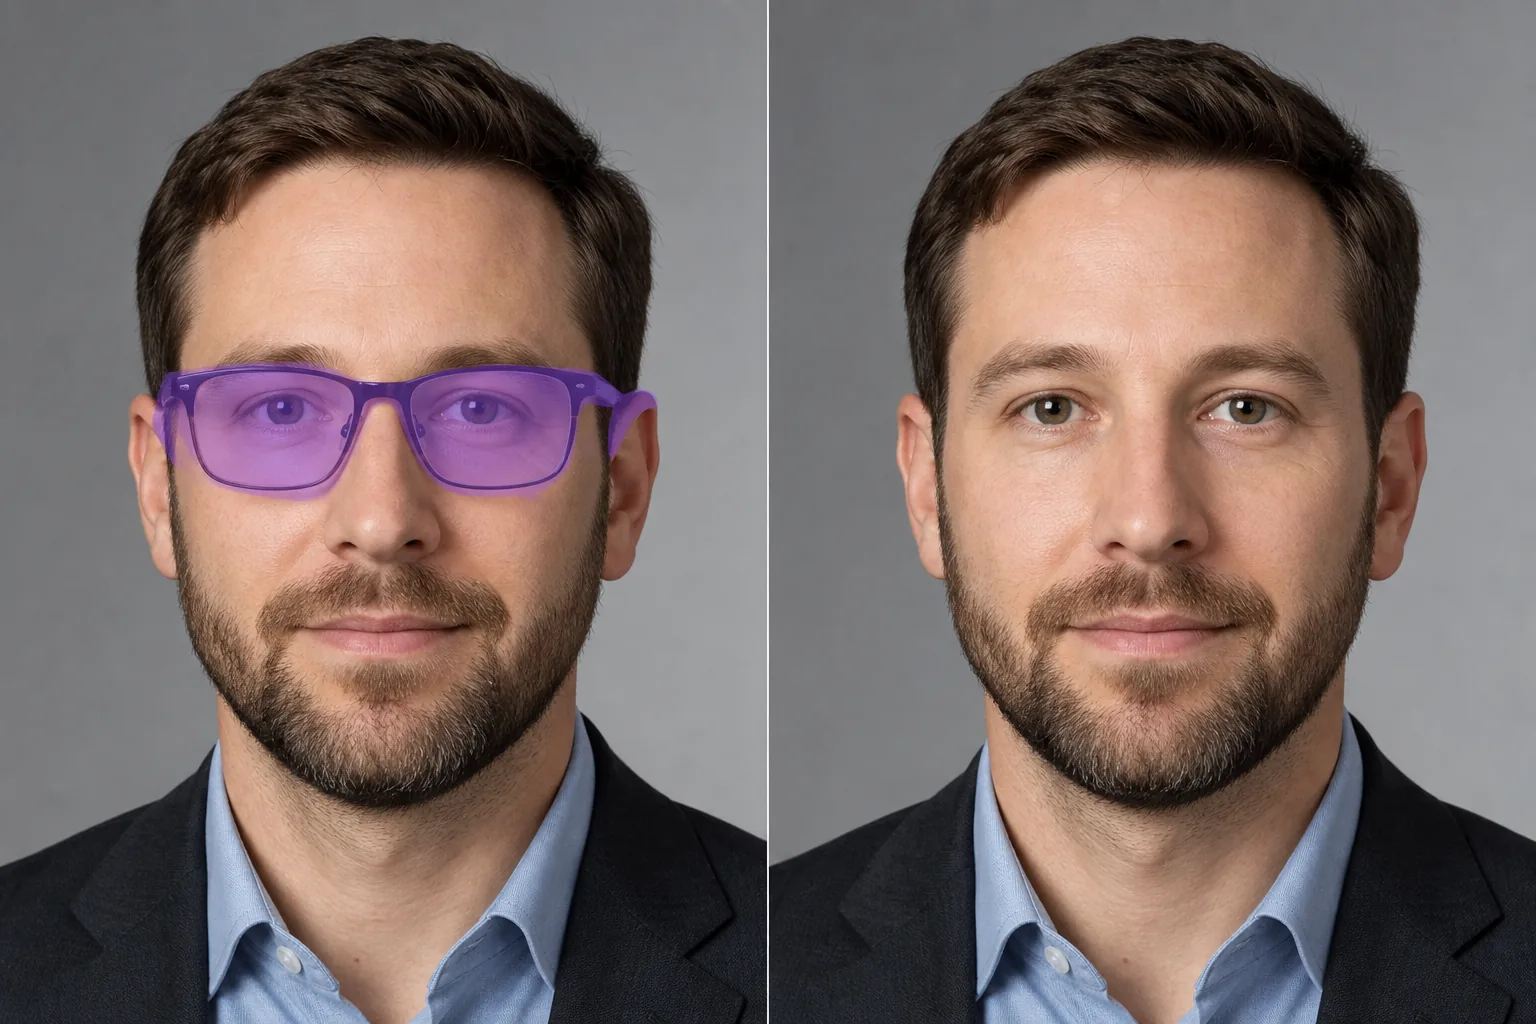
Erase eyeglasses, sunglasses, and reading glasses from portraits, headshots, and ID photos. Magic Eraser removes the frames and lenses, then reconstructs a realistic eye area, bridge of the nose, and temples — producing a convincing glasses-free appearance while respecting that fully hidden eyes are AI estimates.
Last updated
How to remove glasses from a photo
To remove glasses from a photo, open Magic Eraser (web, iOS, or Android), upload the portrait, and brush over the full glasses area — lenses, bridge, temple arms, and nose-pad marks. Tap Erase, then review the result in the Magic Eraser product flow; sign-in or additional product steps may apply. The AI removes the frames and reconstructs plausible, natural-looking eyes and skin behind them. Glasses sit right across the most important part of a portrait — the eyes — so removing them is never as simple as deleting the frames. A passport or visa office may reject a photo because eyeglasses are showing. A modeling client books a shoot, then realizes they need a clean glasses-off version for the agency. A guest in a wedding group photo is hiding behind dark sunglasses, blocking their expression. In every case, erasing only the frames leaves a hole where the eyes, nose bridge, brows, and temples used to be — plus tell-tale nose-pad dents and lens shadows on the cheeks. This is why glasses removal is genuinely hard, and why Magic Eraser's AI does more than wipe pixels. It reads the visible geometry of the face — the surrounding skin tone, the shape of the brow, the lighting on the cheeks — and uses AI inpainting to reconstruct what the frames covered. When the eyes are partly visible through clear or lightly tinted lenses, the reconstruction stays close to the real eyes. With opaque sunglasses, the AI generates plausible eyes that match the face from visible context; it does not recover literal hidden pixels or guarantee the person's actual eyes. You brush over the frames, tap once, and review in Magic Eraser on web, iOS, or Android.
Remove glasses in three steps
- 1
Upload your portrait
Open Magic Eraser on the web, iOS, or Android and upload the photo. The tool works on any face-forward photo where glasses are clearly visible.
- 2
Brush over the glasses
Paint over the entire glasses area: both lenses, the bridge, and the temple arms extending to the ears. Include the nose pad marks and any shadow cast by the frames. Covering the complete glasses footprint gives the AI the best reference for reconstruction.
- 3
Erase, review, and save
Tap Erase, then inspect the edited preview for natural eyes, matching detail, and a smooth nose bridge. If needed, adjust the selection and erase again, then continue through the Magic Eraser save or export flow shown in the product.
Best for
- Passport and visa photos that require no eyeglasses
- Modeling portfolios needing both glasses and no-glasses versions
- Professional headshots where the client wants an alternate look
- Removing sunglasses to reveal eyes in casual and group photos
- ID badge photos with no-glasses requirements
- Before/after visualization for LASIK and eye surgery marketing
- Creating glasses-free versions of event and wedding portraits
- Social media profile photos showing a different look
Tips for natural glasses removal
Glasses removal works best on face-forward portraits with even lighting. The AI needs to reconstruct the entire eye area, so photos where the eyes are partially visible through the lenses (clear or lightly tinted) produce the most natural results — the AI has partial eye information to work from. For dark sunglasses that completely hide the eyes, the AI generates estimated eyes based on the rest of the face — the result looks natural but may not exactly match the person's actual eyes. Thin wireframe glasses are easier to remove than thick-framed glasses because less facial detail is obscured. If the glasses cast a strong shadow on the cheeks or nose, include the shadow area in your brush strokes. For reflective lenses showing environmental reflections, brush over the entire lens area including the reflection. After removal, zoom into both eyes and check that they look symmetrical and consistent with each other.
Frequently asked questions
- Can it remove sunglasses and show the eyes?
- Yes. For dark sunglasses, the AI generates natural-looking eyes based on the surrounding facial features. The result is convincing at normal viewing distances, though the generated eyes are an AI estimate rather than the person's actual eyes.
- Will it work for passport photo requirements?
- Many passport and ID rules restrict eyeglasses, but requirements vary by country and agency. Magic Eraser can help create a clean glasses-free portrait; always check the official agency photo rules before submitting.
- Does it remove the frame marks and nose pad indentations?
- Include the nose pad area and any visible frame marks in your brush selection. The AI removes the selected glasses area and associated marks, then reconstructs plausible skin in those areas.
- Is glasses removal free?
- Check the current Magic Eraser flow for available starting, save, and export options. Upload or open your photo, brush over the glasses, erase, review the preview, then follow the product prompts for the available output options.
- Can I remove glasses on my phone, or only on a computer?
- Both. Magic Eraser runs in mobile browsers and as iOS and Android apps, with the same brush-and-erase workflow as the web version. Upload or open the portrait, paint over the full glasses footprint with your finger, tap Erase, review the preview, then continue through the product's save or export flow.
- How realistic does the glasses-free result actually look?
- Very convincing at normal viewing distances, especially with thin frames or clear lenses where the eyes are partly visible. The AI reconstructs eyes, brows, and skin from the surrounding face. With dark sunglasses it generates plausible eyes rather than recovering hidden ones, so the result is realistic but an estimate — zoom in and check both eyes match.
- Why use AI instead of editing glasses out manually in Photoshop?
- Manual removal means cloning skin, hand-painting eye detail, masking edges, and rebuilding the nose bridge — slow, skill-heavy work that can look pasted. Magic Eraser keeps the workflow simpler: brush the glasses footprint, erase, review the preview, and continue through the product's save or export flow.
- What if the glasses are tilted, partly off-frame, or worn by several people?
- Brush whatever frame area is visible. For group photos, paint each person's glasses footprint before erasing. Steep side angles, partial frames, or heavy reflections are harder; include the full lens and any shadow in your selection, then review the preview and re-run the erase if a stray edge remains.