
Travel Blog Photo
Transform crowded travel snapshots into publication-quality destination photography. This template removes tourists, photobombers, and visual clutter from landmark and landscape shots using Magic Eraser, then applies AI Enhance to correct the difficult exposure conditions common in travel photography — harsh midday sun, deep temple interiors, backlit sunsets — and boost natural colors for images that make readers want to book the trip.
Try this template freePersonal template preview
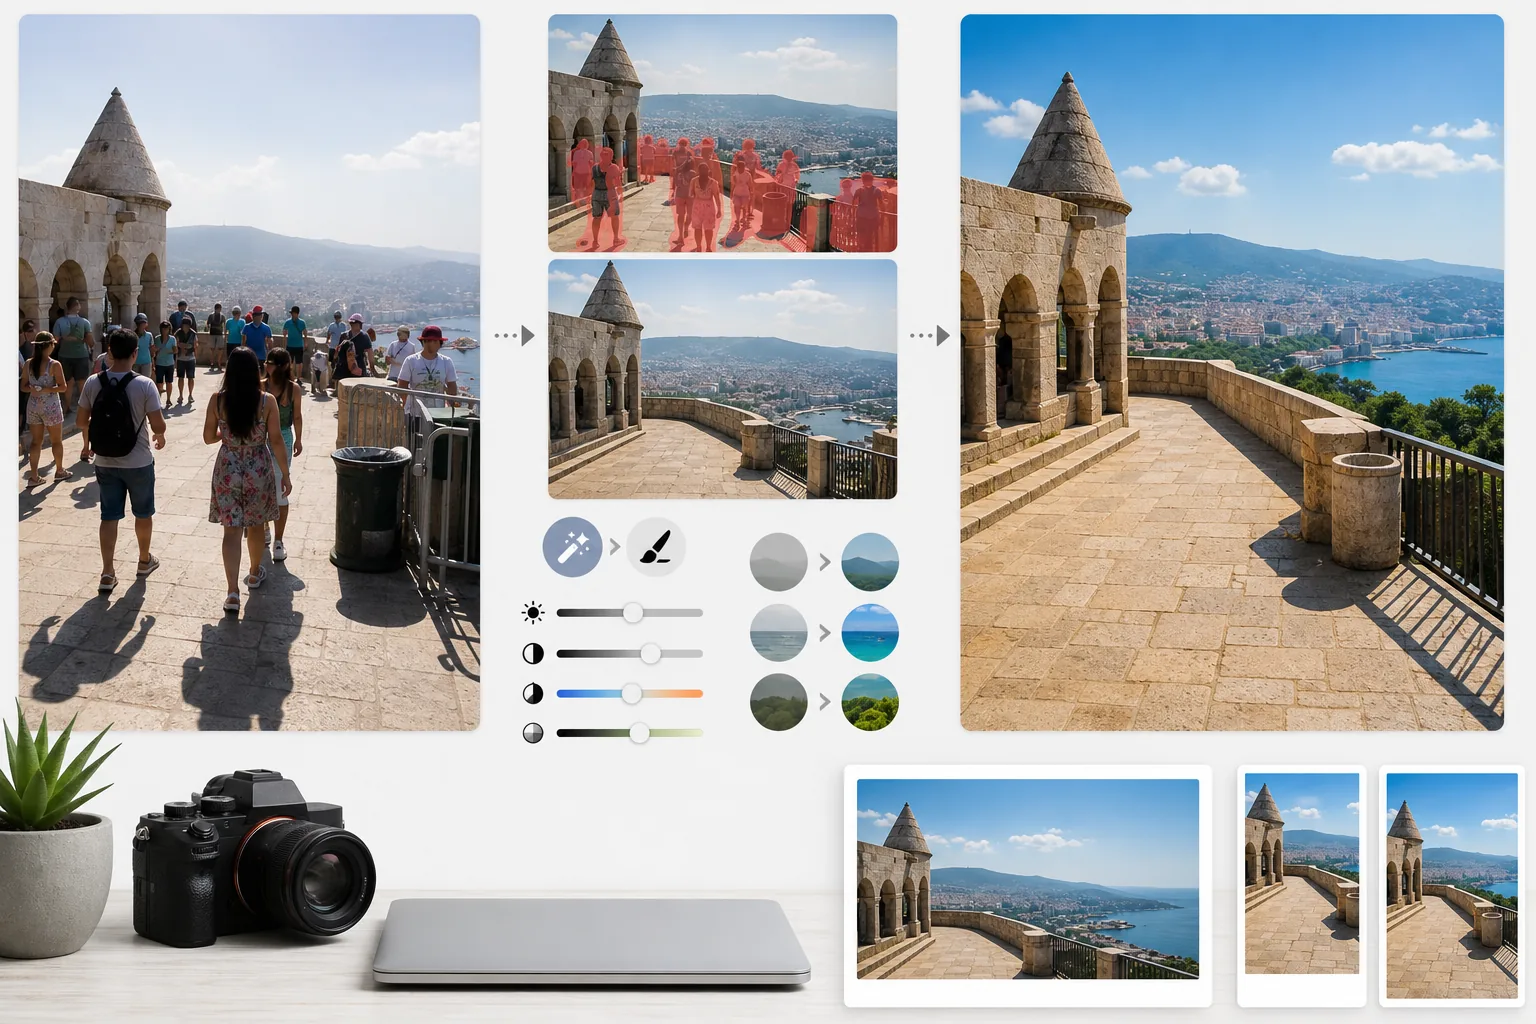
What this template does
Fixes the two biggest problems in travel photography: crowds and bad light. Magic Eraser removes tourists standing in front of monuments, photobombers walking through your frame, and visual clutter like trash bins, construction barriers, and temporary signage that ruin the sense of place. The AI reconstructs the architecture, pavement, and landscape behind removed people and objects using the surrounding context. AI Enhance then tackles the exposure challenges unique to travel — interior shots of cathedrals and temples where windows are blown out and shadows are black, harsh midday sun that flattens colors at tropical destinations, and backlit sunset scenes where the foreground is silhouetted. Colors are boosted to reflect what the destination actually looks like to the human eye, which cameras consistently underrepresent in dynamic range.
Template settings
| Tourist removal | Auto-detect and remove people from landmark and landscape shots |
| Exposure correction | HDR-style recovery of highlights and shadows for difficult light |
| Color enhancement | Boost natural saturation (sky, water, foliage) without artificial look |
| Haze removal | Cut through atmospheric haze for clearer distant landscapes |
| Output resolution | 4000px long edge (blog hero images at retina quality) |
How to use this template
Upload your travel photo
Upload any travel photo — crowded landmarks, landscape vistas, street scenes, interior architecture. The template handles JPEGs from smartphones, mirrorless cameras, and action cameras. RAW files are also accepted for maximum editing flexibility.
Remove crowds and clutter
Magic Eraser detects people in the frame and removes them. You can choose to remove all people, keep specific individuals (yourself or travel companions), or selectively remove only those blocking key architectural or landscape features. The AI fills in the missing areas with reconstructed ground, walls, and scenery.
Enhance light and color
AI Enhance applies HDR-style processing that recovers blown-out skies and lifts deep shadows — common in temple interiors and narrow European streets. Colors are boosted to match what your eyes saw at the destination, particularly in sky blues, ocean teals, and foliage greens. Atmospheric haze is reduced for clearer mountain and cityscape vistas.
Export for blog and social
Download at 4000px long edge for retina-quality blog hero images, or at platform-specific sizes for Instagram, Pinterest, and Facebook. The file includes optimized EXIF data retention for photographers who geotag their work.
Pro tips for best results
- ✓Take multiple shots of the same scene a few seconds apart. When tourists move between frames, the AI has reference information about the ground and walls behind them, producing cleaner reconstructions than a single frame alone.
- ✓For interior shots of churches, temples, and museums, slightly overexpose the photo when shooting. It is easier for the AI to recover bright highlights than to lift extremely dark shadows, and interior shots tend to be underexposed by default.
- ✓Shoot landscapes during golden hour or blue hour when possible. AI Enhance can boost colors in midday flat light, but the directional warm light of golden hour creates shadows and dimension in landscapes that no amount of color grading can replicate.
Common questions
Can I keep myself in the photo but remove other tourists?
+
Yes. You can mark yourself or your travel companions as protected subjects. The AI removes everyone else from the scene while keeping the protected individuals in place with their original position, lighting, and shadow intact.
How well does this work with very crowded scenes?
+
It works best when crowds cover less than about 40% of the frame. Extremely crowded scenes — like a packed piazza where you cannot see the ground between people — provide too little background reference for clean reconstruction. In those cases, partial removal of the front rows often produces a convincing result.
Will haze removal make the photo look unnatural?
+
The haze reduction is calibrated for natural-looking results. It removes the blue-grey atmospheric scattering that obscures distant mountains and buildings, but preserves the subtle aerial perspective that gives depth to landscape photos. The result looks like shooting on a crisp, clear day rather than a filtered or over-processed image.
Show every destination at its uncrowded best
Upload travel photos and get tourist-free, color-enhanced images that make your readers want to pack their bags.
Try it freeRelated templates
More personal templates for your workflow.
Create compliant ID photos for visas, driver's licenses, and national IDs with proper background color, head sizing, and facial expression requirements.
Enhance graduation photos with background cleanup, cap and gown color correction, blemish removal, and print-ready sharpening for frames and announcements.
Enhance concert and event photos with low-light noise reduction, stage lighting color correction, crowd distraction removal, and detail recovery from dark venue shots.
Create beautiful newborn announcement card photos with soft backgrounds, gentle color grading, hospital clutter removal, and print-ready dimensions for mailing.
Prepare family and portrait photos for holiday greeting cards with festive backgrounds, warm color grading, snow effects, and standard card dimensions for printing.
Restore and enhance memorial tribute photos with gentle retouching, background simplification, warm respectful color grading, and print-ready dimensions for services.