फ़ोटो से उंगलियों के निशान और धब्बे हटाएँ
उत्पाद फोटोग्राफी में परावर्तक सतहें एक फिंगरप्रिंट चुंबक हैं - प्रत्येक स्पर्श स्टूडियो प्रकाश व्यवस्था के तहत एक दृश्यमान निशान छोड़ता है, और यहां तक कि तीस सेकंड का स्टाइलिंग पास भी साफ करने के लिए एक दर्जन नए प्रिंट छोड़ सकता है। Magic Eraser का AI गहनों, फोन, कांच के बर्तनों, दर्पणों, पॉलिश की गई धातुओं, रसोई के उपकरणों, बाथरूम फिक्स्चर और किसी भी अन्य परावर्तक या चमकदार सतह से उंगलियों के निशान, हथेली के दाग और त्वचा-तेल के निशान को हटा देता है - सेकंड में नीचे के स्वच्छ परावर्तक फिनिश का पुनर्निर्माण करता है।
अंतिम अपडेट
इरेज़र खोलें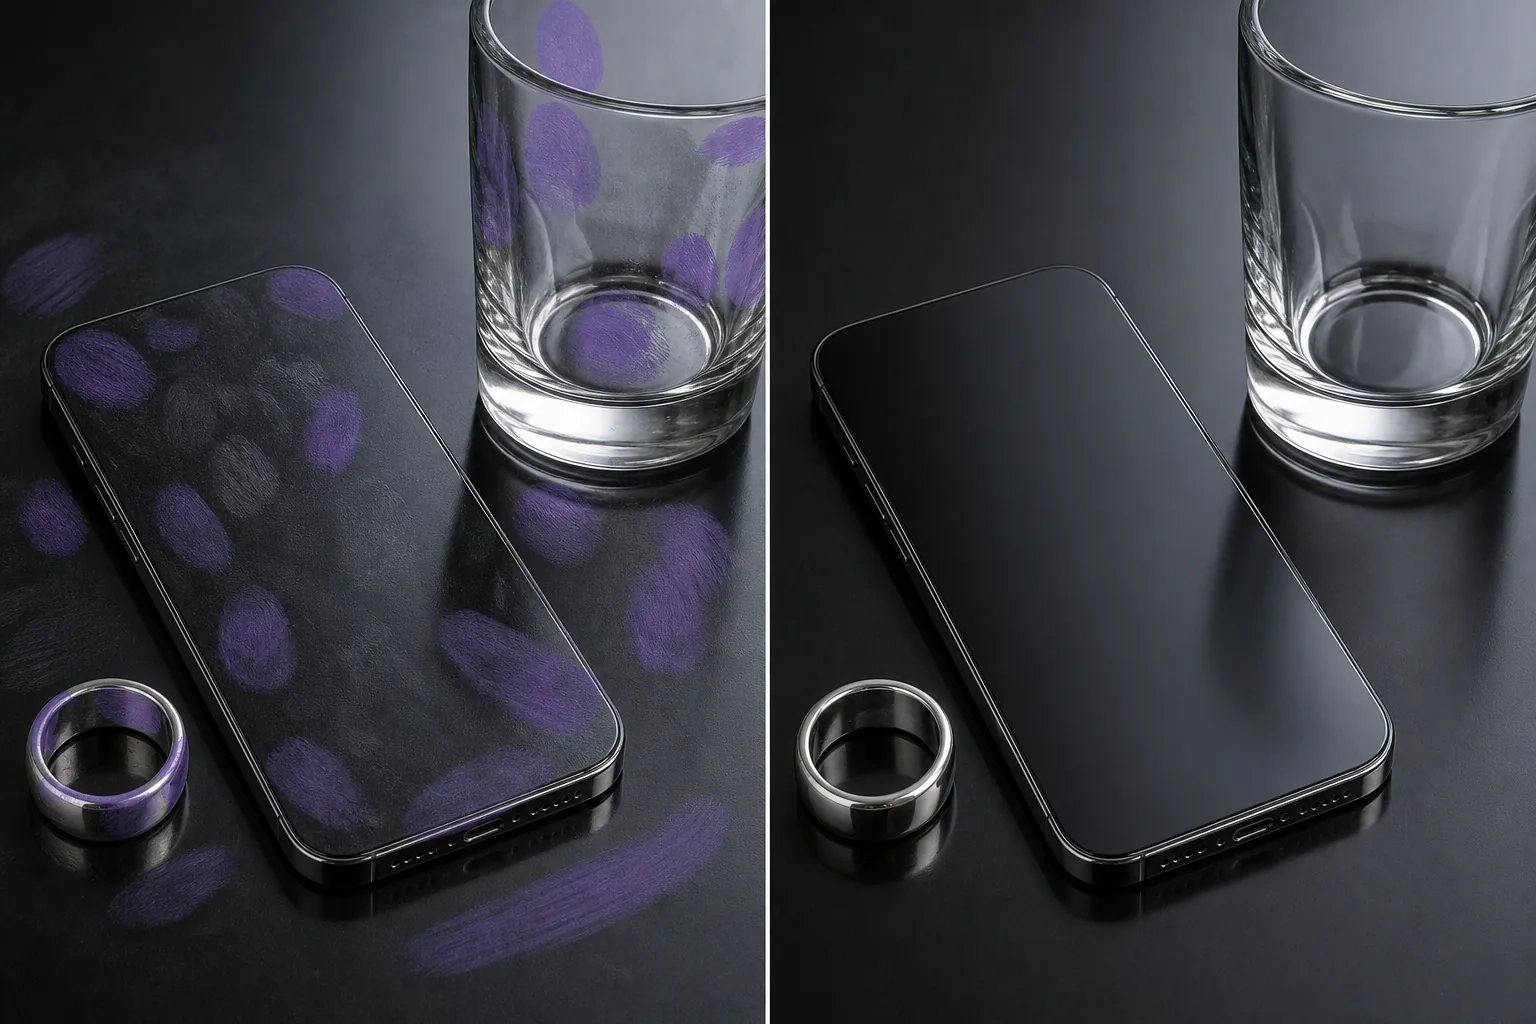
प्रत्येक परावर्तक सतह वाली तस्वीर में उंगलियों के निशान क्यों दिखाई देते हैं?
अधिकांश प्रकाश स्थितियों में उंगलियों के निशान अनिवार्य रूप से आंखों के लिए अदृश्य होते हैं, लेकिन फोटोग्राफी के लिए आवश्यक नियंत्रित स्टूडियो प्रकाश व्यवस्था के तहत स्पष्ट रूप से दिखाई देने लगते हैं। एक पॉलिश चांदी की अंगूठी जो सामान्य रोशनी में प्राचीन दिखती है, सॉफ्टबॉक्स के नीचे स्टाइलिंग से लेकर हर प्रिंट को दिखाती है; एक स्टेनलेस-स्टील रेफ्रिजरेटर जिसे सफ़ाई दल ने मिटा दिया, अभी भी लिस्टिंग-फ़ोटो फ़्लैश के नीचे हाथ की धारियाँ दिखाई दे रही हैं; एक ग्लास कॉफ़ी टेबल, जो खिड़की की रोशनी को पकड़ती है, से पता चलता है कि हर जगह एक स्टाइलिंग टीम ने एक प्रोप लगाया है। भौतिकी अपरिहार्य है - त्वचा का तेल और नमी नीचे की सतह की तुलना में अलग तरह से अपवर्तित होती है, और नियंत्रित प्रकाश इसके विपरीत को बढ़ाता है। प्रत्येक शॉट से पहले मैन्युअल रूप से सफाई करने से मदद मिलती है लेकिन समस्या खत्म नहीं होती है: प्रत्येक प्रोप समायोजन, प्रत्येक कैमरा-एंगल परिवर्तन, प्रत्येक अंतिम स्टाइलिंग ट्विक शटर फायर होने से पहले अगले 30-60 सेकंड में नए प्रिंट पेश करता है। फ़ोटोशॉप में मैन्युअल फ़िंगरप्रिंट हटाना सबसे कठिन सफाई कार्यों में से एक है क्योंकि प्रिंट पारभासी होते हैं (आप उनके माध्यम से सतह देख सकते हैं), आकार में अनियमित होते हैं (प्रत्येक प्रिंट अद्वितीय होता है), और क्रॉस रिफ्लेक्टिव ग्रेडिएंट्स (सतह का प्रतिबिंब प्रिंट के क्षेत्र में भिन्न होता है)। क्लोन-स्टैम्प टूल को सतह की परावर्तनता प्रवणता को संरक्षित करते हुए प्रत्येक प्रिंट के क्षेत्र का पुनर्निर्माण करना होता है - जटिल सतहों पर प्रति प्रिंट 3-8 मिनट का काम। Magic Eraser का AI प्रिंट से सटे अचिह्नित क्षेत्रों से परावर्तक ढाल का अनुमान लगाकर और एक ब्रश पास में प्रिंट के क्षेत्र में लगातार साफ सतह का पुनर्निर्माण करके ज्यामिति को संभालता है। घने फ़िंगरप्रिंट मामलों के लिए (20+ दृश्यमान प्रिंट वाली फ़ोन स्क्रीन, हर हाथ की स्थिति को पकड़ने वाला एक ग्लास शेल्फ), ब्रश-ओवर-प्रिंट-फिर-टैप वर्कफ़्लो 2 मिनट से कम समय में पूरी सतह को संभालता है।
तीन चरणों में उंगलियों के निशान मिटाएँ
- 1
फोटो अपलोड करें
वेब, iOS या Android पर Magic Eraser खोलें। आभूषण उत्पाद शॉट, फोन या इलेक्ट्रॉनिक्स फोटो, कांच के बर्तन की संरचना, दर्पण या खिड़की शॉट, पॉलिश-धातु उपकरण छवि, या कोई भी फोटो जहां उंगलियों के निशान परावर्तक सतह को अव्यवस्थित करते हैं, वहां छोड़ें। JPEG, PNG, HEIC और WebP सभी समर्थित हैं।
- 2
प्रत्येक फिंगरप्रिंट और दाग वाले क्षेत्र पर ब्रश करें
प्रत्येक दृश्यमान फिंगरप्रिंट, हथेली के धब्बे, तेल के निशान या हाथ की लकीर पर पेंट करें। पॉलिश की गई धातुओं (गहने, घड़ियाँ, स्टेनलेस स्टील) के लिए, केवल दृश्यमान प्रिंट को बिना अवरोधित परावर्तक क्षेत्र में फैलाए ब्रश करें - एआई संदर्भ के रूप में आसन्न स्वच्छ प्रतिबिंब का उपयोग करता है। एक साथ क्लस्टर किए गए कई प्रिंट वाले ग्लास और दर्पणों के लिए, क्लस्टर को बड़े पैमाने पर ब्रश करने के बजाय प्रत्येक प्रिंट के क्षेत्र को अलग से ब्रश करें - एआई क्लीनर पुनर्निर्माण का उत्पादन करता है जब उसके पास काम करने के लिए स्पष्ट प्रिंट सीमाएं होती हैं। फ़िंगरप्रिंट और स्क्रीन सामग्री दोनों वाली फ़ोन स्क्रीन के लिए, जो दृश्यमान रहनी चाहिए, केवल बेज़ेल्स और स्क्रीन किनारों के आसपास प्रिंट क्षेत्रों को ब्रश करें; यदि प्रिंट प्रदर्शित सामग्री को ओवरलैप करते हैं, तो उन्हें शोधन पास की आवश्यकता होती है क्योंकि एआई अंतर्निहित स्क्रीन सामग्री को अनिश्चित रूप से पुनर्निर्माण करता है।
- 3
मिटाएँ और परिष्कृत करें टैप करें
एआई प्रत्येक फिंगरप्रिंट के नीचे साफ परावर्तक सतह का पुनर्निर्माण करता है, जो आसपास की सतह के प्रतिबिंब ढाल, पॉलिश बनावट और किसी भी सजावटी पैटर्न (ब्रश-धातु बनावट, सजावटी उत्कीर्णन, ग्लास नक़्क़ाशी) से मेल खाता है। विशिष्ट उत्पाद-फोटोग्राफी मामलों (गहने, घड़ियां, फोन, कांच के बर्तन, पॉलिश किए गए उपकरण) के लिए, सतह की सामान्य परावर्तक जटिलता पर पुनर्निर्माण अदृश्य है। गहनों या घड़ियों पर उच्च-स्तरीय संपादकीय कार्य के लिए जहां प्रतिबिंब ढाल पूरी दृश्य कहानी है, पुनर्निर्मित प्रतिबिंबित विवरण को तेज करने के लिए एक AI Enhance पास का पालन करें। पूर्ण रिज़ॉल्यूशन पर निर्यात करें.
के लिए सर्वोत्तम
- आभूषण उत्पाद फोटोग्राफी (अंगूठियां, हार, घड़ियां, बालियां) जहां पॉलिश धातु और रत्न स्टाइल और हैंडलिंग से लेकर हर स्पर्श दिखाते हैं
- फ़ोन, टैबलेट और इलेक्ट्रॉनिक्स उत्पाद शॉट्स जहां स्क्रीन, ग्लास बैक और धातु फ्रेम प्रत्येक कैमरा-कोण समायोजन के बीच प्रिंट लेते हैं
- कांच के बर्तन और बारवेयर रचनाएँ (वाइन ग्लास, कॉकटेल ग्लास, डिकैन्टर) जहां कैटलॉग और संपादकीय कार्य के लिए अदृश्य-हैंडलिंग सफाई की आवश्यकता होती है
- स्टेनलेस-स्टील के उपकरणों, ग्लास-फ्रंट अलमारियाँ, और पॉलिश-पत्थर के काउंटरों के साथ रियल-एस्टेट लिस्टिंग रसोई, जिसमें तैयारी की हाथ की धारियाँ दिखाई दे रही हैं
- दर्पण, क्रोम फिक्स्चर, ग्लास शॉवर दरवाजे और हर स्पर्श दिखाने वाली पॉलिश-टाइल सतहों के साथ रियल-एस्टेट लिस्टिंग बाथरूम
- रेस्तरां मेनू और भोजन फोटोग्राफी जहां प्लेटें, चांदी के बर्तन, कांच के बर्तन और स्टेनलेस स्टील के कुकवेयर अन्यथा हर स्टाइल-पास स्पर्श को दिखाएंगे
- कलेक्टर मार्केटप्लेस (ईबे, क्रोनो24, होडिन्की क्लासीफाइड्स) के लिए फोटोग्राफी देखें, जहां सतह की सफाई से बोली लगाने वालों का विश्वास बढ़ता है।
- इंटीरियर-डिज़ाइन पोर्टफ़ोलियो के लिए दर्पण, खिड़की और फ़्रेम फ़ोटोग्राफ़ी, जहाँ परावर्तक सतहें प्राथमिक सौंदर्य तत्व हैं
किनारे के मामले और युक्तियाँ
फ़िंगरप्रिंट हटाना तब सबसे अच्छा काम करता है जब परावर्तक सतह का कम से कम 30-50% प्रिंट के बिना दिखाई देता है - वह अचिह्नित क्षेत्र एआई को प्रिंट के क्षेत्र में परावर्तन, ढाल और पॉलिश-बनावट विवरण के पुनर्निर्माण का संदर्भ देता है। चार मामलों में एक अलग दृष्टिकोण की आवश्यकता है। सबसे पहले, सतह के 70-90% हिस्से को कवर करने वाले बहुत घने प्रिंट क्लस्टर (स्टाइलिंग सत्र के बाद एक ग्लास टेबल जिसमें कई प्रॉप्स लगाए और स्थानांतरित किए जाते हैं): एक बार में पूरी सतह को बड़े पैमाने पर ब्रश करने के बजाय क्षेत्र के अनुसार ब्रश करें। एआई प्रत्येक पास से सटे स्पष्ट अनब्लॉक संदर्भ क्षेत्रों के साथ स्वच्छ पुनर्निर्माण का उत्पादन करता है। उन सतहों के लिए जहां प्रिंट पूरे परावर्तक क्षेत्र को कवर करते हैं, लक्ष्य सतह का वर्णन करने वाले टेक्स्ट प्रॉम्प्ट के साथ AI भरें ('सूक्ष्म क्षैतिज ब्रश बनावट के साथ साफ पॉलिश चांदी,' 'सूक्ष्म आंतरिक-प्रतिबिंब ढाल के साथ अचिह्नित ग्लास') ब्रश इरेज़र की तुलना में बेहतर परिणाम देता है क्योंकि इसमें एक्सट्रपलेशन का कोई संदर्भ नहीं है। दूसरा, धातु की सतहों पर सजावटी उत्कीर्णन, हॉलमार्क, या मुद्रांकित लोगो पर उंगलियों के निशान: उन्हें संरक्षित करने के लिए उत्कीर्ण क्षेत्रों के चारों ओर सावधानी से ब्रश करें - यदि ब्रश इसके ऊपर से गुजरता है तो एआई अनिश्चित रूप से उत्कीर्णन का पुनर्निर्माण करेगा। विशेष रूप से घड़ी के डायल और आभूषण हॉलमार्क के लिए, 30-सेकंड-प्रति-प्रिंट सावधानीपूर्वक ब्रश तकनीक अभिलेखीय-ग्रेड परिणाम उत्पन्न करती है। तीसरा, बनावट वाली सतहों पर उंगलियों के निशान (ब्रश धातु, सैंडब्लास्टेड ग्लास, नक्काशीदार दर्पण): एआई सतह की बनावट को अच्छी तरह से संभालता है लेकिन पुनर्निर्मित अनुभाग के साथ दिशात्मक अनाज को थोड़ा चिकना कर सकता है। 16x20 या इससे बड़े संपादकीय-ग्रेड प्रिंट के लिए, छोटे ब्रश के साथ एक टच-अप पास दिशात्मक स्पष्टता को बहाल करता है। चौथा, फोन या डिवाइस स्क्रीन पर उंगलियों के निशान जो प्रदर्शित सामग्री के साथ ओवरलैप होते हैं: बेज़ल और स्क्रीन किनारों में प्रिंट क्षेत्रों को ब्रश करें; प्रदर्शित ऐप आइकन या टेक्स्ट को ओवरलैप करने वाले प्रिंट के लिए, उन्हें शोधन पास की आवश्यकता होती है क्योंकि एआई अंतर्निहित प्रदर्शन सामग्री को अनिश्चित रूप से पुनर्निर्माण करता है। विनियमित श्रेणियों (चिकित्सा उपकरण, खाद्य-संपर्क उत्पाद) में उत्पाद फोटोग्राफी के लिए, उत्पाद की स्पष्ट सफाई को महत्वपूर्ण रूप से बदलने वाले फोटो संपादन का मूल्यांकन किसी भी लागू एफटीसी या उत्पाद-प्रकटीकरण आवश्यकताओं के विरुद्ध किया जाना चाहिए - कॉस्मेटिक सफाई के रूप में फिंगरप्रिंट हटाना आम तौर पर ठीक है, लेकिन नियामक सीमा से अवगत रहें।
अक्सर पूछे जाने वाले प्रश्नों
- क्या किसी फोटो से उंगलियों के निशान हटाना मुफ़्त है?
- हाँ। Magic Eraser का निःशुल्क टियर दैनिक उपयोग सीमा के साथ फिंगरप्रिंट और स्मज क्लीनअप को कवर करता है। प्रीमियम ($29.99/वर्ष) में अपग्रेड करने से सीमाएं हट जाती हैं और उच्च-रिज़ॉल्यूशन निर्यात अनलॉक हो जाता है - आभूषण संपादकीय फोटोग्राफी, वॉच-कलेक्टर मार्केटप्लेस लिस्टिंग, एमएलएस रियल-एस्टेट फोटो और किसी भी कैटलॉग कार्य के लिए उपयोगी जहां परावर्तक-सतह निष्ठा को बड़े डिस्प्ले और प्रिंट आकार में बनाए रखने की आवश्यकता होती है।
- क्या यह अधिकांश सतह को कवर करने वाले घने फ़िंगरप्रिंट समूहों पर काम करता है?
- हाँ, क्षेत्र-दर-क्षेत्र पास दृष्टिकोण के साथ। अपने 50-90% क्षेत्र में प्रिंट से ढकी सतहों के लिए (स्टाइलिंग सत्र के बाद एक ग्लास टेबल, व्यापक हैंडलिंग के बाद एक फोन स्क्रीन, एक लंबे कैमरा-समायोजन चक्र के बाद एक पॉलिश-धातु का टुकड़ा), पूरी सतह को एक बार में बड़े पैमाने पर ब्रश करने के बजाय 3-5 क्षेत्र में सफाई का काम करें। जब प्रत्येक पास के निकट स्पष्ट अनब्लॉक संदर्भ होता है तो एआई स्वच्छ पुनर्निर्माण उत्पन्न करता है। उन सतहों के लिए जहां प्रिंट बिना किसी अवरोधित संदर्भ के पूरे क्षेत्र को कवर करते हैं, लक्ष्य साफ सतह का वर्णन करने वाले टेक्स्ट प्रॉम्प्ट के साथ एआई फिल पर स्विच करें ('सूक्ष्म क्षैतिज ब्रश बनावट के साथ पॉलिश चांदी,' 'आंतरिक-प्रतिबिंब ढाल के साथ अचिह्नित स्पष्ट ग्लास') - संकेत दृश्यमान संदर्भ की आवश्यकता के बिना पुनर्निर्माण को सही प्रतिबिंबित चरित्र की ओर ले जाता है।
- क्या पुनर्निर्मित परावर्तक सतह पूर्ण रिज़ॉल्यूशन पर प्रामाणिक दिखेगी?
- विशिष्ट उत्पाद-फोटोग्राफी मामलों (स्टूडियो लाइटिंग के तहत आभूषण, फोन और इलेक्ट्रॉनिक्स, वाणिज्यिक शॉट्स में कांच के बर्तन, रियल-एस्टेट उपकरण) के लिए, पुनर्निर्माण 16x20 तक के प्रिंट आकार सहित पूर्ण रिज़ॉल्यूशन पर अदृश्य है। उच्च-स्तरीय संपादकीय कार्य के लिए जहां परावर्तक ढाल संपूर्ण दृश्य कहानी है - लक्जरी घड़ी फोटोग्राफी, बढ़िया आभूषण कैटलॉग कार्य, ग्लास-आर्ट पोर्टफोलियो शॉट्स - पुनर्निर्मित परावर्तक विवरण को तेज करने के लिए प्रारंभिक फिंगरप्रिंट हटाने के बाद एक AI Enhance शोधन पास पर योजना बनाएं। एआई का पहला पास कभी-कभी पुनर्निर्मित अनुभाग के किनारों पर ढाल निरंतरता को थोड़ा सुचारू कर सकता है। 30-60 सेकंड का टच-अप संपादकीय-ग्रेड की स्पष्टता को पुनर्स्थापित करता है।
- क्या मैं डेस्कटॉप संपादक के बिना उत्पाद-सूचीकरण कार्य के लिए फ़ोन फ़ोटो पर ऐसा कर सकता हूँ?
- हाँ। Magic Eraser के iOS और Android ऐप्स वेब ऐप के समान फिंगरप्रिंट-हटाने वाले वर्कफ़्लो को चलाते हैं। ई-कॉमर्स विक्रेताओं, Etsy दुकानों, आभूषण पुनर्विक्रेताओं और फोन पर उत्पाद फोटोग्राफी करने वाले घड़ी संग्राहकों के लिए, ऑन-डिवाइस क्लीनअप डेस्कटॉप पर वापस निर्यात किए बिना वर्कफ़्लो को केवल फ़ोन पर रखता है। छोटी सतहों पर घने फिंगरप्रिंट मामलों के लिए (एक अंगूठी या बाली शॉट क्लोज़-अप जहां प्रिंट क्लस्टर को सावधानीपूर्वक ब्रश परिशुद्धता की आवश्यकता होती है), यदि उपलब्ध हो तो बड़ी आईपैड स्क्रीन से फोन वर्कफ़्लो को लाभ होता है, लेकिन आईफोन और एंड्रॉइड फोन अधिकांश उत्पाद शॉट्स पर सेवा योग्य परिणाम देते हैं।
- आभूषण हॉलमार्क और उत्कीर्णन के बारे में क्या - क्या एआई उन पर पुनर्निर्माण करेगा?
- उत्कीर्ण क्षेत्रों, हॉलमार्क, मुद्रांकित लोगो और किसी भी सजावटी धातु के काम के आसपास सावधानी से ब्रश करें - यदि ब्रश उत्कीर्णन के ऊपर से गुजरता है, तो एआई उत्कीर्ण विवरण में धातु की सतह को अनिश्चित रूप से पुनर्निर्माण करेगा और इसे चिकना या विकृत कर सकता है। उत्कीर्ण हॉलमार्क वाले गहनों के लिए सही तकनीक: उत्कीर्णन क्षेत्र पर ज़ूम करें, उत्कीर्णन को ओवरलैप किए बिना केवल दृश्य फिंगरप्रिंट को ब्रश करें, और एआई को उत्कीर्णन और प्रिंट के बीच केवल साफ पॉलिश क्षेत्र को फिर से बनाने दें। कई जटिलताओं (उप-डायल, दिनांक विंडो, सूचकांक, ब्रांड लोगो) के साथ घड़ी के डायल के लिए, वही ब्रश-अराउंड-द-डिटेल तकनीक लागू होती है - एआई पॉलिश-मेटल क्लीनअप को अच्छी तरह से संभालता है लेकिन सबसे अच्छा काम करता है जब ब्रश डिज़ाइन के विस्तृत तत्वों का सम्मान करता है।
- क्या AI फ़ोन स्क्रीन और इलेक्ट्रॉनिक डिस्प्ले पर फ़िंगरप्रिंट संभाल सकता है?
- बेज़ल क्षेत्र और स्क्रीन किनारों के आसपास उंगलियों के निशान के लिए हाँ। फ़िंगरप्रिंट के लिए जो सक्रिय प्रदर्शित सामग्री (ऐप आइकन, टेक्स्ट, फ़ोटो, वीडियो फ़्रेम) को ओवरलैप करते हैं, एआई अंतर्निहित डिस्प्ले सामग्री को अनिश्चितता के साथ फिर से बनाता है क्योंकि यह नहीं जानता कि मूल स्क्रीन क्या दिखाती है। फ़ोन-उत्पाद फ़ोटोग्राफ़ी के लिए सबसे साफ़ वर्कफ़्लो: शूटिंग से पहले भौतिक स्क्रीन को माइक्रोफ़ाइबर कपड़े से साफ़ करें (हमेशा संपादन से अधिक कुशल), स्क्रीन को ऐसे कोण पर शूट करें जो उंगली-पक्ष प्रतिबिंब को कम करता है, फिर बेज़ेल्स में और स्क्रीन किनारों के आसपास किसी भी शेष प्रिंट के लिए Magic Eraser ब्रश का उपयोग करें। लाइफस्टाइल फोटोग्राफी में फोन डिस्प्ले के लिए जहां स्क्रीन की सामग्री मायने रखती है (एक ऐप इंटरफ़ेस दिखाने वाला फोन पकड़ने वाला हाथ), वास्तविक फोटो सत्र के लिए मैन्युअल-सफाई दृष्टिकोण सही आकार है; एआई क्लीनअप अवशिष्ट मुद्दों को संभालता है।
- क्या रियल-एस्टेट लिस्टिंग फ़ोटो पर फ़िंगरप्रिंट हटाना एमएलएस नियमों के अंतर्गत है?
- आम तौर पर हाँ, चेतावनियों के साथ। अधिकांश क्षेत्रीय एमएलएस बोर्डों को संपत्ति की स्थायी विशेषताओं का सटीक प्रतिनिधित्व करने के लिए फ़ोटो सूचीबद्ध करने की आवश्यकता होती है। उंगलियों के निशान और धब्बे स्थायी विशेषताएं नहीं हैं - वे सतह की स्थितियां हैं जो किसी भी एक पल और अगले पल के बीच बदलती रहती हैं, और व्यक्तिगत रूप से संपत्ति का दौरा करने वाले किसी भी संभावित खरीदार को तुरंत अपने स्वयं के प्रिंट के साथ सतहों का सामना करना पड़ेगा। रसोई के उपकरणों, बाथरूम के दर्पणों, कांच के शॉवर दरवाजों, पॉलिश-पत्थर के काउंटरों और इसी तरह की सतहों से उंगलियों के निशान हटाना मानक कॉस्मेटिक लिस्टिंग फोटोग्राफी है और इसे आमतौर पर गलत बयानी नहीं माना जाता है। अपवाद: कोई भी सफाई जो वास्तविक क्षति को छुपाती है (खरोंच जो विक्रेता छिपाना चाहता है, पानी के धब्बे जो चल रहे रिसाव का संकेत देते हैं, नक़्क़ाशी जो रासायनिक क्षति का संकेत देती है) एक अलग श्रेणी है और इसमें प्रकटीकरण निहितार्थ हो सकते हैं। प्रकाशन से पहले अपने विशिष्ट एमएलएस दिशानिर्देश जांचें।