Remove noise from photos
Clean up grainy, noisy photos taken in low light, at high ISO, or with older cameras. Magic Eraser's AI removes the noise pattern while preserving sharp detail and natural texture — turning unusable dark shots into clean, printable images.
Last updated
Open Magic Eraser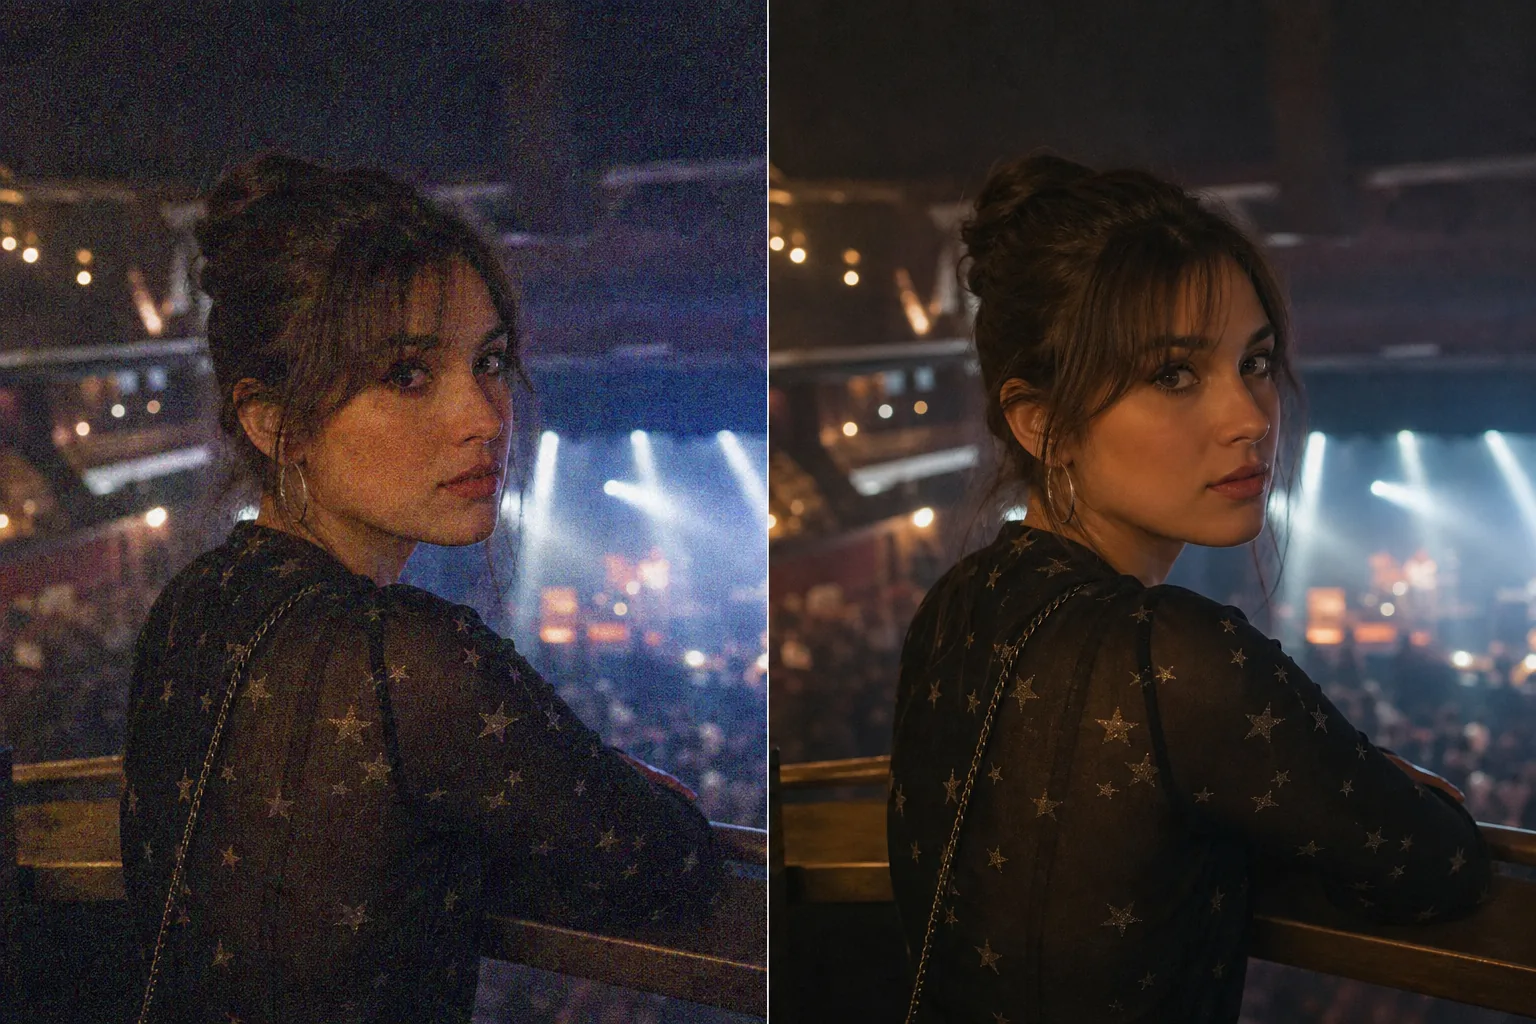
How to remove grain and noise from a photo
To remove grain and noise from a photo, open Magic Eraser on the web, iOS, or Android, upload your shot, and apply AI denoising — the AI image denoiser reads the sensor-noise pattern and clears the colored speckles and luminance grain while keeping edges and detail intact. It is free with sign-in required. It works best when real detail still sits beneath the noise; extreme ISO 12800+ shots clean up but cannot fully recover detail already lost to the noise floor. Digital noise — the colored speckles and luminance grain that appear in photographs — is the most common quality problem in low-light photography. Concert photos, indoor event shots, night cityscapes, astrophotography, and any photo taken at ISO 1600 or above will show visible noise. Phone cameras in dark restaurants, clubs, and evening events produce noisy images because their small sensors amplify the signal. Older digital cameras and scanned film also carry grain that reduces perceived quality. Traditional noise reduction in editing software requires careful slider balancing — too little leaves the noise visible, too much smears detail into a watercolor-like mush. Magic Eraser's AI denoiser distinguishes between noise (random speckle patterns) and actual image detail (edges, textures, fine features), removing one while preserving the other.
Denoise a photo in three steps
- 1
Upload your noisy photo
Open Magic Eraser on the web, iOS, or Android and upload the grainy or noisy image. The tool handles both color noise (colored speckles) and luminance noise (grainy texture).
- 2
Apply AI denoising
Use the AI enhancement tool with noise reduction enabled. The AI analyzes the noise pattern across the image and removes it while preserving edges, textures, and fine detail. For severely noisy images, a second pass may further clean the result.
- 3
Review and export
Check the result at full zoom — detail should be preserved while the noise speckles are gone. Verify that facial features, text, and fine textures remain sharp. Export the clean version for printing, posting, or archiving.
Best for
- Concert and live music photos taken at high ISO
- Indoor event and party photos in dim lighting
- Night photography and cityscapes with visible grain
- Phone camera photos from dark restaurants and bars
- Astrophotography with sensor noise
- Scanned film negatives with grain
- Security camera stills that need cleanup
- Wildlife photography in dawn or dusk conditions
Tips for effective noise removal
Noise removal works best when the underlying detail is still present beneath the noise — the AI amplifies the real signal and suppresses the random noise. For moderate noise (ISO 1600-6400 on modern cameras), results are excellent — the cleaned image looks like it was shot at base ISO. For extreme noise (ISO 12800+, very dark phone photos), the AI removes the worst of the grain but some detail may have been lost to the noise floor and cannot be recovered. Color noise (the random colored speckles) is easier to remove than luminance noise (the grainy texture), so results may retain a slight grain texture in extremely noisy images while completely eliminating the colored artifacts. For images that are both noisy and underexposed, apply enhancement to lift the exposure first, then denoise — this order produces cleaner results than denoising the dark image first.
Frequently asked questions
- Will denoising make my photo blurry?
- The AI distinguishes between noise and real detail, removing speckles while preserving edges and textures. The result is cleaner without the blur that traditional noise reduction often introduces.
- Does it work on phone camera photos?
- Yes. Phone cameras produce significant noise in dim conditions. The AI denoiser handles phone camera noise patterns effectively, producing much cleaner results from restaurant, bar, and evening photos.
- Can it remove film grain from scanned photos?
- Yes. Film grain follows a similar pattern to digital noise. The AI removes the grain while preserving the underlying image detail. If you want to keep some film grain for aesthetic purposes, use a lighter application.
- Is noise removal free?
- Yes. Magic Eraser's free tier covers noise reduction. Upload your grainy photo, apply AI denoising, and export the clean result.
- How is an AI image denoiser different from Photoshop or Lightroom noise reduction?
- Traditional noise reduction in editors uses sliders that blur the whole image to hide grain — push them too far and fine detail turns mushy. An AI image denoiser is trained to tell noise apart from real detail, so it suppresses the random speckle while keeping edges, text, and textures. That means less manual balancing and a cleaner result, especially on faces and fine detail where slider-based smoothing usually struggles.
- Is noise the same as grain, and which page should I use?
- They overlap but differ in source. Noise is digital sensor speckle from high ISO or small phone sensors — random colored and luminance dots. Grain is the texture of film or a deliberate stylistic look. This page focuses on denoising sensor noise from low-light and high-ISO shots. If you specifically want to remove or adjust film-style grain, use our dedicated grain removal page, which is tuned for that pattern.
- Can I denoise several photos in a row?
- Yes. Process them one at a time — upload a photo, apply AI denoising, export, then load the next. Each image is quick, so a set of concert or event shots goes through without much wait. Keep the originals; denoising is non-destructive on your source files since you export a new clean copy each time rather than overwriting the upload.