Remove scratches from photos
Erase scratches, cracks, creases, and surface damage from scanned prints, vintage photographs, and old family photos. Magic Eraser removes the damage and reconstructs the original detail underneath — restoring photos to their pre-damage appearance.
Last updated
Open Magic Eraser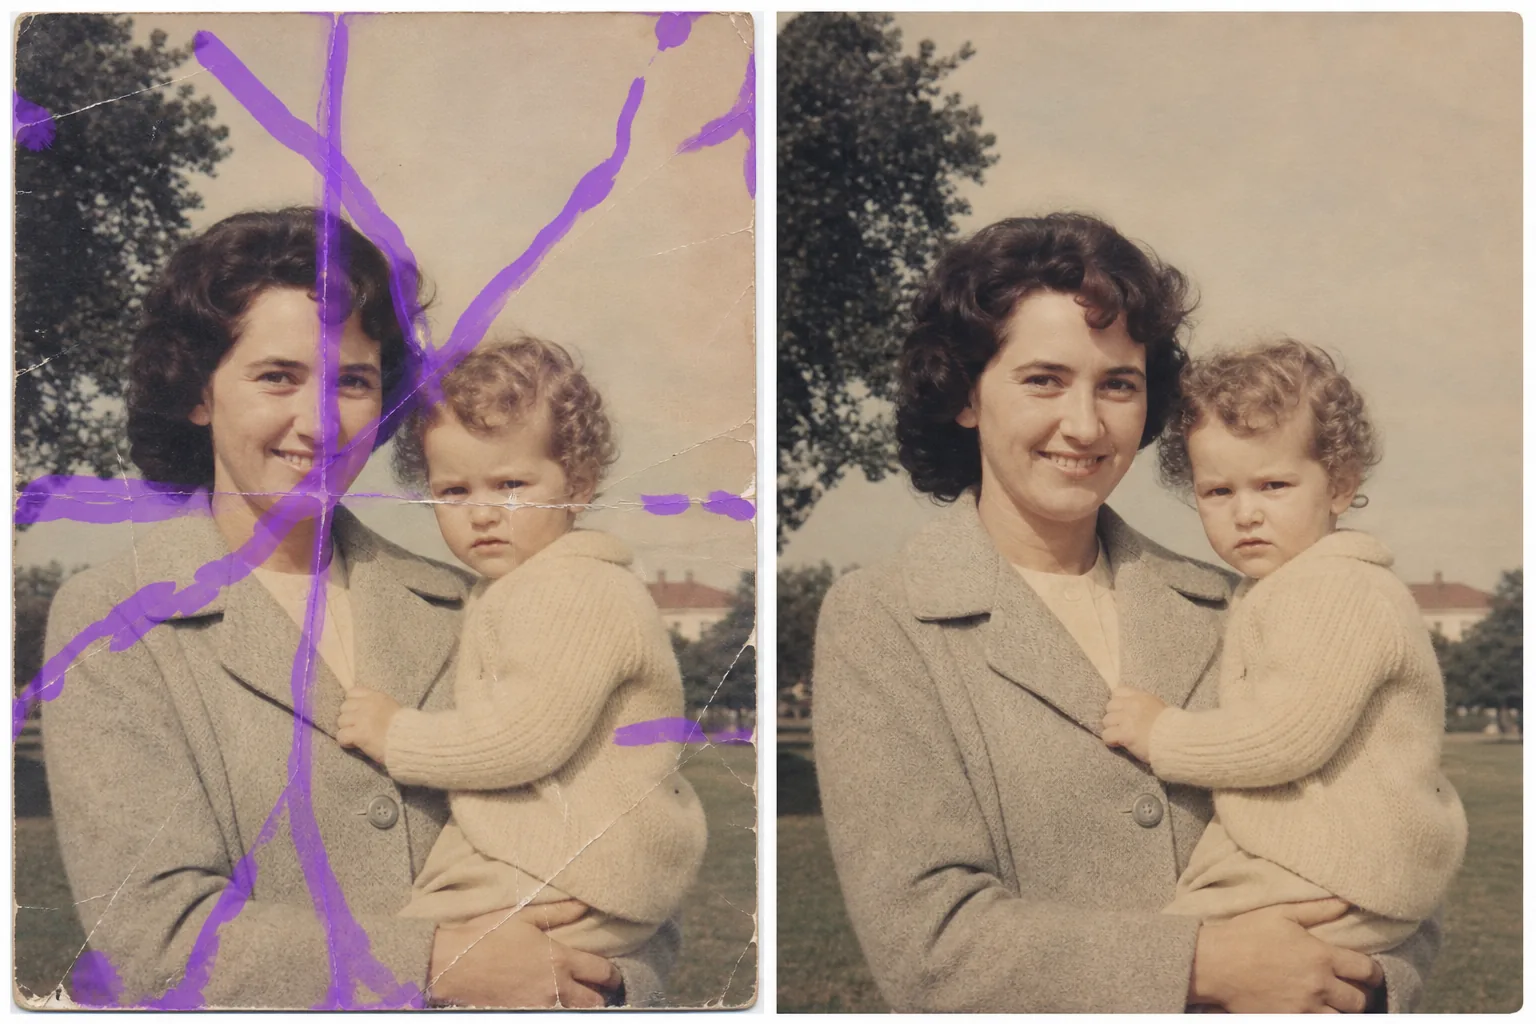
How to remove scratches from a photo
To remove scratches from a photo, open Magic Eraser on the web, iOS, or Android, upload the scanned print or image, brush along each scratch, crease, or crack, and tap Erase. The AI follows the line of damage and rebuilds the face, clothing, background, or texture underneath. It includes limited free edits after sign-in. The same brush also clears surface scratches and scuffs on objects — a marked phone case, a scuffed shoe, a scratch across a product shot. For a heavily damaged photo, work in sections and review each pass at 100%. Physical prints degrade over time. Scratches from handling, creases from storage, cracks from bending, and surface abrasion from albums all leave visible marks that cut across faces, landscapes, and memories. When you scan a scratched print, every line of damage gets captured at full resolution — often more visible on screen than on the physical print. Traditional retouching requires clone-stamping each scratch manually, matching texture and tone along every pixel of every line. For a heavily scratched photo, this can take hours. Magic Eraser's AI analyzes the scratch pattern — its direction, depth, and the detail it covers — and reconstructs the original image content underneath. Brush over the scratches, and the AI fills in faces, clothing, backgrounds, and textures as though the damage never occurred.
Remove scratches in three steps
- 1
Upload your scanned photo
Open Magic Eraser on the web, iOS, or Android and upload the scanned image. For best results, scan at 300 DPI or higher — the more detail the AI has, the better the reconstruction around scratches.
- 2
Brush over the scratches
Paint over each scratch, crack, or crease. For long scratches running across the image, brush along the full length. For clusters of fine scratches, use a wider brush to cover the affected area. Include a small margin beyond the visible damage.
- 3
Erase and review
Tap Erase and the AI removes the scratch marks, reconstructing the faces, textures, and backgrounds underneath. Review the result at full zoom to check that reconstructed areas blend naturally with surrounding detail. Export the restored photo for printing, sharing, or archiving.
Best for
- Scanned family photos with handling scratches across faces
- Vintage prints with surface cracks from age and storage
- Album photos with adhesive damage and peel marks
- Historical photographs being digitized for archives
- Estate and memorial photo restoration projects
- Wedding and event photos damaged in storage or transport
- Photo restoration businesses processing client scans
- School and yearbook photos with creases and fold lines
Tips for removing scratches cleanly
Scan quality matters for scratch removal. A high-resolution scan (300+ DPI) gives the AI more surrounding detail to reference when reconstructing the damaged area. If the scratch runs through a face, the AI uses the undamaged portions of the face to reconstruct the missing detail — the more facial information available, the better the result. For very deep scratches that removed the emulsion (appearing as white lines on the print), the AI reconstructs both the color and texture. Lighter scratches that only scatter light are even easier to correct. Process long scratches in sections if the result varies along the length — different background textures may need separate treatment. For photos with both scratches and fading, remove the scratches first, then use the AI enhancement tools to restore color and contrast. This sequence produces cleaner results than trying to correct everything at once.
Frequently asked questions
- Can it remove deep scratches that go through faces?
- Yes. The AI reconstructs facial features using the undamaged portions of the face as reference. Deep scratches through eyes, noses, and mouths are restored with natural-looking detail, though extremely wide damage areas may need multiple passes.
- Does it work on cracked photos?
- Yes. Cracks, creases, and fold lines follow the same removal process. Brush over the crack line and the AI fills in the missing detail. For photos cracked into multiple pieces, align and merge the scans first, then remove the crack lines.
- Is it free to remove scratches from photos?
- Yes. Magic Eraser's free tier handles scratch removal with daily limits. For bulk restoration projects or professional photo restoration work, paid plans offer unlimited processing.
- What scan resolution should I use?
- 300 DPI is the minimum recommended resolution. 600 DPI produces better results for heavily scratched photos because it captures more surrounding detail for the AI to reference during reconstruction.
- How do I remove scratches from a photo on my phone?
- Open Magic Eraser in any mobile browser or the iOS or Android app, load the photo from your camera roll, and pinch to zoom in on the scratch. Brush along the line with your finger and tap Erase. Zooming in lets you trace a thin scratch precisely without painting over the detail beside it. The result matches the desktop version and saves straight back to your photos.
- Can it remove a scratch or scuff from an object, not just an old photo?
- Yes. The same brush works on surface scratches and scuffs in everyday shots — a scratch across a phone screen or case, a scuff on a shoe or piece of furniture, a mark on a car panel or a product photo. Brush over the scratch and the AI rebuilds the surface around it; on glossy or reflective surfaces, follow the scratch closely and check the highlight line at 100%.
- Can it fix a photo with many scratches at once?
- Yes. Brush over all the scratches you can see and tap Erase once — the AI rebuilds each damaged line from the detail around it. For a print with dense, crisscrossing damage, it's usually cleaner to work in sections: brush an area, review it at 100%, then move to the next, so each region rebuilds against intact surrounding detail.