Remove banding from photos
Erase the visible stair-step bands that ruin smooth gradients in skies, sunsets, and soft studio backdrops. Magic Eraser detects the stepped contour lines left by low bit-depth or aggressive compression and reconstructs a continuous gradient, so the transition reads as smooth tone instead of stacked color blocks.
Last updated
Open Magic Eraser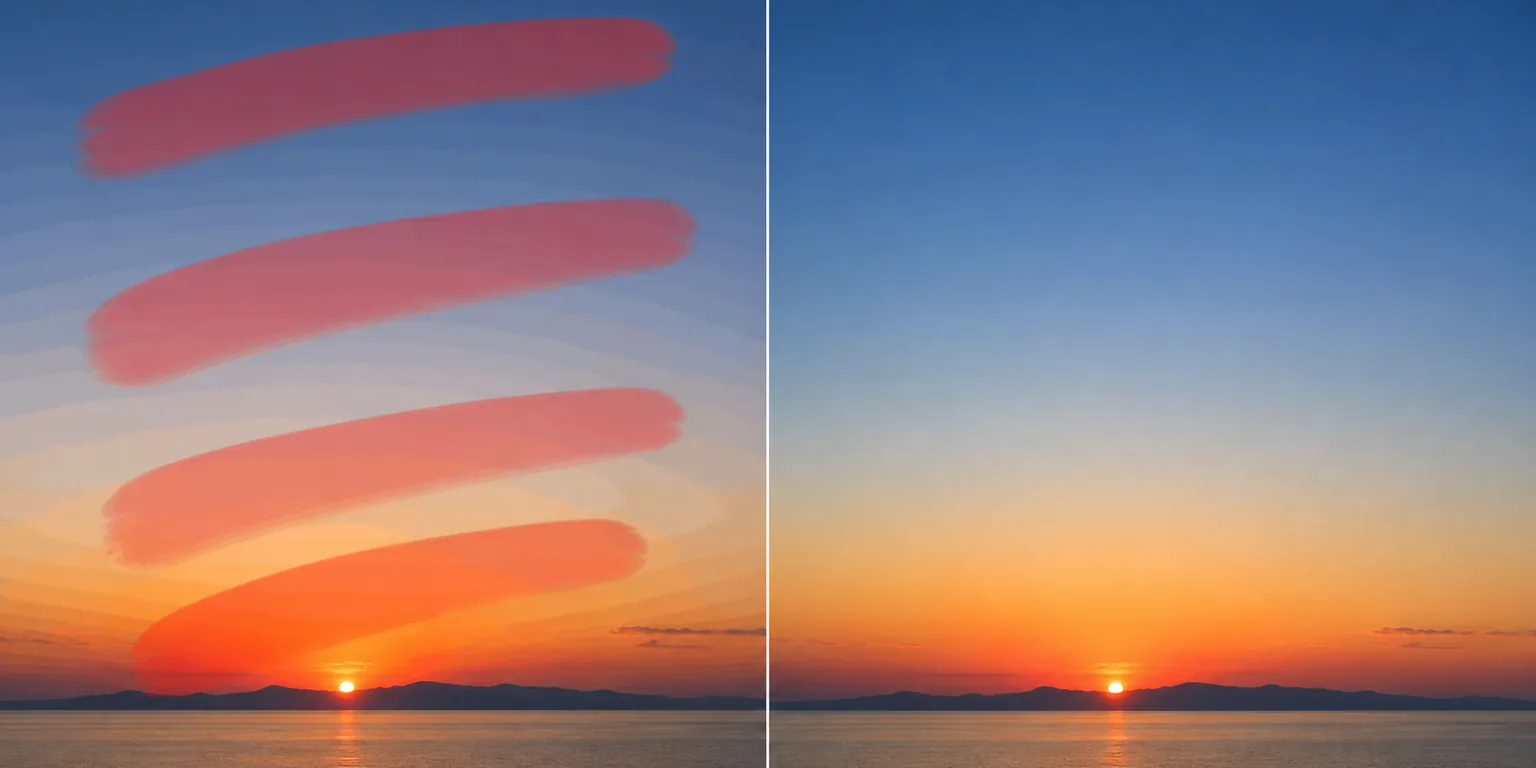
What causes color and gradient banding
Banding is what you see when a smooth gradient — a clear sky, a sunset fade, a soft vignette behind a product — breaks into visible stair-step bands of flat color instead of blending continuously. It happens when there aren't enough tonal values to describe the transition: an 8-bit (or worse, lower) image only has so many steps between two shades, and a slow gradient spreads those few steps across a wide area, so each step becomes a wide, flat stripe with a hard edge. Heavy JPEG or streaming compression makes it worse by quantizing nearby tones into the same value, and screenshots, gradient backgrounds, and exports from low-bit-depth pipelines are the usual suspects. Unlike JPEG artifacts, which show as 8×8 blocks and ringing around edges, or grain, which is random speckle scattered across the frame, banding is structured: parallel contour lines that follow the shape of the gradient. Magic Eraser targets exactly that structure, smoothing the steps back into a clean, continuous gradient while leaving real detail alone.
Remove banding in three steps
- 1
Upload the banded image
Open Magic Eraser on the web, iOS, or Android and upload the photo. It works on skies, sunsets, gradient backgrounds, soft studio backdrops, and any smooth tonal area where the bands appear.
- 2
Brush across the bands
Paint over the region where the stair-step bands are visible. Drag the brush across the whole gradient — including the flat stripes and the hard edges between them — so the AI sees the full run of steps it needs to smooth, not just one band.
- 3
Erase and review
Tap Erase and the AI rebuilds a continuous gradient in place of the steps. Check the smoothed area at full zoom to confirm the contour lines are gone and the transition is even, then export the cleaned-up image.
Best for
- Smoothing stair-step bands in clear skies and sunset gradients
- Cleaning soft gradient backgrounds behind product and portrait shots
- Fixing banding introduced by heavy JPEG or streaming compression
- Repairing low-bit-depth exports, screenshots, and gradient wallpapers
- Evening out contour lines in studio backdrops and vignettes
- Recovering smooth tone in flat, evenly-lit areas of a photo
- Prepping graphics with gradient fills before publishing or printing
- Removing posterization-style steps in dark shadow falloff
What to expect from banding removal
Banding removal works best on broad, smooth areas where the AI has room to interpolate a continuous gradient — wide skies and soft backdrops reconstruct cleanly because there's no competing detail to preserve. The harder the banding (very few tonal steps, very wide stripes), the more the AI has to invent tone that was never captured, so extreme posterization in deep shadows may not fully resolve and can leave faint residual steps. Brush across the entire gradient rather than a single stripe: smoothing one band in isolation can create a new visible seam where the repaired area meets the untouched steps next to it. Where banding overlaps real texture — clouds, foliage, fabric weave — expect a trade-off, since the tool can soften genuine detail along with the steps; keep the brush on the flat tonal regions for the best result. As with any generative repair, Magic Eraser produces a plausible smooth gradient rather than recovering the original high-bit-depth data that compression discarded — it's a convincing reconstruction, not a true restore of lost values. For the cleanest output, export to a high-quality format afterward so the smoothed gradient isn't immediately re-banded by another round of compression.
Frequently asked questions
- How is banding different from JPEG artifacts?
- Banding is structured stair-step contour lines that follow a smooth gradient — think parallel stripes across a sky. JPEG artifacts are 8×8 blocks and ringing that cluster around hard edges. They often appear together, but banding lives in the smooth areas while artifacts live around detail. Magic Eraser handles each: brush the bands for banding, and use the jpeg-artifacts flow for blocky edges.
- Why did banding appear after I exported or compressed the file?
- Compression quantizes nearby tones into the same value, collapsing a smooth gradient into a few flat steps. Low-bit-depth exports do the same by limiting how many shades are available. That's why a gradient that looked fine on screen can show hard bands once saved as a compressed JPEG or low-bit PNG.
- Will it bring back the original smooth gradient exactly?
- Not exactly. The tonal detail lost to low bit-depth or compression isn't in the file anymore, so the AI reconstructs a plausible continuous gradient rather than recovering the original values. On broad, smooth areas the result is hard to distinguish from a true gradient; on severe posterization it's a strong improvement but may leave faint residual steps.
- Is banding removal free?
- Yes. Magic Eraser's free tier smooths color and gradient banding on web, iOS, and Android. Upload the image, brush across the bands, and export the cleaned-up gradient at no cost.