
Reduce dark circles in photos
Reduce visible under-eye shadows and discoloration in portraits, headshots, and professional photos. Magic Eraser edits the image area you brush while keeping natural skin texture and under-eye contours where the source photo supports it.
Last updated
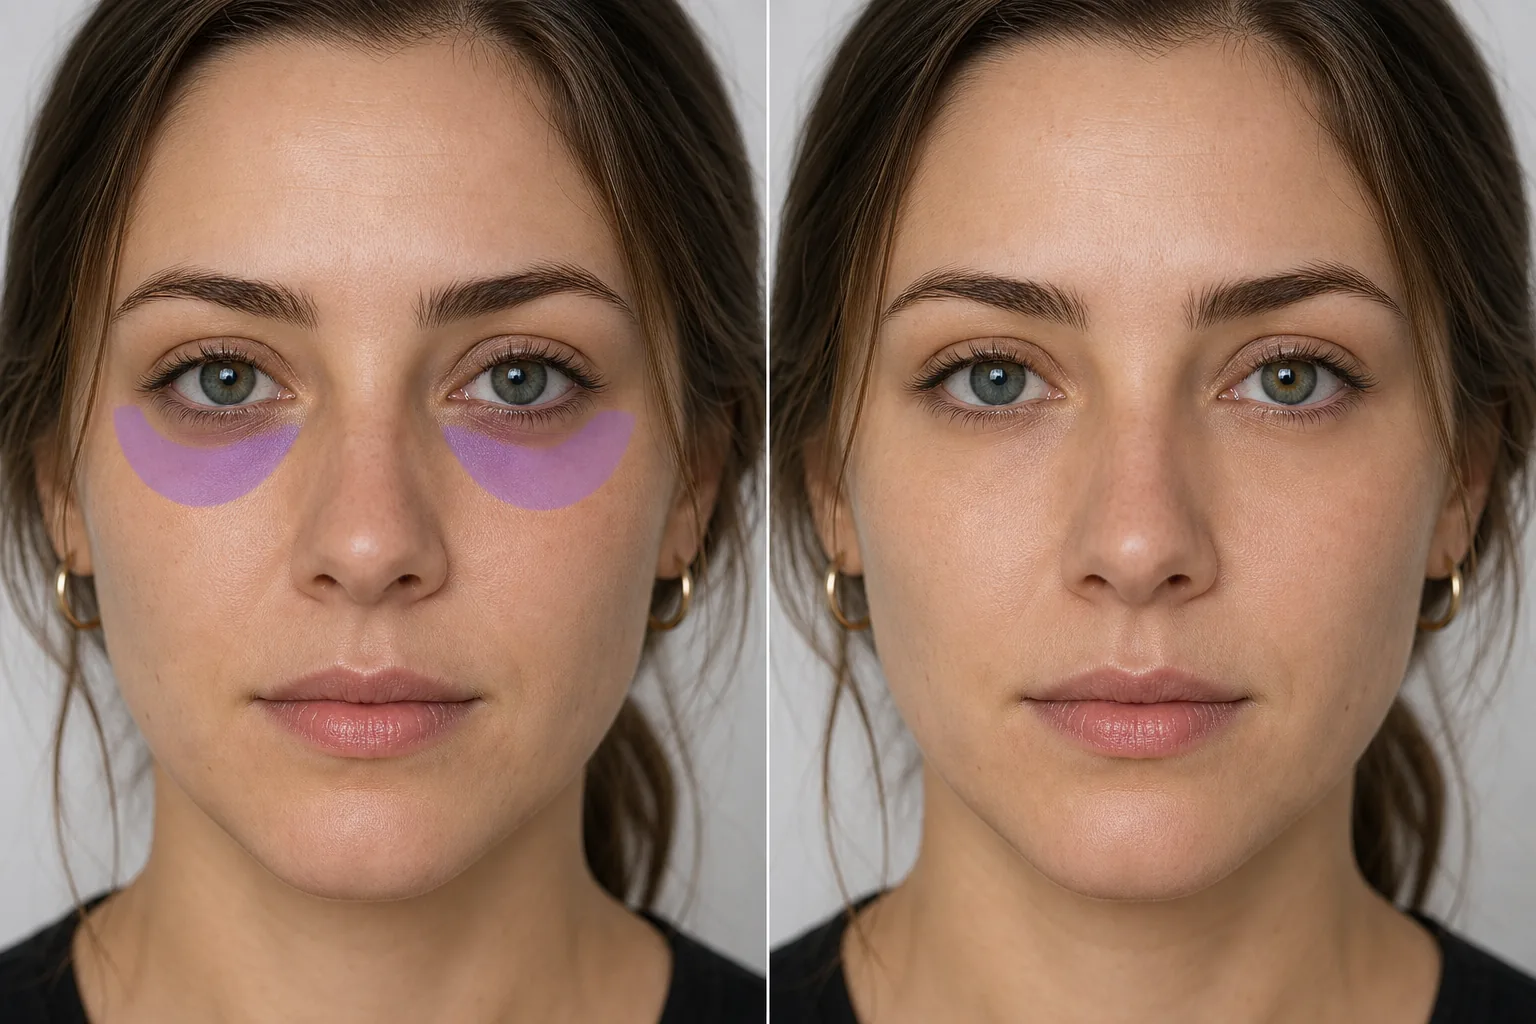
How to reduce dark circles in a photo
To reduce dark circles in a photo, open Magic Eraser on the web, iOS, or Android, upload your portrait, brush over the visible under-eye shadow or discoloration, and let the AI soften that area in the image while preserving natural eye-socket contour and skin texture where possible. This edits the photo only — it changes the appearance of pixels in the image and does not affect your actual under-eye area or skin. For the most natural result, reduce rather than erase: a little shadow under the eye is normal, and fully flattening it can make a face look masked. Keep the portrait recognizable, especially for headshots and ID-style photos. Visible dark circles are a common portrait retouching request because lighting, camera angle, and shadows can make the under-eye area look darker in a photo than intended. Overhead lights can cast deeper shadows into the eye-socket area, while flash can create different contrast issues. Traditional retouching uses careful dodge-and-burn work with color correction to reduce the dark tone while maintaining natural contour. Magic Eraser supports a targeted workflow: brush over the dark area in the photo and review the softened discoloration while keeping the natural eye-socket contour and skin texture where the source image allows.
Reduce dark circles in three steps
- 1
Upload your portrait
Open Magic Eraser on the web, iOS, or Android and upload the headshot or portrait with visible under-eye shadows or discoloration.
- 2
Brush under the eyes
Paint over the darkened area under each eye in the photo. Follow the natural curve of the under-eye area. Include the visible discolored zone but avoid brushing over the lower eyelid crease so the image keeps a believable lid line.
- 3
Erase and review
Tap Erase and review how the AI reduces visible discoloration in the brushed area. Check the photo at full size so both sides still look natural and the under-eye contour has not been flattened.
Best for
- Professional headshots where lighting makes under-eye shadows look stronger
- Wedding portraits with visible under-eye discoloration in the image
- Corporate team photos that need consistent, natural-looking portrait edits
- Acting headshots where under-eye shadows distract from the expression
- LinkedIn and social media profile photos
- Video call screenshots and virtual event portraits
- Passport and ID-style photos where flash emphasizes under-eye shadows
- Event photos from early morning or late night occasions
Tips for natural dark circle correction
The goal is reduction, not elimination. Completely removing all shadow under the eyes can look unnatural because the eye socket creates normal tonal depth in a photo. Aim for a natural image edit that softens visible discoloration without making the area look airbrushed. Brush precisely along the dark area — going too wide onto the cheeks or too high onto the lower lid can make the photo look distorted. For very deep purple or brown discoloration in the image, review one pass before applying more editing. If the circles appear with raised under-eye contours, focus the edit on discoloration; the contour may remain because it is part of the photographed structure. For harsh overhead lighting, adjust the overall image first if needed, then use targeted correction under the eyes.
Frequently asked questions
- Will it look like I'm wearing concealer?
- Not if the edit is kept subtle. The AI reduces visible dark tone in the image while preserving natural skin texture and the under-eye contour where possible, so the photo should not look like a heavy makeup effect.
- Can it change bags under the eyes too?
- Magic Eraser is best used here for visible discoloration and shadow in the photo. Raised under-eye contours are part of the photographed structure, so avoid promising or expecting a physical change; review the image and keep any reduction subtle.
- Does it work on both eyes equally?
- Brush each eye's under-eye area separately for the most natural result. The AI processes each brushed area independently, matching the edit to that side's tone and lighting. Keep the brush below the lower lash line, avoid painting into the eyeball or catchlight, and use a lighter second pass only if one side still looks darker in the photo.
- Does this edit affect my actual under-eye area?
- No. Magic Eraser edits the uploaded image only. Upload the photo, brush the visible under-eye shadow or discoloration, tap Erase, and review the result in the image. It does not change your actual skin, sleep, allergies, or any physical feature.