写真のゴミを取り除く
スキャンした家族写真に点在するほこりの斑点、風景写真のセンサーの塊、製品写真の表面のほこり、スタジオの背景の糸くずを取り除きます。 Magic Eraser は数百個の塵埃を数秒で除去します。各塵埃を 1 つずつクローンスタンプしたり、手動でスポット修復パスを実行したりする必要はありません。
最終更新日
Magic Eraser を開きます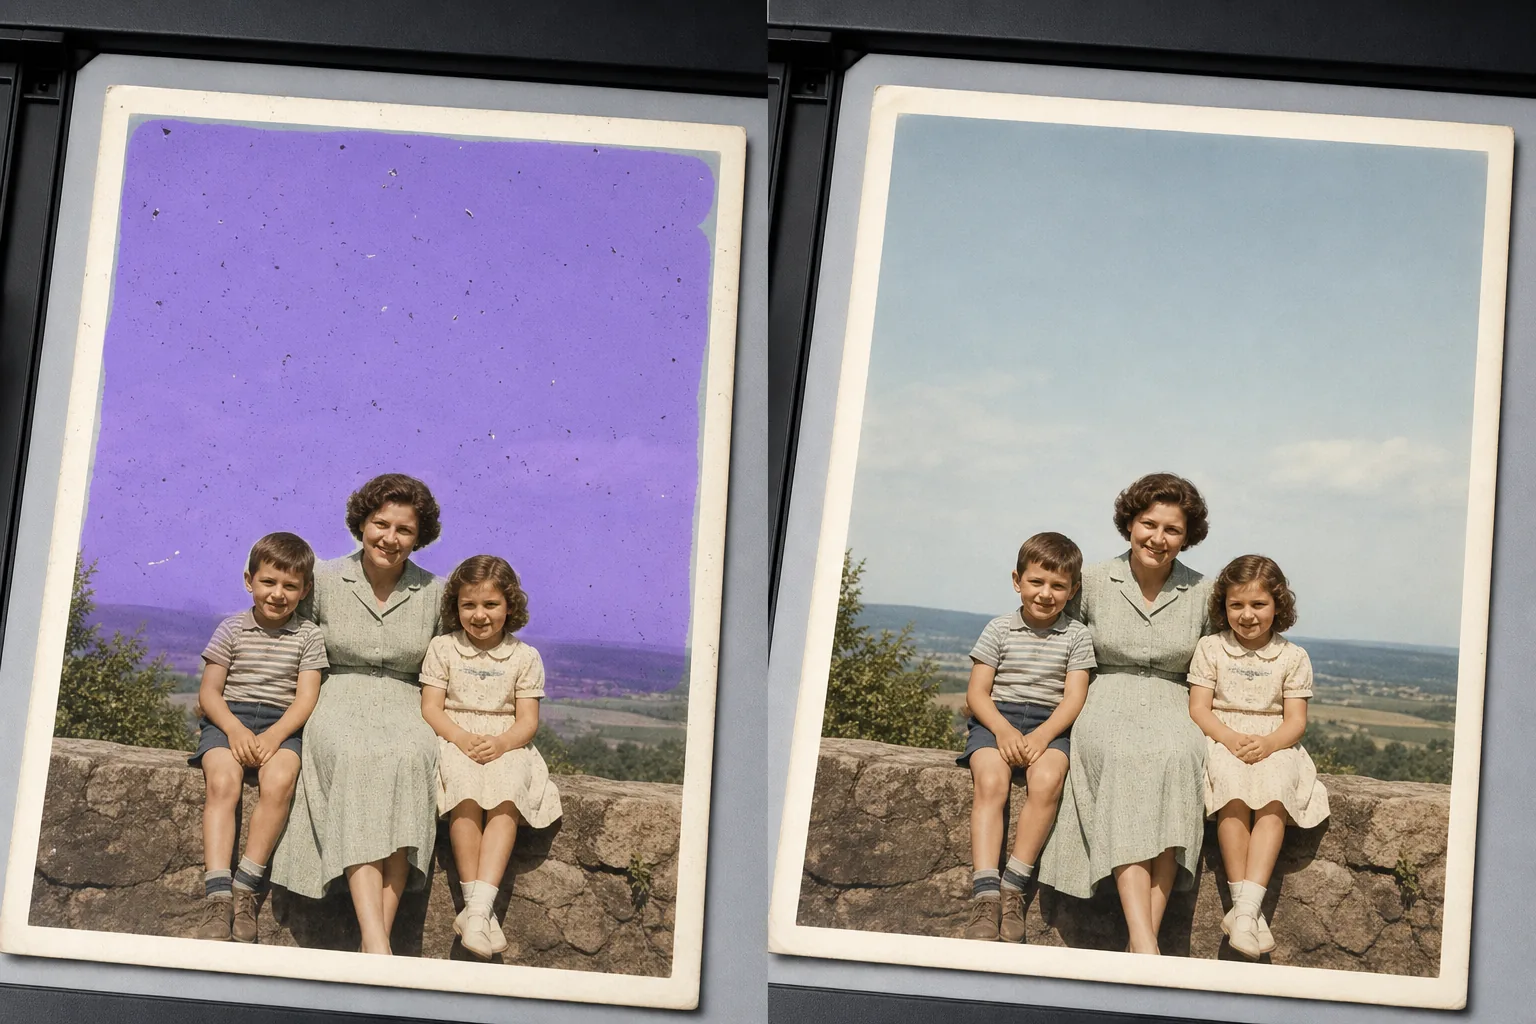
塵埃が大規模な手動編集に勝てない理由
写真からホコリやゴミの跡を消すには、Web版・iOS・AndroidのいずれかでMagic Eraserを開いて画像をアップロードし、気になる部分——ホコリが浮いた空、スキャンした古いプリント、商品の背景など——をブラシでなぞるだけ。AIが下地の質感を保ったまま、細かな点を一度のパスでまとめて消し去ります。無料で、登録も不要です。空や無地の壁、スタジオのスイープなど均一な部分が最も得意で、AIが表面をきれいに再構築します。細かいディテールの上に乗ったゴミも、違和感のない形で自然に補完されます。点が多いスキャン画像の場合は、最も高解像度のコピーから始め、区切りながらブラシでなぞり、ズームインして仕上がりを確認するのがおすすめです。 単一の塵の斑点は簡単にクローンスタンプできます。空に 300 個の斑点があり、均一な背景に 200 個の斑点がある古い写真をスキャンした場合は、別の問題になります。各斑点には独自のクローン ソースが必要であり、各ソースは周囲のテクスチャと一致する必要があり、作業は斑点の数に比例してスケールされます。 Magic Eraser は、影響を受けるエリア全体を領域として処理します。つまり、空、壁、スタジオのスイープ、またはスキャンの影響を受ける部分をブラシで塗りつぶし、AI が下層のテクスチャを維持しながら 1 回のパスですべての斑点を除去します。風景の空のデジタルセンサーのゴミ、古い写真のスキャナーのガラスのゴミ、製品写真の表面のゴミ、スタジオの背景の糸くずに効果があります。
3ステップでホコリを除去
- 1
写真をアップロードする
Web、iOS、または Android で Magic Eraser を開き、スキャンした古い写真、デジタル風景、製品ショット、またはスタジオ画像をドロップします。 JPEG、PNG、HEIC、WebP、および TIFF (サポートされている場合) が受け入れられます。
- 2
ほこりの多い部分をブラシで拭きます
個々の斑点を軽くたたくのではなく、影響を受けた領域 (空全体、均一な壁、スタジオの背景、スキャンしたネガの透明な領域) をペイントします。領域上の幅広のブラシは AI に「この表面全体を掃除する」と指示し、シングル パスとして実行されます。斑点ごとに軽くたたくと速度が遅くなり、テクスチャの再構築の一貫性が低くなります。複数の領域 (空と前景) に塵が広がっているスキャンの場合は、各領域を順番にブラシします。
- 3
「消去して検査」をタップします
Magic Eraser は、ブラシをかけた領域内のすべての斑点を数秒で除去し、その下にある空のグラデーション、壁のテクスチャ、またはスタジオのスイープを維持します。 100% ズームで残留斑点をスキャンし、欠けた領域で 2 回目のパスを実行してから、フォト アルバム、製品カタログ、ポートフォリオ、またはアーカイブ用にフル解像度でエクスポートします。
こんな方に最適
- スキャナーのガラスや元の印刷面からの傷やほこりのある古い家族写真をスキャンした
- ネガフィルムまたは OHP フィルムに埃が蓄積したビンテージ フィルムのスキャン (35mm、中判、大判)
- 空にセンサーダストが見えるデジタル風景や天体写真のショット
- 光沢のある背景または暗い背景で表面の埃が見える商品写真
- 掃き出し紙に糸くず、髪の毛、またはほこりが付着したスタジオの背景ショット
- スキャナーのガラス上の埃が余白に見える文書や本のページのスキャン
- 長年保管されていたアーカイブの塵を利用したスライドフィルムのデジタル化
- 高倍率でレンズ要素上の埃が見える顕微鏡写真やマクロ写真
エッジケースとヒント
ゴミの除去は、通常、斑点が小さく、暗く、背景が比較的均一であるため、AI 写真編集の中で最もきれいな処理の 1 つです。 2 つの特殊なケースでは、特に注意する必要があります。第一に、「斑点」が実際には被写体の細かい部分(空の遠くの鳥、風景の中の小さな花、天体写真のかすかな星)である場合、AI はそれを塵として扱い、除去する可能性があります。粉塵が本当に粉塵であると確信できる領域のみをマスクし、エクスポートする前に全数検査を慎重に行ってください。 2 番目: スキャンされた古い写真に傷と埃が両方とも一緒に表示されている場合は、両方をブラシで上書きします。AI は傷の修復と埃の除去を同じパスで処理しますが、傷の修復では周囲のテクスチャと一致させるためにタッチアップ パスが必要になる場合があるため、検査ステップに余裕を持ってください。アーカイブおよび復元作業の場合は、元のスキャンをマスターとして保存し、クリーンアップされたバージョンを別のファイルとして保存します。アーカイブ基準 (IFLA、写真保存に関する NEDCC ガイドライン) は、クリーニングされた派生物と並行してオリジナルを保存することを一貫して推奨しています。
よくある質問
- 写真のゴミ取りは無料ですか?
- はい。 Magic Eraser の無料利用枠では、1 日の使用量制限付きでほこりの除去がカバーされます。プレミアム (年間 29.99 ドル) にアップグレードすると、制限がなくなり、高解像度のエクスポートが可能になります。これは、印刷された家族写真の修復、製品カタログ、アーカイブのデジタル化プロジェクトに役立ちます。
- 何百もの塵がついた古いスキャン写真をきれいにすることはできますか?
- はい。影響を受ける各領域(空、均一な背景、ほこりが頬にある場合は顔、壁)をブラシで塗り、消去します。 AI は、マスクされた領域内のすべての斑点を 1 回のパスで除去します。写真の多くの領域にゴミが広がっているスキャンの場合は、領域ごとにブラシと消去のパターンを実行します。これは、斑点ごとにクローン スタンプを作成するよりもはるかに高速で、より一貫性のあるテクスチャの再構築が生成されます。
- 同じスキャン上の傷についてはどうですか?
- キズやホコリをブラシで一緒に落とします。 Magic Eraser は両方を同じパスで処理します。つまり、スクラッチは細長いダストとして AI に読み取られ、再構築ロジックは同様です (基礎となるテクスチャを保持し、線状欠陥または点欠陥を除去します)。特に布地、レンガ、芝生などのテクスチャーのある表面では、スクラッチ修復では周囲のテクスチャーの方向に合わせるためにタッチアップが必要になる場合があるため、100% ズームでの検査時間に余裕を持ってください。
- きれいになった空、壁、背景は明らかに編集されているように見えますか?
- ほとんどの写真では、いいえ、AI は基礎となるグラデーション、粒子パターン、色を保持します。表示される可能性のある 2 つのケース: 細かい雲のテクスチャまたは指向性粒子のある空で、リビルドによってパターンがわずかに柔らかくなる可能性があります (キャラクターを復元するために、より小さなブラシで 2 回目のパスを実行します)。意図的に微妙なテクスチャ(独自の粒子を持つマットな素材)を使用した製品写真では、AI が意図した以上に滑らかになる可能性があります(よりしっかりとマスクし、より細かいブラシでタッチアップを実行します)。
- クリーンアップしたバージョンだけでなく、オリジナルのスキャンも保存しておく必要がありますか?
- はい。アーカイブ、修復、家族史プロジェクトの場合、IFLA と NEDCC の写真保存ガイドラインは、オリジナルのデジタル マスターをクリーニング済みの派生物と並べて保管することを推奨しています。明確なファイル命名規則 (`IMG_1942_original.tif` および `IMG_1942_cleaned.tif`) を使用することで、数十年後も関係が明確になります。オリジナルは歴史的な記録です。クリーニングされたバージョンが作業用のプリントになります。