Remove eye bags from photos
Calm the puffiness and swelling under the eyes in portraits, selfies, and headshots. Magic Eraser softens the bag and the small shadow it casts, then rebuilds smooth under-eye skin with AI so the edit reads as a well-rested look rather than an obvious retouch.
Last updated
Open Magic Eraser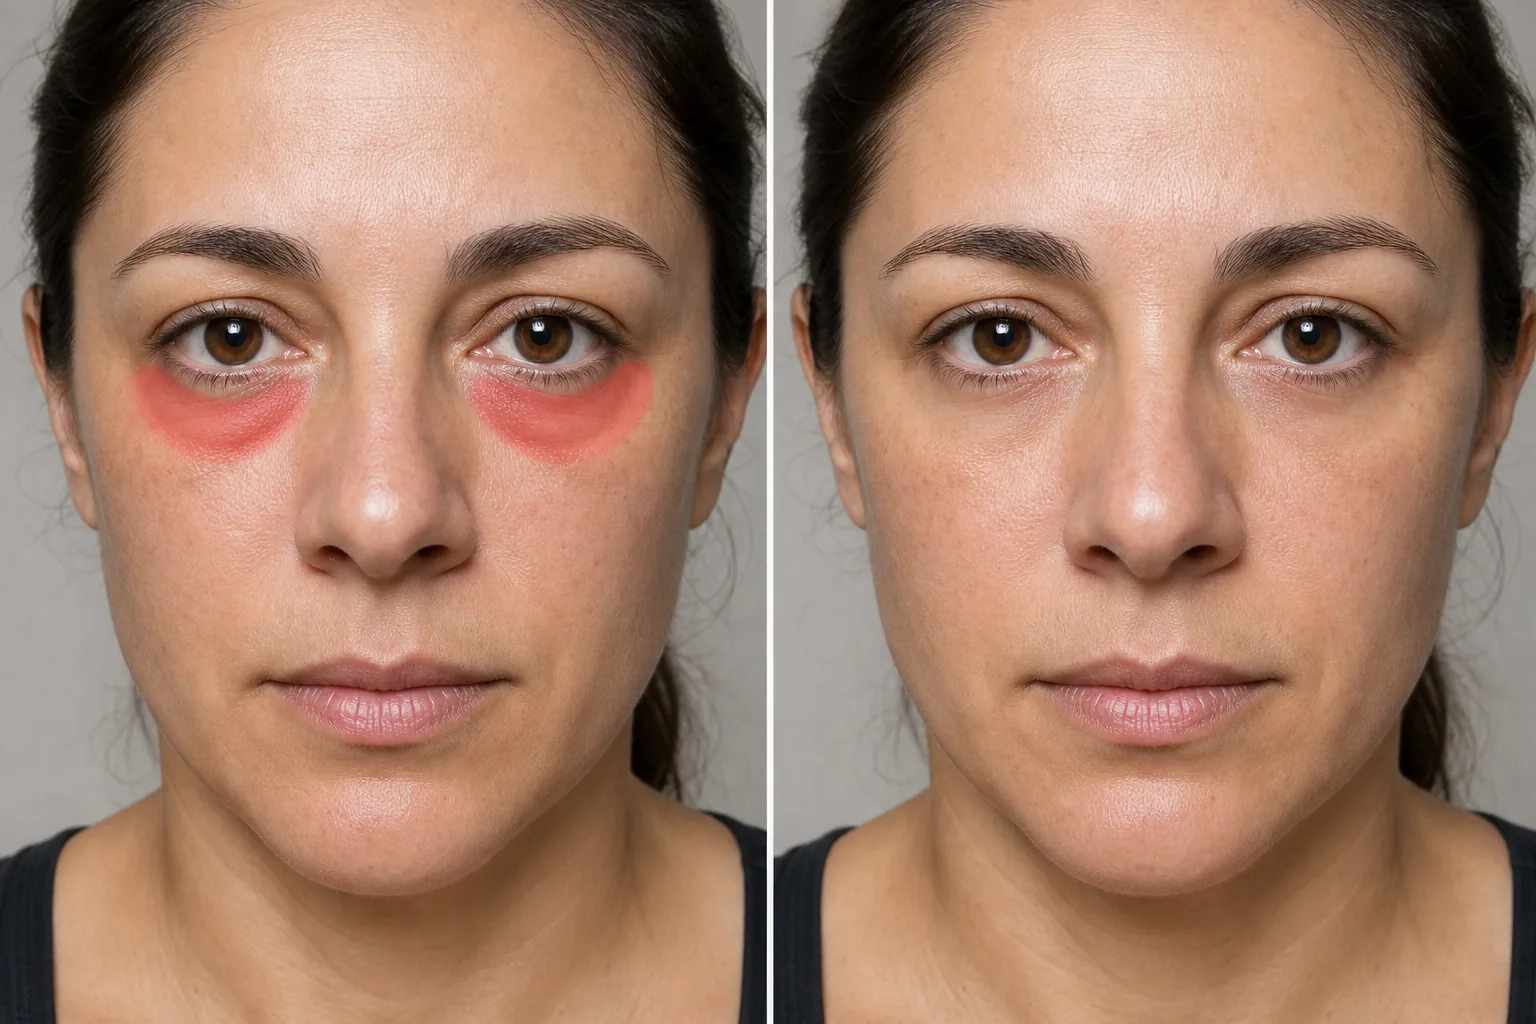
Why eye bags show up in photos
Under-eye bags are the little ridges of puffiness or swelling that sit just below the lower lash line, and a camera tends to make them look worse than they feel. A short night, salty food, allergies, or simply a long day leave the area slightly swollen, and then hard overhead light or an on-camera flash carves a shadow under the puff that exaggerates the whole shape. The result is a tired-looking frame even when you feel fine. For a profile photo, a work headshot, a passport-style portrait, or a picture you want to post, that one puffy moment can spoil an otherwise good shot. Instead of reshooting or waiting for a better night's sleep, Magic Eraser lets you work directly on the under-eye area: it eases the raised bag, lifts the shadow line beneath it, and reconstructs the surrounding skin so the transition from cheek to lower lid stays smooth. It is worth being clear about what this is — eye-bag removal is retouching the look of puffiness in a single photo, not a change to your face or your health.
Remove eye bags in three steps
- 1
Upload your portrait
Open Magic Eraser on the web, iOS, or Android and upload the portrait or selfie. It works on close-up faces, full headshots, and people pictured in group photos.
- 2
Brush the puff and its shadow
Paint over the raised bag and the shadow that falls just under it. Keep the brush below the lash line and away from the eyelid and lashes — covering the puff and its shadow, not the eye itself, gives the most natural result.
- 3
Erase and review
Tap Erase and the AI flattens the puffiness and rebuilds the under-eye skin underneath. Check that some natural contour remains so the eye still looks real, ease off if it reads too smooth, then export the retouched portrait.
Best for
- Freshening up tired-looking selfies after a short night
- Softening under-eye puffiness in professional headshots
- Calming swelling that hard flash or overhead light exaggerates
- Touching up profile photos and dating-app pictures
- Reducing allergy or post-cry puffiness in a single portrait
- Evening out one person's under-eye area in a group photo
- Subtle retouching that keeps real under-eye skin texture
- Preparing a rested-looking portrait when only one frame is usable
What to expect from eye-bag removal
Eye bags are about volume and the shadow that volume casts, which is different from dark circles — those are color or pigment under the eye, and a different brush target. Magic Eraser works best on bags when you keep the edit gentle and let the surrounding skin guide the reconstruction. A clear under-eye area with even light rebuilds cleanly, because the AI can extend cheek tone and a soft shadow into the flattened region. Leave a hint of natural contour in place; erasing every shadow makes the eye look flat or pasted on, which is the tell-tale sign of over-editing. Stay below the lash line and off the eyelid, since brushing the eye itself can smear lashes or distort the lid. Strong, directional shadows and heavy makeup can be harder for the AI to read, so those may need a more careful brush. As with all generative retouching, the tool produces a plausible, flattering reconstruction of the area rather than an accurate medical picture of your skin — it softens how puffiness looks in one photo, and it cannot diagnose or treat the swelling itself. Treat the output as a portrait edit, not a health claim.
Frequently asked questions
- What is the difference between eye bags and dark circles?
- Eye bags are puffiness or swelling — a raised ridge of volume under the eye — while dark circles are color or pigment in the same area. Magic Eraser handles both, but you brush them differently: for bags, target the raised puff and its shadow; for dark circles, target the discolored skin.
- Will it look obviously edited?
- Not if you keep it subtle. Because Magic Eraser rebuilds real skin texture and a soft shadow instead of blurring, light edits read as a rested look. Leave a little natural contour under the eye — erasing it entirely is what makes a face look flat and retouched.
- Should I brush the eyelid or lashes?
- No. Stay below the lash line and cover only the puffy bag and the shadow beneath it. Painting over the eyelid or lashes can smear them or distort the eye, so let the AI smooth just the under-eye transition.
- Is eye-bag removal free?
- Yes. Magic Eraser's free tier handles under-eye retouching on web, iOS, and Android. Upload your portrait, brush the puff and its shadow, and export the result at no cost.