एआई के साथ एक छवि को कैसे उन्नत करें
उच्च-डीपीआई स्क्रीन पर मुद्रित या प्रदर्शित होने पर कम-रिज़ॉल्यूशन वाली तस्वीरें पिक्सेलयुक्त दिखती हैं। एआई अपस्केलिंग वास्तविक विवरण जोड़ते हुए छवियों को उनके मूल रिज़ॉल्यूशन को 2x या 4x तक बढ़ा देता है - न केवल पिक्सेल को बड़ा बनाता है, बल्कि बारीक विवरण उत्पन्न करता है जो मूल में नहीं था।
Last updated
अब अपस्केल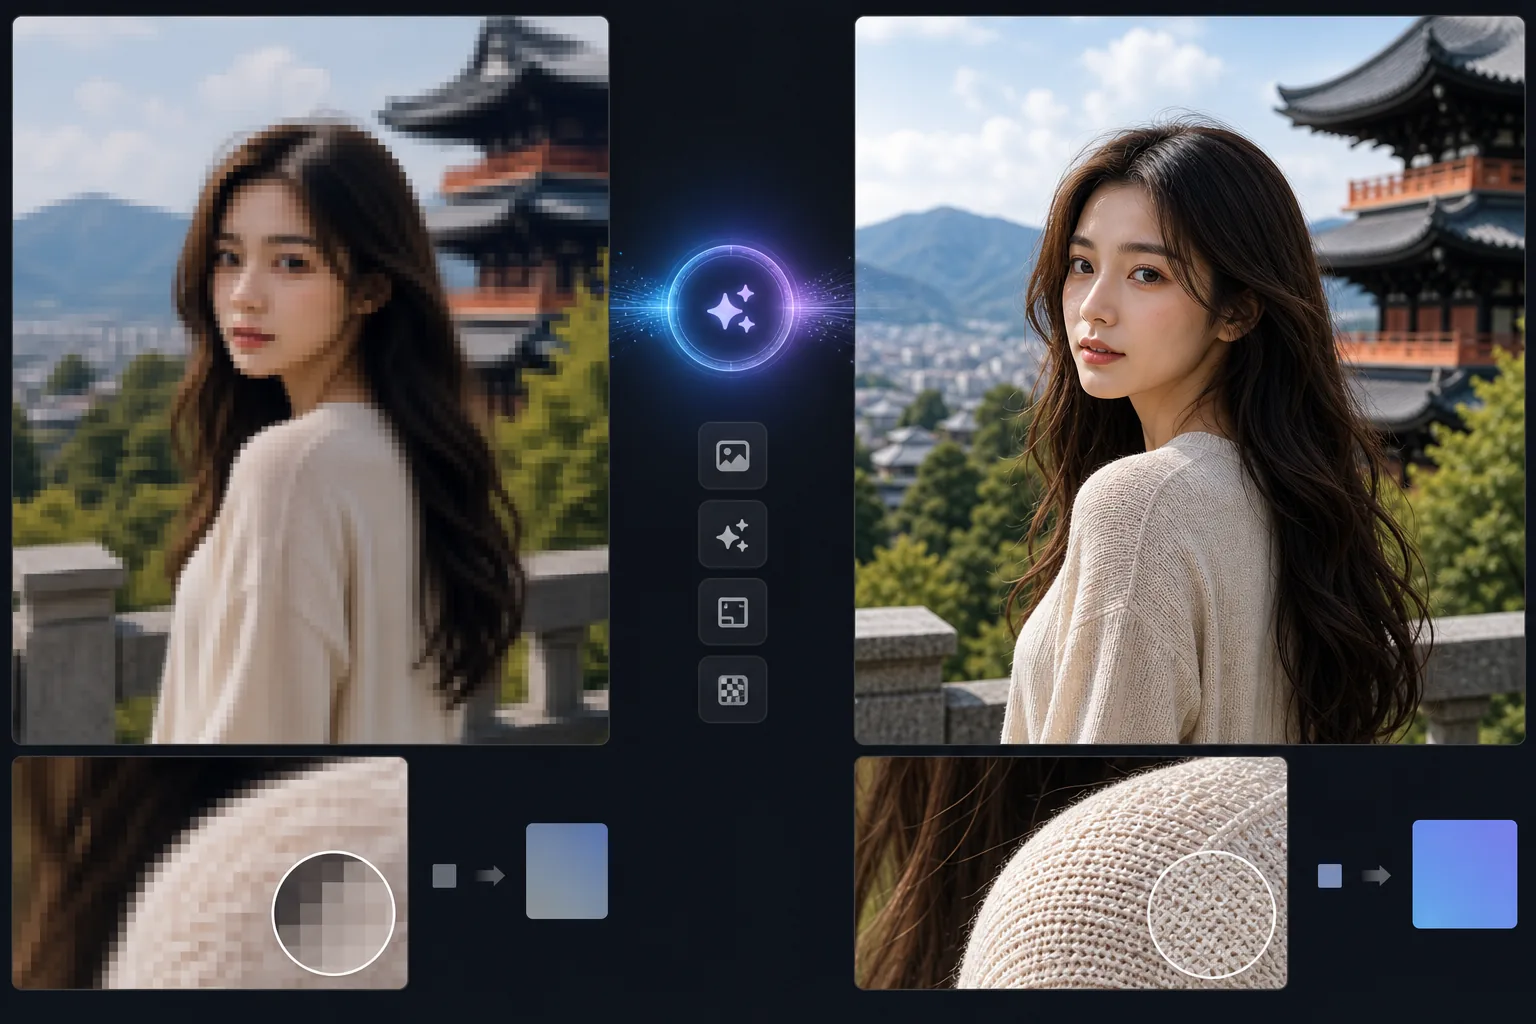
पारंपरिक उन्नयन विफल क्यों होता है और एआई सफल क्यों होता है?
किसी इमेज को अपस्केल करने के लिए, वेब, iOS या Android पर Magic Eraser खोलें, अपनी कम-रिज़ॉल्यूशन वाली फ़ोटो अपलोड करें, अपस्केल फ़ैक्टर चुनें (2x या 4x), और बड़ी वर्शन डाउनलोड करें — AI सिर्फ़ पिक्सल खींचने के बजाय सचमुच की बारीक डिटेल जोड़ता है। यह मुफ़्त है, साइनअप की ज़रूरत नहीं। फ़ैक्टर जितना ज़्यादा होगा, AI को रिकवर करने के बजाय उतनी ही ज़्यादा डिटेल खुद से बनानी पड़ती है, इसलिए किसी ठीक-ठाक फ़ोटो का 2x अपस्केल हक़ीक़त के सबसे क़रीब रहता है, जबकि बड़ी छलांगें शार्प तो दिखती हैं पर असली ओरिजिनल से और दूर हट जाती हैं। आपके पास जो सबसे अच्छी कॉपी हो उससे शुरू करें, और भारी अपस्केलिंग को एक भरोसेमंद बढ़ोतरी मानें, रिकवर की हुई इमेज नहीं। पारंपरिक छवि अपस्केलिंग (बाइक्यूबिक, बिलिनियर इंटरपोलेशन) विस्तार करते समय अंतराल को भरने के लिए पड़ोसी पिक्सल का औसत निकालती है। यह धुंधली, नरम छवियां उत्पन्न करता है क्योंकि कोई नया विवरण नहीं बनाया जाता है - एल्गोरिदम केवल मौजूदा पिक्सेल के बीच सुचारू होता है। एआई अपस्केलिंग यह समझने के लिए लाखों उच्च-रिज़ॉल्यूशन छवियों पर प्रशिक्षित गहन शिक्षण मॉडल का उपयोग करता है कि उच्च रिज़ॉल्यूशन पर कौन सा बारीक विवरण मौजूद होना चाहिए। जब एआई किसी चेहरे को बेहतर बनाता है, तो यह त्वचा की बनावट, पलकों का विवरण और बालों की किस्में जोड़ता है जो मूल रिज़ॉल्यूशन में दिखाई नहीं देते थे। जब यह पाठ को उन्नत करता है, तो यह अक्षरों के किनारों को स्पष्ट, पठनीय रूपों में तेज करता है। परिणाम एक ऐसी छवि है जो ऐसी दिखती है जैसे इसे मूल रूप से उच्च रिज़ॉल्यूशन पर कैप्चर किया गया था।
तीन चरणों में अपस्केल
- 1
छवि अपलोड करें
वेब, iOS या Android पर Magic Eraser खोलें। वह कम-रिज़ॉल्यूशन छवि अपलोड करें जिसे आप बड़ा करना चाहते हैं - एक वेब डाउनलोड, एक पुराना फ़ोन फ़ोटो, एक क्रॉप की गई छवि, या एक छोटा थंबनेल। JPEG, PNG और WebP समर्थित।
- 2
अपस्केल फैक्टर चुनें
2x या 4x अपस्केलिंग चुनें. 2x दोनों आयामों को दोगुना कर देता है (एक 500x500 छवि 1000x1000 बन जाती है)। 4x उन्हें चौगुना कर देता है (500x500 2000x2000 हो जाता है)। उच्च कारक फ़ोटो पर सबसे अच्छा काम करते हैं; ग्राफिक्स और टेक्स्ट के लिए 2x अधिक सुरक्षित है।
- 3
प्रोसेस करें और डाउनलोड करें
एआई छवि सामग्री का विश्लेषण करता है और प्रत्येक क्षेत्र के लिए उपयुक्त अतिरिक्त विवरण के साथ उच्च-रिज़ॉल्यूशन संस्करण तैयार करता है - चेहरे पर त्वचा की बनावट, कपड़ों पर कपड़े की बुनाई, पत्ते पर पत्ती का विवरण, वास्तुकला पर तेज धार। नए रिज़ॉल्यूशन पर उन्नत छवि डाउनलोड करें।
के लिए सर्वोत्तम
- पुराने या कम-रिज़ॉल्यूशन वाले डिजिटल फ़ोटो को बिना पिक्सेलेशन या धुंधलापन के बड़े आकार में प्रिंट करना
- बड़ी छवि के एक विशिष्ट क्षेत्र में ज़ूम करने पर रिज़ॉल्यूशन खो देने वाली क्रॉप की गई फ़ोटो को बड़ा करना
- पुराने फ़ोन फ़ोटो में सुधार करना (शुरुआती स्मार्टफ़ोन कैमरे आधुनिक उपकरणों की तुलना में बहुत कम रिज़ॉल्यूशन पर कैप्चर किए गए)
- उच्च-डीपीआई रेटिना डिस्प्ले के लिए वेब छवियां तैयार करना जहां मानक रिज़ॉल्यूशन नरम दिखता है
- पुनर्मुद्रण या संग्रह के लिए उपयोग योग्य रिज़ॉल्यूशन पर वापस थंबनेल या सोशल मीडिया छवियों को अपग्रेड करना
सर्वोत्तम परिणामों के लिए युक्तियाँ
उपलब्ध सर्वोत्तम स्रोत सामग्री से शुरुआत करें। यदि आपके पास थंबनेल और मध्यम-रिज़ॉल्यूशन संस्करण दोनों हैं, तो माध्यम का उपयोग करें - एआई के पास काम करने के लिए अधिक डेटा है। फ़ोटो के लिए, 4x अपस्केलिंग अच्छी तरह से काम करती है क्योंकि AI प्राकृतिक बनावट को समझता है और ठोस विवरण उत्पन्न कर सकता है। ग्राफिक्स, लोगो और टेक्स्ट के लिए, 2x के साथ बने रहें - AI 4x पर फ्लैट-रंग वाले क्षेत्रों पर अवांछित बनावट पेश कर सकता है। जेपीईजी संपीड़न कलाकृतियों को अपस्केलिंग द्वारा बढ़ाया जाता है, इसलिए यदि संभव हो, तो पीएनजी या उच्च गुणवत्ता वाले जेपीईजी से शुरू करें। गंभीर रूप से संपीड़ित छवियों के लिए, अपस्केलिंग से पहले कलाकृतियों को कम करने के लिए एन्हांसमेंट टूल का उपयोग करें।
अक्सर पूछे जाने वाले प्रश्नों
- क्या एआई अपस्केलिंग से वास्तविक विवरण जुड़ता है?
- हाँ। पारंपरिक इंटरपोलेशन के विपरीत, जो केवल पिक्सेल के बीच धुंधला हो जाता है, एआई अपस्केलिंग प्रशंसनीय बारीक विवरण उत्पन्न करता है - त्वचा की बनावट, बालों की किस्में, कपड़े की बुनाई, पत्ती पैटर्न - एआई ने जो सीखा है उसके आधार पर समान सामग्री के उच्च-रिज़ॉल्यूशन संस्करण कैसे दिखते हैं।
- अधिकतम अपस्केल कारक क्या है?
- एक पास में 4x अधिकतम है। बड़े विस्तार के लिए, आप चरणों में अपग्रेड कर सकते हैं (2x फिर 2x), हालांकि प्रत्येक पास के साथ गुणवत्ता घटती जाती है।
- क्या मैं स्क्रीनशॉट या ग्राफ़िक को अपग्रेड कर सकता हूँ?
- हाँ, लेकिन परिणाम भिन्न-भिन्न होते हैं। टेक्स्ट वाले स्क्रीनशॉट 2x पर अच्छी तरह से अपस्केल होते हैं - एआई अक्षर किनारों को तेज करता है। ग्रेडिएंट और आइकन के साथ जटिल यूआई स्क्रीनशॉट में हल्की बनावट आ सकती है। लोगो और सरल ग्राफ़िक्स के लिए, वेक्टर रीड्राइंग एआई अपस्केलिंग की तुलना में अधिक स्वच्छ परिणाम दे सकता है।
- क्या अपस्केलिंग मुफ़्त है?
- हाँ। एआई अपस्केलिंग दैनिक उपयोग सीमा के साथ निःशुल्क स्तर पर उपलब्ध है। प्रीमियम योजनाएं सीमाएं हटाती हैं और बैच अपस्केलिंग की अनुमति देती हैं।
- 2x, 4x और इससे ज़्यादा अपस्केलिंग में क्या फ़र्क़ है?
- यह नंबर बताता है कि हर डाइमेंशन कितनी बढ़ती है: 2x चौड़ाई और ऊँचाई दोनों को दोगुना करता है (कुल पिक्सल 4 गुना), और 4x हर साइड को चार गुना करता है (पिक्सल 16 गुना)। मुख्य ट्रेड-ऑफ़ यह है कि फ़ैक्टर जितना बड़ा होगा, AI को जो असल में मौजूद है उससे दोबारा बनाने के बजाय उतनी ही ज़्यादा डिटेल खुद से गढ़नी पड़ती है। 2x असली इमेज के सबसे क़रीब रहता है और चेहरों या किसी भी ऐसी चीज़ के लिए सबसे सुरक्षित चुनाव है जिसे सटीक दिखना ज़रूरी हो। 4x और इससे आगे (जो चरणों में अपस्केल करके मिलता है) फ़ाइल को बड़ा और शार्प बना देते हैं पर वह उतनी ही ज़्यादा AI की व्याख्या पर आधारित होती जाती है, इसलिए हो सकता है बारीक डिटेल असली सब्जेक्ट से मेल न खाएँ। अपनी आउटपुट साइज़ पूरी करने वाला सबसे छोटा फ़ैक्टर चुनें — जिस रिज़ॉल्यूशन पर आप असल में दिखाएँगे या प्रिंट करेंगे, उससे ज़्यादा अपस्केल करने का कोई फ़ायदा नहीं।