
Comment supprimer l'acné des photos avec AI — Magic Eraser
Apprenez à supprimer l'acné, les boutons et les imperfections cutanées des photos avec AI tout en préservant la texture naturelle de la peau. Guide étape par étape couvrant la suppression des imperfections, le traitement des cicatrices et les pratiques de retouche éthiques pour les portraits et les photos de profil.
SEO & Growth
Vérifié par Magic Eraser Editorial ·
Sommaire
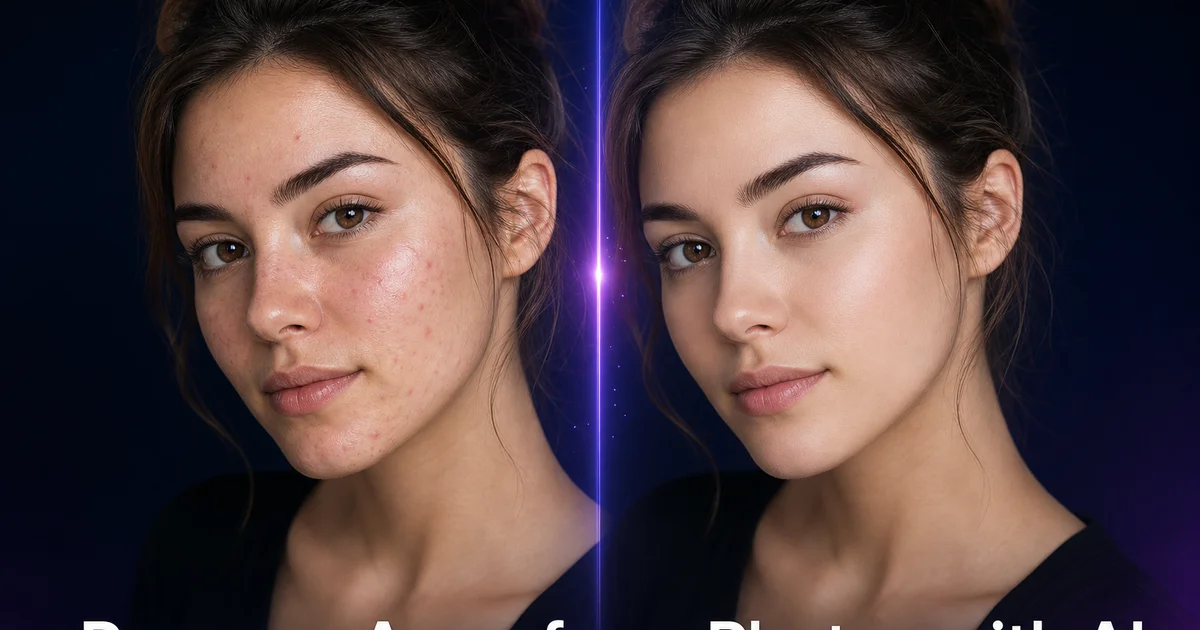
L'acné est l'affection cutanée la plus courante au monde, touchant environ 85 % des personnes entre 12 et 24 ans et un nombre important d'adultes bien dans leur trentaine et leur quarantaine. C'est également la retouche la plus demandée en photographie de portrait. Devant le blanchiment des dents, la réduction des cernes et la suppression des cheveux rebelles combinés. La raison est simple : l'acné est temporaire, mais les photographies sont permanentes. Un bouton qui apparaît et disparaît en une semaine peut persister sur une photo pendant des années. La plupart des gens veulent que leurs photos les représentent tels qu'ils sont habituellement, plutôt que tels qu'ils étaient lors d'une mauvaise journée de peau.
La suppression traditionnelle des imperfections dans Photoshop nécessite l'outil tampon de duplication et le pinceau de retouche. Un échantillonnage manuel minutieux de la peau adjacente pour combler chaque tache. Un retoucheur expert passant cinq à dix minutes par portrait peut produire des résultats naturels, mais la compétence requise est élevée. Un travail de tampon de duplication mal exécuté produit des motifs de répétition visibles, des textures étalées et des décalages chromatiques qui semblent pires que les imperfections d'origine. L'écart entre la retouche experte et le tamponnage amateur est énorme. Il a maintenu la suppression de haute qualité des imperfections hors de portée pour la plupart des photographes amateurs.
AI blemish removal a éliminé cet écart de compétence. Magic Eraser utilise des réseaux neuronaux qui comprennent la texture de la peau, l'éclairage du visage et les motifs de pores pour remplacer chaque imperfection supprimée par un comblement qui correspond à la peau environnante au niveau du pixel. Le résultat est impossible à distinguer d'une peau n'ayant jamais eu d'imperfection. Pas une zone floutée, pas un motif de texture répété, mais une peau saine convaincante qui conserve les pores, les ridules et les variations naturelles qui rendent un visage réaliste. Ce guide couvre le flux de travail complet pour supprimer l'acné des photos tout en conservant la texture naturelle de la peau qui sépare une bonne retouche d'une édition évidente.
- AI blemish removal remplace chaque bouton par une peau générée qui correspond à la texture, au teint, au motif des pores et à la direction de l'éclairage environnants — pas une zone floutée ou une répétition clonée.
- Cibler les imperfections individuelles avec un pinceau serré préserve le caractère de la peau environnante, ce qui rend les résultats naturels plutôt qu'aérographiés.
- L'acné active et les cicatrices d'acné nécessitent des approches différentes : suppression complète pour les imperfections surélevées, lissage subtil de la texture pour les cicatrices creuses et réduction douce du contraste pour les marques sombres post-inflammatoires.
- Le surtraitement est l'erreur la plus courante — la peau réelle a des pores visibles, des ridules et des variations de couleur qui doivent être préservés après la suppression des imperfections.
- Une retouche cohérente sur une série de photos évite l'effet étrange d'une peau parfaite dans une image et d'imperfections visibles dans une autre de la même personne.
Pourquoi AI blemish removal semble plus naturel que la retouche manuelle
L'outil tampon de duplication — la méthode traditionnelle de suppression des imperfections — fonctionne en copiant des pixels d'une zone de l'image et en les collant sur une autre. Le retoucheur sélectionne une zone de peau propre près de l'imperfection, puis peint cette peau propre sur le bouton. Le problème est que la peau n'est pas uniforme. Le motif des pores, l'angle des follicules pileux, la couleur des vaisseaux sanguins sous-cutanés et le gradient lumineux varient tous constamment sur le visage. Un patch de tampon de duplication prélevé à deux centimètres peut avoir une densité de pores légèrement différente, un angle de lumière légèrement différent ou une chaleur de couleur légèrement différente. Un retoucheur expérimenté masque ces différences par un mélange minutieux et de multiples points d'échantillonnage, mais le processus est long et les résultats sont fragiles. Chaque patch ne fonctionne que dans son emplacement spécifique.
AI blemish removal ne copie pas les pixels d'ailleurs dans l'image. Il génère de nouveaux pixels à partir de rien, en utilisant sa compréhension de la structure de la peau pour créer un comblement statistiquement cohérent avec la zone environnante sans être une copie d'une région spécifique. Cela signifie que le comblement généré a la densité de pores correcte pour son emplacement, l'angle de gradient lumineux correct, la chaleur et la saturation correctes, et le motif de poils fins correct. Le tout synthétisé pour correspondre au contexte local plutôt que transplanté d'une région faciale différente. Le résultat est un comblement qui semble avoir toujours été là, pas comme s'il avait été collé.
La différence est plus visible dans les amas d'imperfections importants où l'approche du tampon de duplication peine le plus. Lorsqu'un amas de cinq ou six boutons couvre une zone de joue, il y a peu de peau propre à proximité à échantillonner. Le retoucheur au tampon de duplication doit réutiliser la même zone source plusieurs fois, créant un motif de répétition visible. La même disposition de pores apparaissant trois fois dans une zone de deux centimètres semble artificielle même pour un observateur occasionnel. AI generation crée des comblements uniques pour chaque imperfection, chacun cohérent avec le contexte local mais pas identique aux autres ni à aucune autre partie de l'image, évitant complètement l'artefact de répétition.
- Le tampon de duplication copie les pixels d'un endroit à un autre, transférant une densité de pores, un angle de lumière et une chaleur de couleur incorrects pour le nouvel emplacement.
- AI generation crée de nouveaux pixels à partir de rien qui sont statistiquement cohérents avec la peau environnante sans copier aucune région spécifique.
- Les comblements générés correspondent à la densité de pores locale, au gradient lumineux, à la chaleur de couleur et au motif des poils fins parce qu'ils sont synthétisés pour s'adapter, pas transplantés.
- Les amas d'imperfections évitent les artefacts de répétition qui tourmentent le travail au tampon de duplication parce que chaque comblement AI est unique tout en restant localement cohérent.
Traiter les différents types d'acné dans la retouche de portrait
Toutes les acnés ne se ressemblent pas, et l'approche de suppression doit correspondre au type. Les comédons — points noirs et points blancs — sont de petites taches plates ou légèrement surélevées qui sont les plus faciles à supprimer car elles créent une perturbation minimale de la texture cutanée environnante. Un seul coup de pinceau sur chaque comédon produit une suppression nette. Les papules et pustules — les bosses rouges enflammées et les boutons à tête blanche — sont plus grandes et créent des interactions lumineuses plus complexes car leur surface surélevée capte les reflets et projette de petites ombres. Leur suppression nécessite que l'AI reconstruise non seulement la texture de la peau mais aussi le motif d'éclairage local comme si la bosse n'était pas là.
L'acné kystique présente le plus grand défi car les nodules profonds et enflammés créent des changements majeurs dans le contour de la peau, la couleur et la texture sur une grande surface. Une seule lésion kystique peut affecter une zone de la taille d'un bout de doigt, avec une rougeur rayonnant au-delà de la bosse visible, un gonflement qui altère le contour du visage et une perturbation de la texture de surface due à la peau étirée et enflammée. Pour l'acné kystique, travaillez par étapes : d'abord supprimez les bosses et les changements de couleur les plus marqués, puis traitez la rougeur résiduelle et la perturbation de la texture dans un second passage. Essayer de tout corriger en une seule suppression laisse souvent une zone anormalement lisse qui ressemble à un autre type d'artefact.
L'acné sur le front, le menton et la mâchoire — la zone T et la zone hormonale — est souvent dense et répétée, avec de nombreuses petites bosses de taille similaire. Pour ces zones, la tentation est de peindre un grand coup de pinceau sur toute la zone et de laisser l'AI tout remplacer. Résistez à cette tentation. Le remplacement de grande surface élimine la variation naturelle de texture qui rend la peau réaliste. Au lieu de cela, traitez les imperfections une par une ou par petits amas, en conservant la peau non imparfaite entre elles. Le processus prend plus de temps mais produit des résultats qui ressemblent à de la peau plutôt qu'à une surface numérique.
- Les comédons sont les plus faciles à supprimer — de petites taches qui nécessitent un seul coup de pinceau sans reconstruction complexe de l'éclairage.
- Les papules et pustules nécessitent que l'AI reconstitue les motifs d'éclairage locaux car leurs surfaces surélevées créent des reflets et de petites ombres.
- L'acné kystique doit être traitée par étapes — d'abord les bosses proéminentes, ensuite la rougeur résiduelle — pour éviter des zones anormalement lisses.
- Les zones d'acné dense doivent être retouchées imperfection par imperfection plutôt que balayées avec un gros pinceau, préservant la texture naturelle entre les taches.
Préserver la texture de la peau et éviter l'aspect plastique
L'aspect plastique — une peau si lisse qu'elle semble appartenir à un mannequin plutôt qu'à un visage humain — est la marque de la retouche amateur et le piège que tout flux de travail de suppression des imperfections doit activement éviter. Cela se produit lorsque le processus de retouche supprime non seulement les imperfections mais aussi la texture naturelle de la peau qui les entoure. Les pores sont l'élément de texture le plus important à préserver. Chaque visage humain a des pores visibles, et leur absence dans une photographie signale immédiatement une retouche intensive à tout observateur, qu'il reconnaisse consciemment ce qui manque ou qu'il ressente simplement une vague impression que quelque chose ne va pas.
AI blemish removal dans Magic Eraser est conçu pour préserver la texture environnante par défaut, mais la technique de pinceau de l'opérateur compte. Utiliser un pinceau trop grand par rapport à l'imperfection balaie la texture qui devrait rester. Utiliser trop de coups de pinceau qui se chevauchent dans une zone érode progressivement la texture par un traitement cumulatif, même si chaque coup individuel la préserve. Le principe est une intervention minimale : utilisez le plus petit pinceau qui couvre chaque imperfection, appliquez un coup par imperfection et arrêtez lorsque l'acné active est supprimée. Ne continuez pas à affiner, lisser ou perfectionner. Chaque passage supplémentaire éloigne le résultat de la peau naturelle et le rapproche de l'aspect plastique.
Les taches de rousseur, les grains de beauté et les variations naturelles de pigmentation sont les autres éléments à conserver. Ces caractéristiques font partie de l'identité d'une personne et doivent rester après la suppression de l'acné, sauf si le sujet demande explicitement leur suppression. Un portrait retouché doit ressembler à la personne lors de son meilleur jour de peau. Reconnaissable, avec toutes ses caractéristiques naturelles intactes, moins les imperfections temporaires. Si vous retouchez la photo de quelqu'un d'autre, faites l'erreur d'enlever moins plutôt que plus. Vous pouvez toujours enlever un point supplémentaire si demandé. Vous ne pouvez pas dé-supprimer un grain de beauté que la personne considérait comme un trait distinctif de son visage.
- La visibilité des pores est l'élément de texture le plus important — son absence est le principal signal de sur-retouche que les spectateurs détectent même inconsciemment.
- Utilisez le plus petit pinceau qui couvre chaque imperfection et appliquez un seul coup par tache pour éviter l'érosion cumulative de la texture par les passages qui se chevauchent.
- Les taches de rousseur, les grains de beauté et la pigmentation naturelle sont des traits d'identité qui doivent rester sauf si le sujet demande explicitement leur suppression.
- La norme de retouche est la personne lors de son meilleur jour de peau — reconnaissable, moins les imperfections temporaires, pas une version numériquement perfectionnée.
Considérations éthiques dans la retouche cutanée
La retouche cutanée existe dans un contexte culturel et éthique que les éditeurs responsables devraient reconnaître. La disponibilité généralisée des outils AI blemish removal signifie que presque tous les portraits publiés en ligne peuvent être retouchés pour montrer une peau parfaite, créant cumulativement une norme visuelle irréaliste. Les personnes qui voient des centaines de visages retouchés quotidiennement sur les réseaux sociaux développent des attentes sur ce à quoi ressemble une peau normale que la peau réelle ne peut pas satisfaire. Les organisations de photographie professionnelle, dont les Expert Photographers of America, ont publié des directives exhortant à la retenue dans la retouche cutanée, principalement pour les photographies de mineurs et les images éditoriales présentées comme documentaires.
La directive pratique pour une suppression éthique des imperfections est de supprimer les conditions temporaires et de préserver les caractéristiques permanentes. L'acné active, une égratignure, une éruption cutanée temporaire, un coup de soleil, une réaction allergique — ce sont des conditions qui se résoudront d'elles-mêmes et dont la présence dans une photographie est accidentelle plutôt que représentative de l'apparence typique de la personne. Les supprimer produit une photographie qui représente plus précisément l'apparence habituelle de la personne. La texture de la peau, les motifs de pores, les rides, les ridules d'expression, la variation naturelle de la couleur de la peau et les caractéristiques liées à l'âge sont des traits permanents qui définissent l'apparence de la personne et doivent être préservés.
Pour la photographie commerciale et sur les réseaux sociaux, divulguez les retouches importantes lorsque le contexte le justifie. Une photo de portrait de portfolio est comprise par convention comme étant retouchée. Un témoignage avant-après de produit qui supprime l'acné de la photo après est trompeur. Une photo de profil de site de rencontre avec toutes les imperfections supprimées est un choix personnel. Opter pour montrer votre apparence réelle sert mieux tout le monde que de présenter une version idéalisée qui crée de fausses attentes. La meilleure suppression d'imperfections est celle qu'un spectateur ne remarquerait pas même s'il examinait la photo de près. Non pas parce que la retouche est invisible, mais parce que le résultat ressemble à une peau parfaitement normale et saine.
- La prolifération des portraits retouchés crée des normes cutanées irréalistes cumulatives — les organisations professionnelles exhortent à la retenue, particulièrement pour les photos de mineurs.
- Supprimez les conditions temporaires (acné active, égratignures, éruptions cutanées) qui ne représentent pas l'apparence typique ; préservez les caractéristiques permanentes (pores, rides, variation naturelle de couleur).
- Divulguez les retouches importantes dans les contextes où une présentation non retouchée est attendue, comme les témoignages ou la photographie journalistique.
- La meilleure retouche ressemble à une peau normale et saine à l'examen rapproché — le spectateur ne devrait pas remarquer la retouche du tout.
How to do it
- 1
Select the blemish areas using the Magic Eraser brush tool
Zoom in to the face and use the Magic Eraser brush at a size slightly larger than each individual blemish. Brush over pimples, whiteheads, blackheads, and inflamed spots one at a time rather than painting a large area. Targeting individual blemishes preserves the surrounding skin texture. Pores, fine lines, and natural color variation — that makes the result look like real skin rather than an airbrushed mannequin. For clusters of blemishes close together, you can paint them in a single stroke. Keep the brush path tight to the affected areas.
- 2
Let the AI fill the removed areas by sampling surrounding healthy skin texture
Magic Eraser analyzes the skin texture, tone, and lighting in the area immediately surrounding each removed blemish, then generates a replacement patch that matches. The AI considers the direction of light falling on the face, the local skin color including any natural redness or pigmentation variation, the pore pattern density, and any fine facial hair. The generated fill looks like the skin that would be there if the blemish had never formed. Not like a blurred patch pasted over the spot.
- 3
Address acne scarring and post-inflammatory hyperpigmentation separately
Active blemishes and acne scars require different treatment. Active pimples are raised, colored spots that Magic Eraser removes completely. Acne scars — pitted, ice-pick, or rolling scars — are texture depressions that create small shadows on the skin surface. For mild scarring, use AI Enhance to slightly smooth the texture variation while keeping the overall skin character. For dark marks left by healed acne, called post-inflammatory hyperpigmentation, use a light touch. Reduce the contrast of the dark patch without eliminating it fully, so the skin reads as naturally even-toned rather than artificially uniform.
- 4
Preserve natural skin texture by avoiding over-processing
The most common mistake in blemish removal is removing too much. Real skin has visible pores, fine lines, subtle color variation, tiny moles, freckles, and peach fuzz. These are not blemishes and should not be removed. After clearing acne, zoom out and compare the edited face to the original. If the edited skin looks smoother than any real skin you have seen in person, you have over-processed. The goal is skin that looks like a good skin day, not skin that looks like it was generated by a computer. Selective restraint is what separates expert retouching from amateur over-editing.
- 5
Match the blemish removal across multiple photos for consistency
If you are editing a set of photos from the same session — a portrait series, a headshot collection, or a set of social media images — maintain a consistent level of retouching across all images. Remove the same blemishes in every photo and apply the same degree of scar and hyperpigmentation treatment. Viewers who see multiple photos of the same person will notice if one image has flawless skin while another shows blemishes in different locations, creating an uncanny inconsistency that draws more attention to the editing than the blemishes themselves would have.
Sources
- Skin Retouching in Portrait Photography: Ethical Guidelines and Best Practices — Professional Photographers of America
- Frequency Separation and Skin Texture Preservation in Digital Retouching — ACM SIGGRAPH
- The Psychology of Photo Editing and Self-Perception in Social Media — American Psychological Association