
Comment corriger les photos sous-exposées et sombres : Guide de récupération IA
Apprenez à corriger les photos sous-exposées, sombres et avec beaucoup d'ombres grâce à AI boost. Récupérez les détails perdus, corrigez les décalages de couleur, réduisez le bruit. Sauvegardez les photos que vous pensiez ruinées par un mauvais éclairage ou de mauvais réglages d'appareil.

Product Marketing
Vérifié par Magic Eraser Editorial ·
Sommaire
- Pourquoi les photos finissent sous-exposées
- Ce qui se passe lorsque vous éclaircissez une photo sombre
- Comment l'amélioration par AI récupère les photos sous-exposées
- Scénarios courants de sous-exposition et comment les corriger
- Gérer le bruit après la récupération des ombres
- Conseils de prévention pour éviter la sous-exposition
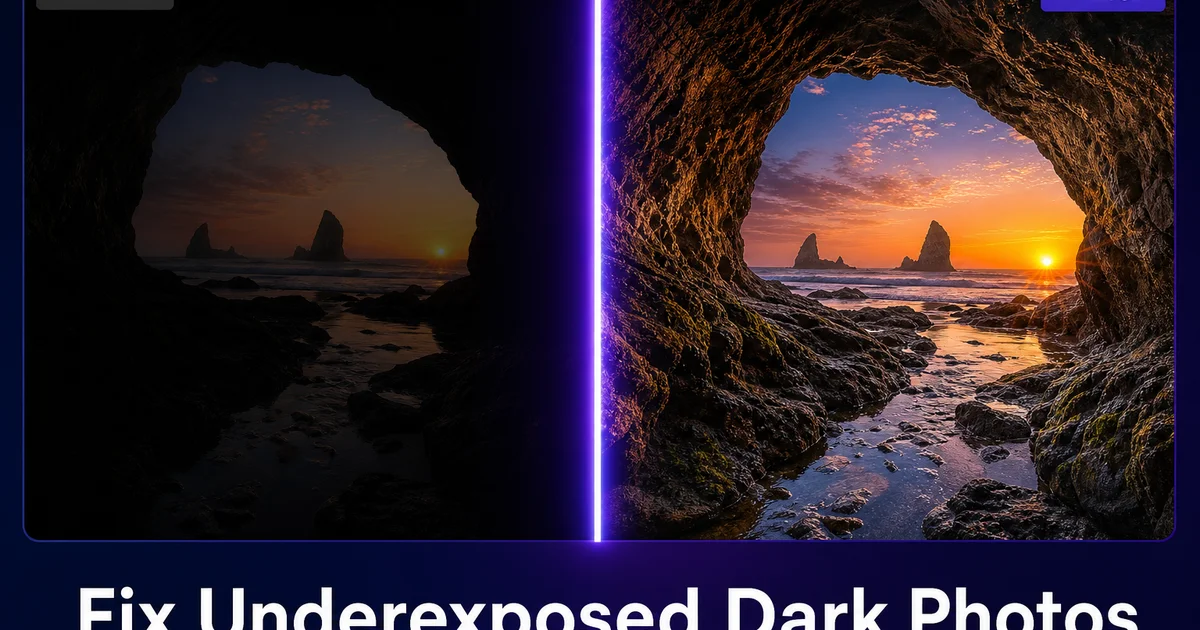
Tout photographe a des images sous-exposées qu'il aimerait pouvoir sauver. La photo d'anniversaire où l'appareil a mesuré la lumière pour la fenêtre lumineuse derrière le gâteau, le portrait au coucher du soleil où le visage du sujet est une silhouette, la photo d'événement en intérieur où le flash n'a pas fonctionné, ou le cliché pris avec un smartphone dans un restaurant sombre qui est ressorti comme un rectangle sombre avec des visages à peine visibles. La sous-exposition est l'un des problèmes photo les plus courants car les appareils photo, y compris les smartphones, jugent fréquemment mal les conditions d'éclairage.
Dans le passé, récupérer une photo sous-exposée nécessitait d'importer un fichier RAW dans Lightroom ou Photoshop, de monter soigneusement le curseur d'exposition, d'ajuster les ombres et les noirs, de corriger les décalages de couleur qui apparaissent lorsque vous éclaircissez les pixels sombres, puis de gérer le bruit que la récupération des ombres amplifie avec le temps. Les fichiers JPEG — que la plupart des smartphones sauvegardent par défaut — avaient encore moins de marge de récupération car le format de fichier compressé supprime les détails d'ombre que les fichiers RAW préservent.
AI-powered boost change la donne. Les modèles d'IA modernes, entraînés sur des millions de paires d'images, peuvent récupérer les détails, corriger les couleurs et réduire le bruit en une seule fois, produisant des résultats à partir de fichiers JPEG qui approchent ce qui n'était possible auparavant qu'avec des fichiers RAW. Ce guide explique pourquoi les photos finissent sous-exposées, ce qui se passe techniquement lorsque vous essayez de les éclaircir, et comment AI boost produit de meilleurs résultats de récupération que les méthodes manuelles traditionnelles.
- AI Enhance récupère 2 à 3 stops de détails d'ombre à partir de photos sous-exposées en un seul passage automatique.
- La correction des couleurs corrige les décalages verts, bleus et jaunes qui deviennent visibles lorsque les pixels sombres sont éclaircis.
- AI noise reduction supprime le grain que la récupération des ombres amplifie sans détruire les détails fins et la texture.
- La récupération JPEG avec AI approche la qualité de la récupération de fichiers RAW qui nécessitait auparavant un logiciel de retouche sur ordinateur.
- Les sujets en contre-jour — silhouettes contre des fenêtres ou des ciels lumineux — sont entièrement récupérables lorsque le sujet conserve des détails d'ombre.
- L'opération en un clic élimine le besoin d'apprendre les curseurs d'exposition, les courbes de tonalité et le masquage de luminance dans les éditeurs professionnels.
Pourquoi les photos finissent sous-exposées
Les systèmes de mesure de la lumière — aussi bien dans les appareils photo dédiés que dans les smartphones — mesurent la lumière dans une scène et calculent un réglage d'exposition qui fait que la luminosité globale fait la moyenne du gris moyen. Cela fonctionne bien pour les scènes uniformément éclairées mais échoue de manière prévisible dans plusieurs situations courantes. Le contre-jour est le coupable le plus fréquent : lorsqu'une source de lumière vive se trouve derrière le sujet (une fenêtre, le soleil, un mur clair), l'appareil expose pour l'arrière-plan lumineux et le sujet tombe dans l'ombre. L'appareil a techniquement bien exposé la partie la plus lumineuse du cadre, mais la partie qui vous intéresse — le visage de la personne — est sombre.
Les événements en intérieur sans flash sont un autre scénario courant. Les restaurants, bars, salles de réception et intérieurs domestiques ont souvent un éclairage qui semble adéquat à l'œil humain mais qui est bien plus sombre que ce dont les appareils photo ont besoin pour une exposition propre. L'appareil soit sous-expose toute la scène, soit pousse l'ISO si haut que la photo est lumineuse mais couverte de bruit. Les smartphones gèrent cela en prolongeant la vitesse d'obturation, ce qui aide pour l'exposition mais introduit un flou de bougé si quelqu'un bouge.
L'erreur de l'utilisateur contribue aussi. Toucher accidentellement l'écran sur la partie lumineuse d'une scène verrouille l'exposition du smartphone pour cette zone. Photographier en modes manuel ou prioritaires sans vérifier l'indicateur d'exposition produit des images sous-exposées lorsque les conditions changent. Et les photographes d'action qui règlent des vitesses d'obturation rapides pour figer le mouvement ne compensent parfois pas avec l'ouverture ou l'ISO, produisant des images techniquement nettes mais très sombres.
- Contre-jour : l'appareil expose pour les arrière-plans lumineux, transformant les sujets en silhouettes.
- Faible luminosité intérieure : restaurants, événements et maisons sont plus sombres que ce que l'œil humain perçoit.
- Erreurs de mesure : les zones claires ou sombres dans le cadre trompent le système d'exposition automatique de l'appareil.
- Réglages utilisateur : les vitesses d'obturation rapides et les modes manuels sans compensation d'exposition produisent des images sombres.
Ce qui se passe lorsque vous éclaircissez une photo sombre
Éclaircir une photo sous-exposée n'est pas aussi simple que d'augmenter le curseur de luminosité. Lorsqu'un appareil photo capture une image sombre, les régions d'ombre contiennent très peu de photons de signal par rapport au bruit électronique dans le capteur. Augmenter ces pixels sombres amplifie à la fois les faibles détails de l'image et le bruit de manière égale, produisant une image plus lumineuse couverte d'artefacts granuleux et tachetés, principalement visibles dans les zones lisses comme la peau, les murs et les dégradés de ciel.
La précision des couleurs se dégrade également. Les régions d'ombre dans les photos numériques ont une fidélité des couleurs plus faible car les filtres de couleur sur le capteur ont besoin d'une quantité minimale de lumière pour enregistrer des informations de teinte précises. Lorsque vous éclaircissez des ombres profondément sous-exposées, les couleurs peuvent dériver. La peau peut prendre une teinte verdâtre ou magenta, les gris neutres peuvent tirer vers le bleu ou le jaune, et les couleurs saturées peuvent paraître boueuses ou délavées. Ces décalages sont plus graves dans les fichiers JPEG, où l'appareil a déjà compressé les informations tonales, que dans les fichiers RAW qui préservent l'intégralité des données du capteur.
Les logiciels de retouche traditionnels vous offrent des curseurs et des courbes pour résoudre chacun de ces problèmes un par un : l'exposition pour la luminosité globale, les ombres pour les régions sombres spécifiquement, les hautes lumières pour éviter d'écrêter les zones claires, la température de couleur pour les ajustements de balance des blancs, la teinte pour la correction vert-magenta, et la réduction du bruit pour nettoyer le grain. Obtenir un résultat d'apparence naturelle nécessite d'équilibrer tous ces réglages, ce qui est une compétence qui prend du temps à développer.
- La récupération des ombres amplifie le bruit du capteur en même temps que les détails de l'image, produisant un grain visible.
- La fidélité des couleurs se dégrade dans les régions profondément sous-exposées, provoquant des décalages des tons de peau et des teintes.
- Les fichiers JPEG ont moins de données d'ombre récupérables que les fichiers RAW en raison de la compression.
- La correction manuelle nécessite d'équilibrer 6 à 8 curseurs différents entre l'exposition, la couleur et la réduction du bruit.
Comment l'amélioration par AI récupère les photos sous-exposées
Les modèles AI boost sont entraînés sur des paires de données appariées — des images sous-exposées accompagnées de leurs homologues correctement exposées — et apprennent à prédire à quoi devrait ressembler la version lumineuse d'une photo sombre. Cela est fondamentalement différent du simple fait d'augmenter les valeurs d'exposition. L'IA ne se contente pas de rendre les pixels sombres plus lumineux. Elle déduit quelle couleur, quel détail et quelle texture ces pixels devraient contenir en se basant sur le contexte environnant et son entraînement sur des millions d'images similaires.
Le résultat est une récupération des ombres qui semble naturelle plutôt que forcée. Les visages éclairés par derrière gagnent des traits visibles avec des tons de peau précis. Les scènes intérieures sombres révèlent les détails de la pièce, les textures des meubles et les couleurs des murs. Les photos de restaurant récupèrent l'ambiance chaleureuse du cadre sans l'aspect plat et bruyant que produit la correction manuelle des ombres. L'IA applique la correction d'exposition, la normalisation des couleurs et la réduction du bruit comme une seule opération unifiée plutôt que comme des étapes séquentielles séparées qui peuvent entrer en conflit les unes avec les autres.
AI Enhance récupère souvent 2 à 3 stops de sous-exposition à partir de fichiers JPEG — équivalent à une image 4 à 8 fois plus lumineuse. À partir de fichiers RAW (si vous photographiez avec un appareil qui les sauvegarde), la récupération peut atteindre 4 à 5 stops. La limite pratique dépend de la quantité de signal que le capteur a réellement capturée dans les régions sombres. Une zone complètement noire avec zéro signal ne peut être récupérée par aucune méthode, IA ou manuelle. Mais la grande majorité des photos sous-exposées — celles où l'on voit quelque chose dans les ombres sur l'écran du téléphone si on l'incline juste comme il faut — contiennent suffisamment de données pour que l'IA produise une récupération pleinement utilisable.
- L'IA prédit la luminosité, la couleur et les détails corrects plutôt que d'amplifier simplement les pixels sombres.
- La correction d'exposition, la normalisation des couleurs et la réduction du bruit se produisent comme une seule opération unifiée.
- Récupération JPEG typique : 2 à 3 stops (4 à 8 fois plus lumineux). Récupération RAW : 4 à 5 stops.
- Les zones complètement noires sans signal du capteur ne peuvent être récupérées par aucune méthode.
Scénarios courants de sous-exposition et comment les corriger
Les portraits en contre-jour sont le scénario de récupération le plus courant. Le sujet se tient devant une fenêtre, un coucher de soleil ou un mur clair. L'appareil expose pour la lumière d'arrière-plan. Ouvrez la photo dans AI Enhance et l'IA fait sortir le visage et le corps du sujet de l'ombre tout en conservant la luminosité de l'arrière-plan. Les tons de peau sont corrigés pour paraître naturels plutôt qu'orangés ou verts. Le résultat ressemble à l'utilisation d'un flash d'appoint — une technique que les photographes experts utilisent pour équilibrer le sujet et l'arrière-plan — sauf que vous l'appliquez après coup.
Les photos d'événements en intérieur — anniversaires, réceptions de mariage, dîners au restaurant, présentations en conférence — sont le deuxième scénario le plus courant. Elles sont souvent prises avec des smartphones sans flash, produisant des images sombres et bruyantes où les visages sont à peine visibles. AI Enhance éclaircit la scène, récupère les détails des visages, corrige les dominantes de couleur chaude tungstène ou froide fluorescente courantes dans l'éclairage intérieur, et réduit le bruit qui affecte les captures smartphone à ISO élevé. Les photos récupérées semblent avoir été prises dans une pièce plus lumineuse.
La photographie de nuit et en faible luminosité bénéficie également de la récupération par IA. Les paysages urbains, les enseignes au néon, les scènes de rue et les photos de vie nocturne se retrouvent souvent avec des zones d'ombre profonde où les détails sont perdus. AI Enhance éclaire ces ombres pour révéler ce qui s'y trouvait — façades d'immeubles, piétons, signalétique, détails architecturaux — tout en préservant l'ambiance de la scène nocturne. La clé est que AI boost ne transforme pas une photo de nuit en photo de jour. Elle révèle les détails dans l'obscurité tout en conservant l'ambiance.
- Portraits en contre-jour : l'IA fait sortir le sujet de la silhouette tout en préservant la luminosité de l'arrière-plan.
- Événements en intérieur : l'IA éclaircit les scènes sombres, récupère les visages et corrige les dominantes de couleur intérieures.
- Photographie de nuit : l'IA révèle les détails d'ombre tout en préservant l'ambiance atmosphérique de la scène nocturne.
Gérer le bruit après la récupération des ombres
Même avec AI boost, les photos sévèrement sous-exposées montreront un certain bruit après la récupération. C'est une limitation physique — le capteur de l'appareil photo n'a tout simplement pas capturé assez de lumière dans les régions sombres pour fournir des données propres. AI noise reduction atténue bien cela, mais comprendre le compromis vous aide à définir des attentes réalistes.
AI noise reduction fait la distinction entre les détails réels de l'image (texture, bords, motifs fins) et le bruit (taches aléatoires sans corrélation avec la scène). Elle supprime le bruit tout en conservant les détails — une tâche que les algorithmes traditionnels de réduction du bruit gèrent mal car ils floutent à la fois le bruit et les détails indistinctement. Le résultat est une image propre qui conserve la texture des tissus, les pores de la peau, les mèches de cheveux et les surfaces d'arrière-plan.
Pour les photos sévèrement sous-exposées — 3 stops ou plus sombres — l'image récupérée peut être suffisamment propre pour les réseaux sociaux et une utilisation sur le web mais montrer une dégradation de qualité visible lorsqu'elle est imprimée en grand ou visualisée en pleine résolution sur un écran haute définition. C'est normal et attendu. L'IA travaille avec des données brutes limitées et ne peut pas fabriquer des détails que le capteur n'a jamais capturés. Utilisez ces photos récupérées pour l'usage qu'elles servent — partager un souvenir sur Instagram, publier un résumé d'événement, envoyer une photo de groupe par texte — plutôt que de vous attendre à ce qu'elles égalent un original correctement exposé.
- AI noise reduction supprime le grain tout en préservant la texture, les bords et les détails fins.
- Les récupérations sévèrement sous-exposées (3 stops et plus) peuvent montrer une dégradation de qualité en pleine résolution ou dans les grands tirages.
- Les photos récupérées conviennent aux réseaux sociaux, au web et à la visualisation sur écran même lorsque l'exposition originale était très mauvaise.
- Fixez des attentes réalistes : l'IA récupère ce que le capteur a capturé, mais ne peut pas fabriquer des données manquantes.
Conseils de prévention pour éviter la sous-exposition
Bien que la récupération par IA soit remarquablement performante, une photo correctement exposée donnera toujours un meilleur résultat qu'une photo sous-exposée récupérée. Quelques habitudes simples préviennent la plupart des problèmes de sous-exposition. Sur les smartphones, appuyez sur le visage du sujet ou la zone que vous voulez bien exposer avant de prendre la photo. Cela remplace la tendance de l'appareil à mesurer pour la zone la plus lumineuse. La plupart des applications d'appareil photo smartphone permettent également de faire glisser un curseur d'exposition vers le haut après avoir appuyé pour faire la mise au point, ajoutant un ou deux stops de luminosité avant de capturer l'image.
Dans les situations de contre-jour, utilisez le mode HDR disponible sur pratiquement tous les smartphones modernes. Le HDR capture plusieurs expositions et les combine afin que l'arrière-plan lumineux et le sujet plus sombre soient tous deux correctement rendus. Pour les appareils photo dédiés, utilisez la compensation d'exposition. Ajoutez +1 ou +2 stops lorsque vous photographiez des sujets en contre-jour ou dans des environnements sombres. Vérifiez l'image de prévisualisation sur l'écran LCD de l'appareil après la première prise et ajustez si le sujet est encore trop sombre.
Pour les événements en intérieur, activez le flash. Le flash des smartphones modernes s'est considérablement amélioré et produit de bien meilleurs résultats qu'une image sous-exposée sans flash que vous devrez récupérer plus tard. Si le flash n'est pas approprié (concerts, cérémonies), stabilisez le téléphone contre une table ou un mur pour permettre une vitesse d'obturation plus longue sans flou de bougé. Acceptez qu'un certain bruit provenant d'un ISO élevé est préférable à une sous-exposition sévère nécessitant une récupération lourde.
- Appuyez sur le sujet sur l'écran de votre smartphone pour mesurer l'exposition pour son visage, pas pour l'arrière-plan lumineux.
- Utilisez le mode HDR pour les scènes en contre-jour — il capture plusieurs expositions et les fusionne automatiquement.
- Sur les appareils photo, ajoutez +1 à +2 stops de compensation d'exposition pour les sujets en contre-jour ou sombres.
- Utilisez le flash pour les événements en intérieur — le flash des smartphones modernes produit de meilleurs résultats qu'une récupération lourde des ombres.
How to do it
- 1
Identify the cause of underexposure
Open the dark photo and assess what caused the underexposure. Common causes include shooting in low light without flash, backlighting where the camera metered for the bright background instead of the subject, fast shutter speed that did not let in enough light, or camera auto-exposure being fooled by a bright area in the frame.
- 2
Run AI Enhance to lift shadows and correct exposure
Open the underexposed image in AI Enhance. The AI analyzes the entire image, detects underexposed regions, and lifts shadows while keeping highlight detail. A single pass often recovers 2-3 stops of shadow detail, revealing faces, textures, and colors that were hidden in darkness.
- 3
Evaluate color accuracy after brightening
Brightening an underexposed photo can reveal color shifts that were hidden in the shadows. Greenish skin tones, blue-shifted backgrounds, or yellow casts from tungsten lighting. AI Enhance corrects these automatically, but review the result to ensure skin tones look natural and background colors appear accurate.
- 4
Check for noise in recovered shadow areas
Shadow recovery amplifies sensor noise that was invisible in the dark pixels. Look for grainy, speckled textures mainly in smooth areas like skin, walls, and sky. AI Enhance includes noise reduction, but severely underexposed images may benefit from a second pass focused on noise cleanup.
- 5
Export the corrected image
Save the brightened image at full resolution. For social media, export at platform-specific dimensions. For prints, ensure the corrected shadows still hold detail at the intended print size. Extreme shadow recovery can look acceptable on screen but fall apart in large prints where noise becomes visible.
Sources
- Understanding Exposure in Digital Photography — Cambridge in Colour
- How Camera Sensors Capture Light — DPReview