
Comment creer des photos LinkedIn professionnelles avec l'IA — Magic Eraser
Creez un portrait LinkedIn professionnel a partir d'une photo prise avec un smartphone grace aux outils d'IA. Remplacez les arriere-plans, corrigez l'eclairage et appliquez un etalonnage professionnel sans engager de photographe.
SEO & Growth
Vérifié par Magic Eraser Editorial ·
Sommaire
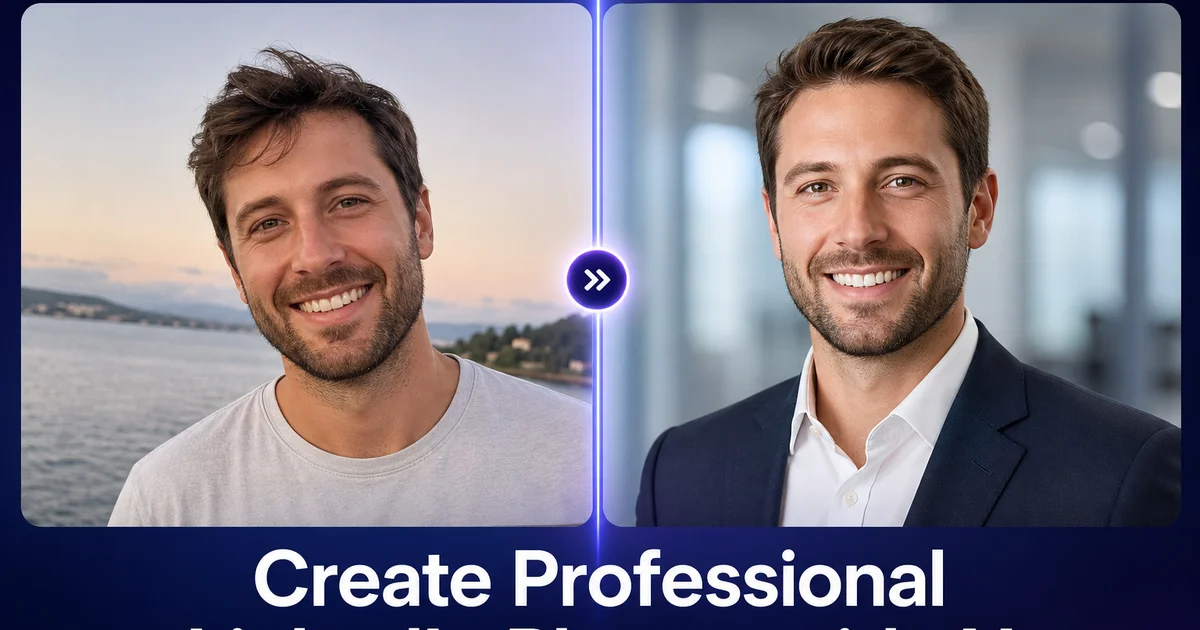
Votre photo de profil LinkedIn est l'image la plus consultee de votre vie professionnelle. Elle apparait chaque fois que vous commentez une publication, envoyez une demande de mise en relation, apparaissez dans les resultats de recherche ou figurez dans la liste de candidats d'un recruteur. Les donnees de LinkedIn montrent que les profils avec des photos professionnelles recoivent jusqu'a 21 fois plus de vues de profil et 36 fois plus de messages que ceux sans photo. Pourtant, la majorite des utilisateurs de LinkedIn n'ont soit pas de photo, utilisent un selfie decontracte, ou se fient a un portrait de cinq ans ou plus qui ne leur ressemble plus.
Les seances de portrait professionnel avec un photographe coutent entre 150 et 500 dollars, necessitent une planification et un deplacement, et produisent des images dans un style fixe unique. Pour de nombreux professionnels — chercheurs d'emploi, freelances, etudiants, personnes en reconversion professionnelle, ou ceux sur des marches plus petits sans acces facile a un photographe — le cout et la logistique creent une barriere qui aboutit soit a l'absence de photo, soit a une photo de mauvaise qualite. Les recherches de Harvard Business Review sur la presentation professionnelle confirment que la qualite du portrait influence grandement la perception initiale dans les contextes de recrutement et de reseautage, ce qui constitue un veritable desavantage professionnel.
Les outils de retouche photo par IA eliminent a la fois les barrières de cout et de logistique. Une photo de smartphone bien prise, combinee a Background Eraser pour un arriere-plan professionnel propre, AI Enhance pour la correction de l'eclairage, et AI Filter pour un etalonnage subtil des couleurs professionnelles, produit un resultat impossible a distinguer d'un portrait en studio pour le visiteur LinkedIn typique. Ce guide vous accompagne a travers le flux de travail complet, depuis la prise de la meilleure photo de base possible avec votre telephone jusqu'a l'exportation de l'image finale aux dimensions optimales de LinkedIn.
- Background Eraser remplace tout arriere-plan — murs de chambre, bureaux occupes, scenes exterieures — par une couleur unie ou un degrade propre et professionnel.
- AI Enhance corrige un eclairage irregulier, eclaircit les ombres sous les yeux et affine les details des yeux sur lesquels les recherches de LinkedIn montrent que les visiteurs se concentrent en premier.
- AI Filter applique un etalonnage professionnel subtil — tons de peau plus chauds, leger contraste — qui rend l'image soignee sans donner l'impression d'avoir ete filtree.
- Le flux de travail complet, de la photo sur telephone au portrait pret pour LinkedIn, prend moins de cinq minutes et coute une fraction d'une seance photo professionnelle.
- Le meme portrait retouche fonctionne sur LinkedIn, les sites web d'entreprise, les signatures email, les biographies d'orateurs et les annuaires professionnels.
Prendre la meilleure photo de base possible avec un smartphone
La qualite de votre portrait LinkedIn final depend fortement de la qualite de la photo de base, quelle que soit la puissance des outils d'edition par IA. Trois facteurs comptent le plus : l'eclairage, le cadrage et l'expression. Pour l'eclairage, tenez-vous face a une grande fenetre avec la lumiere tombant sur votre visage legerement d'un cote. Cela cree le motif d'ombre subtil que les photographes de portrait appellent l'eclairage Rembrandt, qui ajoute de la dimension au visage et est universellement flatteur. Evitez la lumiere directe du soleil, qui cree des ombres dures. Evitez de vous tenir avec la fenetre derriere vous, ce qui transforme votre visage en silhouette.
Pour le cadrage, placez le telephone a hauteur des yeux ou tres legerement au-dessus. En dessous du niveau des yeux, cela cree un angle vers le haut peu flatteur qui accentue le menton et les narines. Cadrez le plan a partir du milieu de la poitrine environ — c'est le recadrage standard du portrait et cela laisse assez d'espace pour que Background Eraser puisse travailler sur les bords de vos epaules et de vos cheveux. Utilisez l'appareil photo arriere plutot que le selfie avant lorsque c'est possible, car l'appareil arriere a un meilleur objectif et capteur. Posez le telephone sur une etiquette ou utilisez un petit trepied et la fonction minuteur pour eviter la distorsion du selfie a bout de bras.
Pour l'expression, le guide de portrait d'Adorama recommande un sourire naturel et detendu qui atteint les yeux — ce que les photographes appellent un sourire de Duchenne. Prenez au moins dix photos avec de legeres variations. Poussez votre menton legerement vers l'avant et vers le bas pour definir la machoire. Portez des couleurs unies dans une teinte qui contraste avec votre arriere-plan prevu — un blazer marine sur un fond gris clair, ou une chemise blanche sur un fond bleu fonce. Evitez les motifs charges qui rivalisent pour attirer l'attention sur votre visage.
- Tenez-vous face a une fenetre avec la lumiere frappant votre visage legerement d'un cote pour un eclairage Rembrandt naturel et flatteur.
- Placez l'appareil a hauteur des yeux et cadrez de la poitrine vers le haut — utilisez l'appareil arriere et un minuteur pour eviter la distorsion du selfie.
- Prenez au moins dix cliches avec de legeres variations d'expression et d'angle pour vous donner des options lors de la retouche.
- Portez des couleurs unies qui contrastent avec la couleur de votre arriere-plan prevu — evitez les motifs charges qui distraient de votre visage.
Creer un arriere-plan professionnel avec Background Eraser
L'arriere-plan d'un portrait LinkedIn communique le professionnalisme avant meme que le visiteur ne le traite consciemment. Un appartement en desordre, un bureau occupe avec des collegues en arriere-plan, ou une photo de groupe recadree avec l'epaule de quelqu'un d'autre visible signalent tous l'informalite. Background Eraser supprime tout ce qui se trouve derriere vous et le remplace par un arriere-plan propre et intentionnel qui correspond au ton professionnel que vous souhaitez projeter.
Pour la plupart des professionnels, un arriere-plan de couleur unie fonctionne le mieux. Le bleu marine fonce, le gris charbon et le gris chaud doux sont les choix les plus populaires car ils fonctionnent avec une large gamme de tons de peau et de couleurs de vetements. La cle est un contraste suffisant — votre visage et vos vetements doivent etre clairement distincts de l'arriere-plan, sans s'y melanger. Si vous avez les cheveux fonces et prevez porter un blazer sombre, choisissez un arriere-plan gris ou bleu plus clair. Si vous portez une chemise blanche, un arriere-plan plus fonce empeche la chemise de rivaliser avec votre visage pour attirer l'attention.
Les arriere-plans en degrade — une transition subtile du plus fonce sur les bords au plus clair derriere la tete — ajoutent une profondeur qui donne au portrait un aspect plus studio. Background Eraser peut appliquer cet effet apres avoir supprime l'arriere-plan d'origine. Certains experts dans les domaines creatifs preferent un arriere-plan environnemental legerement flou (bibliotheque, bureau, paysage urbain) plutot qu'une couleur unie. Si vous souhaitez cet aspect, prenez la photo dans le cadre reel, puis utilisez AI Enhance pour flouter davantage l'arriere-plan plutot que de le remplacer entierement.
- Les arriere-plans bleu marine fonce, gris charbon et gris chaud doux fonctionnent avec la plus large gamme de tons de peau et de couleurs de vetements.
- Assurez un contraste suffisant entre votre visage, vos vetements et l'arriere-plan — les sujets fonces necessitent des arriere-plans plus clairs et vice versa.
- Les arriere-plans en degrade ajoutent de la profondeur imitant l'eclairage de studio et rendent le portrait plus soigne.
- Les professionnels creatifs peuvent preferer un arriere-plan environnemental flou — AI Enhance peut augmenter le flou d'un cadre reel plutot que de le remplacer entierement.
Corriger l'eclairage et ameliorer les details avec AI Enhance
Meme une configuration d'eclairage par fenetre bien positionnee produit des imperfections qui distinguent une photo de telephone d'un portrait professionnel. Le cote du visage oppose a la fenetre peut etre trop sombre. La zone sous le menton et autour des orbites accumule des ombres qu'un eclairage de remplissage de studio adoucirait. L'image globale peut etre legerement sous-exposee car l'appareil photo du telephone a mesure pour la fenetre lumineuse plutot que pour votre visage. AI Enhance resout tous ces problemes en un seul passage.
L'IA corrige l'exposition pour que votre visage soit correctement lumineux sans bruler les hautes lumieres sur le front ou le nez. Elle ouvre les ombres sous les yeux et le menton — les zones qui vieillissent et fatiguent le plus un visage en photo — sans rendre l'eclairage plat. Elle affine les yeux et les sourcils, qui sont les caracteristiques sur lesquelles les visiteurs se concentrent en premier et qui definissent l'impression d'alerte, de competence et d'accessibilite que les portraits LinkedIn visent a transmettre. Les propres recherches de LinkedIn confirment que la clarte des yeux est le facteur unique le plus fort dans l'engagement envers les photos de profil.
AI Enhance gere egalement les ameliorations subtiles des details qui separent un portrait soigne d'une photo decontractee. Il lisse les imperfections mineures de la peau que le piqué de l'appareil photo du smartphone exagere — petits boutons, texture irreguliere, legeres rougeurs — sans creer l'aspect visiblement airbrushe qui mine la confiance. Le resultat ressemble a un bon jour de peau capture par un photographe competent, pas a une couverture de magazine retouchee. Pour les porteurs de lunettes, l'IA reduit les reflets et les reflexions que l'eclairage par fenetre cree souvent sur les verres, gardant les yeux visibles et clairs.
- AI Enhance ouvre les ombres sous les yeux et sous le menton qui vieillissent le visage en photo, imitant l'effet d'un eclairage de remplissage professionnel.
- L'affinage des yeux et des sourcils augmente l'impression d'alerte et d'accessibilite qui stimule l'engagement sur les profils LinkedIn.
- Les imperfections mineures de la peau sont lissees naturellement sans creer d'apparence airbrushee ou visiblement retouchee.
- Les porteurs de lunettes beneficient d'une reduction automatique des reflets et des reflexions qui maintient les yeux visibles a travers les verres.
Etalonnage professionnel des couleurs et optimisation finale
La derniere etape qui eleve une photo de telephone corrigee a la qualite d'un portrait professionnel est l'etalonnage des couleurs — l'ajustement subtil de la temperature des couleurs, du contraste et de la gamme tonale qui donne a l'image un aspect soigne et intentionnel. AI Filter applique cet etalonnage d'une maniere calibree pour la photographie de portrait : il rechauffe les tons de peau tres legerement pour un aspect accessible et sain, augmente le contraste des tons moyens pour ajouter de la dimension au visage, et garantit que la couleur de l'arriere-plan est propre et uniforme.
L'ajustement des couleurs doit etre invisible pour le visiteur. L'objectif n'est pas un look filtre ou stylise, mais l'aspect naturel et bien eclaire qui provient d'un equipement photographique professionnel et de conditions de studio. Le contexte professionnel de LinkedIn exige du realisme. Un portrait visiblement filtre suggere que la personne derriere le profil presente une version inexacte d'elle-meme. AI Filter y parvient en effectuant des corrections qui ameliorent la realite plutot que de la deformer.
Apres l'etalonnage des couleurs, recadrez au format carre avec votre visage dans la partie superieure du cadre. Vos yeux doivent se situer approximativement a l'intersection de la ligne de grille du tiers superieur. Exportez a 800 x 800 pixels pour l'affichage le plus net sur LinkedIn. Enregistrez egalement une version plus petite de 400 x 400 pixels pour les plateformes qui imposent des limites de taille de fichier plus strictes. Verifiez l'image au format de vignette ronde — c'est ainsi que la plupart des gens verront votre photo dans les commentaires, les messages et les resultats de recherche — et confirmez que votre visage est clairement visible et bien cadre dans le cercle.
- AI Filter rechauffe legerement les tons de peau et ajoute du contraste des tons moyens pour un aspect professionnel et accessible sans effet de filtre evident.
- Le contexte professionnel de LinkedIn exige que l'etalonnage des couleurs ameliore la realite plutot que de la deformer — la subtilite est essentielle.
- Exportez a 800 x 800 pixels pour l'affichage le plus net sur LinkedIn et verifiez l'image au format de vignette ronde.
- Enregistrez le portrait final pour une utilisation sur LinkedIn, les sites web d'entreprise, les signatures email, les biographies de conferences et les annuaires professionnels.
How to do it
- 1
Take a well-framed base photo with your smartphone
Stand near a window for natural side lighting, position the camera at eye level or slightly above. Frame the shot from mid-chest up. Use the front-facing camera in portrait mode if available. Take at least ten shots with slight variations in expression and angle. A genuine, relaxed smile with visible eyes performs best on LinkedIn. Avoid direct overhead lighting, which creates harsh under-eye shadows.
- 2
Remove the background with Background Eraser
Open the best photo in Background Eraser to isolate yourself from whatever is behind you. Whether you shot against a bedroom wall, a busy office, or an outdoor scene, the AI cleanly separates you from the background. Replace it with a solid professional color. Deep navy, charcoal gray, or a soft gradient — that contrasts with your clothing and draws attention to your face.
- 3
Correct lighting and skin detail with AI Enhance
Run the image through AI Enhance to correct any lighting imbalances from your natural light setup. The AI brightens shadows under the chin and around the eyes, evens out skin exposure across the face, and sharpens eye detail. The feature LinkedIn research shows viewers focus on first. The result looks naturally well-lit rather than artificially processed.
- 4
Apply professional color grading with AI Filter
Use AI Filter to apply subtle professional color grading that makes the image feel polished without looking filtered. Warm the skin tones slightly for an approachable look, ensure the background color complements your complexion. Increase the slight contrast that distinguishes a professional headshot from a casual selfie. The adjustment should be invisible — viewers should notice that you look professional, not that the photo has been edited.
- 5
Crop and export at LinkedIn's recommended dimensions
Crop the final image to a square aspect ratio, centering your face in the upper third of the frame with your eyes roughly at the intersection of the upper-third gridline. Export at 400 by 400 pixels minimum — LinkedIn recommends up to 800 by 800 for the sharpest display. Upload to LinkedIn and check how it appears in both the full profile view and the small circular thumbnail in comments and messages. Both contexts need to look professional.