Remove teeth stains from photos
Fix yellow, stained, or discolored teeth in portraits, headshots, and smiling photos. Magic Eraser removes the discoloration and restores naturally white teeth — bright enough to look healthy without the artificial glow of over-whitening.
Last updated
Open Magic Eraser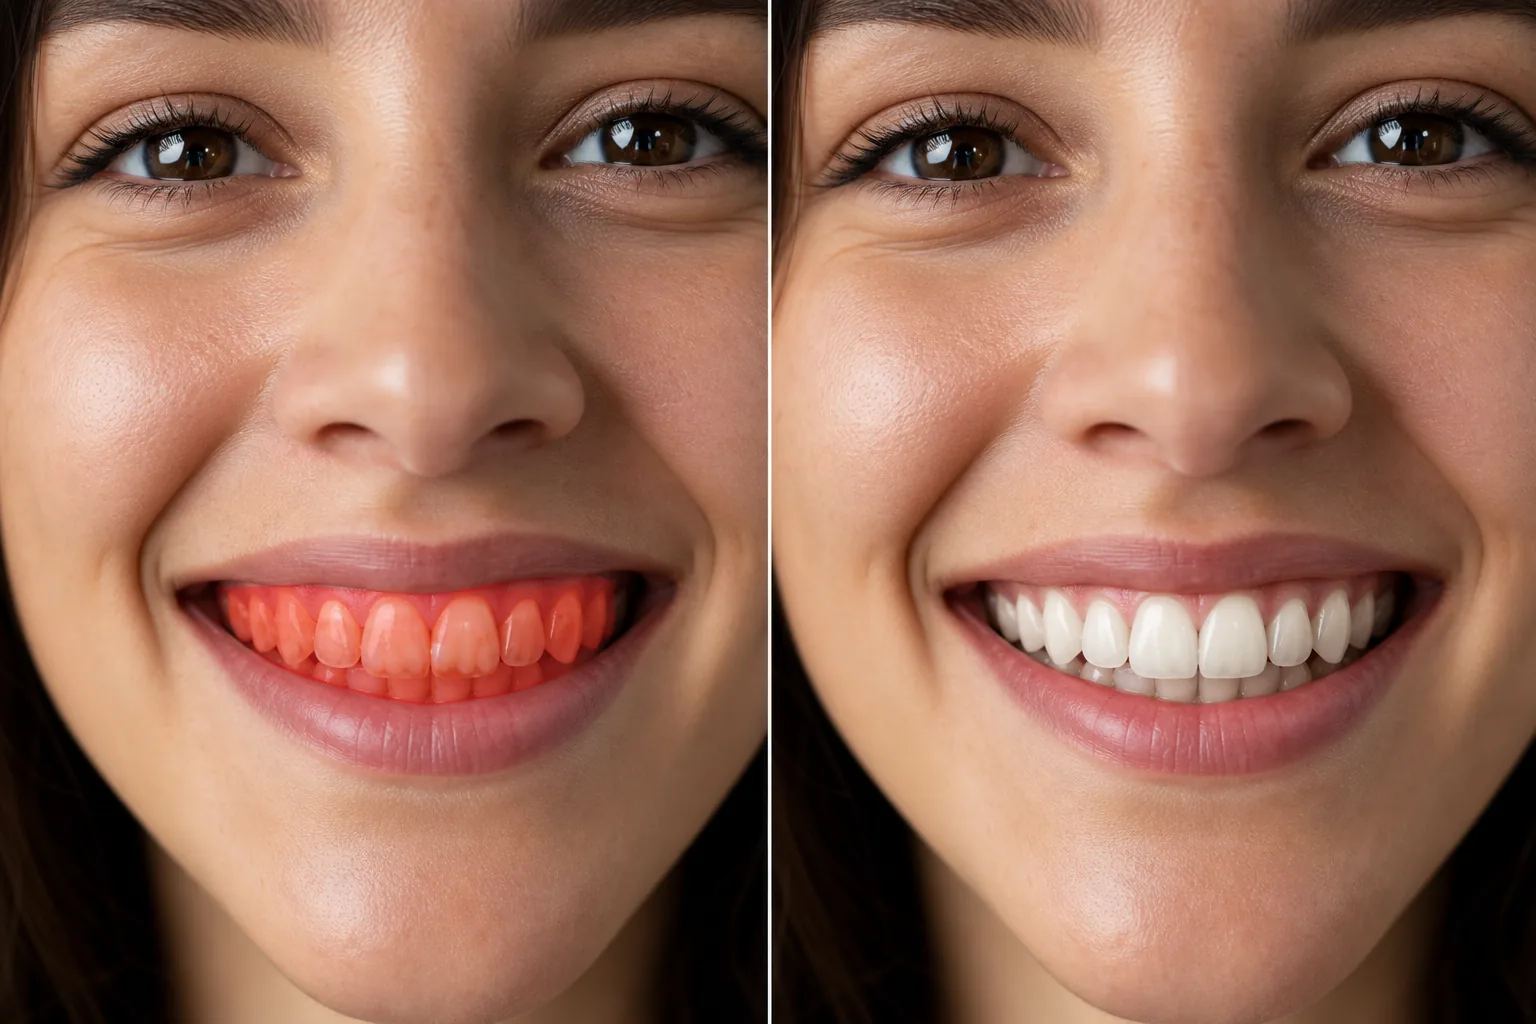
How to whiten teeth in a photo
To whiten teeth in a photo, open Magic Eraser on the web, iOS, or Android, upload your portrait, brush over the visible teeth, and tap Erase — the AI lifts the yellow and brown discoloration to reveal a brighter, more natural smile. It is free with sign-in required. It reduces yellowing and surface stains for a healthier look; it does not replace real dental whitening or fix tooth shape, gaps, or alignment. Coffee, tea, wine, and time stain teeth — and camera flash and studio lighting make the discoloration more visible than it appears in the mirror. Yellowish teeth in an otherwise polished headshot or portrait draw the viewer's eye and can undermine the confident impression the photo is meant to convey. Professional retouchers handle teeth whitening carefully: too much whitening creates the bleached, glowing-teeth look that screams 'edited,' while too little leaves the discoloration visible. The ideal result is teeth that look naturally healthy — the shade they'd be after a professional cleaning, not after heavy cosmetic bleaching. Magic Eraser's AI targets the yellow and brown tones in the tooth area while preserving the natural variation between teeth, the subtle shadows between individual teeth, and the translucency at tooth edges that makes teeth look real.
Whiten teeth in three steps
- 1
Upload your photo
Open Magic Eraser on the web, iOS, or Android and upload the portrait, headshot, or smiling photo with teeth discoloration you want to correct.
- 2
Brush over the teeth
Paint over the visible teeth area. Stay within the tooth surfaces — avoid brushing over lips and gums, as the AI targets the specific color range of tooth discoloration within your selection.
- 3
Erase and check
Tap Erase and the AI removes the yellow/brown staining, revealing naturally white teeth. The shadows between teeth and the slight translucency at edges are preserved for a realistic result. Verify the whiteness looks natural, then export.
Best for
- Professional headshots with a confident, polished smile
- Wedding portraits where the smile is the focal point
- LinkedIn and social media profile photos
- Acting and modeling portfolios
- Corporate team photos with uniform appearance
- Dental practice before/after marketing photos
- Event photos where flash emphasized teeth discoloration
- Dating profile photos with a natural, bright smile
Tips for natural-looking teeth whitening
The key to convincing teeth whitening is restraint. Magic Eraser's AI aims for 'professional cleaning' white rather than 'cosmetic veneer' white — the teeth should look healthy and natural, not luminous. Brush precisely over the tooth surfaces and avoid the gums and lips, which have their own natural pink and red tones that shouldn't be affected. If the photo shows both upper and lower teeth, brush both sets for consistent whitening. For photos where only a few teeth show (a slight smile), brush just the visible teeth — the AI matches the correction to the visible area. Individual teeth may have slightly different natural shades, and the AI preserves this variation for realism. For photos with colored lighting (warm restaurant light, golden hour), the teeth correction accounts for the ambient color cast. If someone has a gold or silver dental cap visible in the photo, avoid brushing over it — the AI may try to whiten it, which would look unnatural.
Frequently asked questions
- Will my teeth look fake or too white?
- No. The AI targets a natural white shade — brighter than stained but not the artificial glow of over-whitened photos. The result looks like well-maintained natural teeth.
- Does it affect the gums or lips?
- Only the area you brush over is corrected. If you stay within the tooth surfaces, gums and lips remain unchanged. If you accidentally include gum or lip area, the AI generally leaves non-tooth colors alone.
- Can it fix a single discolored tooth?
- Yes. Brush over just the affected tooth and the AI corrects its color to match the surrounding teeth. This works well for a single stained or gray tooth that stands out from the rest.
- Is teeth whitening free?
- Yes. Magic Eraser's free tier covers teeth whitening in photos. Upload your portrait, brush over the teeth, and export the brightened smile at no cost.
- Is this a real teeth whitening photo editor, or does it just brighten the whole image?
- It works as a targeted teeth whitening editor. Instead of lifting brightness across the entire photo, the AI corrects only the tooth area you brush, focusing on the yellow and brown discoloration. Gums, lips, and skin keep their natural color. The result is whiter teeth against an unchanged face — not a washed-out, over-brightened image.
- Can I whiten teeth in a photo on my phone?
- Yes. Magic Eraser runs on iOS and Android with the same brush-and-erase flow as the web. Open a portrait from your camera roll, pinch to zoom in on the smile for precision, brush the visible teeth, and tap Erase. Zooming in helps you stay on the tooth surfaces and off the lips and gums, which keeps the whitening looking natural on a small screen.
- How white will the teeth look — can it whiten very yellow teeth?
- It can noticeably reduce strong yellowing, but it aims for a natural healthy shade rather than pure white. For heavily stained teeth, expect a clear improvement toward the color of professionally cleaned teeth, not a bleached veneer look. This keeps the smile believable. If you want them brighter, you can run the brush again, but pushing too far starts to look artificial.