Remove scars from photos
Erase surgical scars, acne scars, injury marks, and other visible scarring from portraits, headshots, and body photos. Magic Eraser removes the scar tissue and reconstructs natural skin tone and texture — producing a clean result that looks unedited.
Last updated
Open Magic Eraser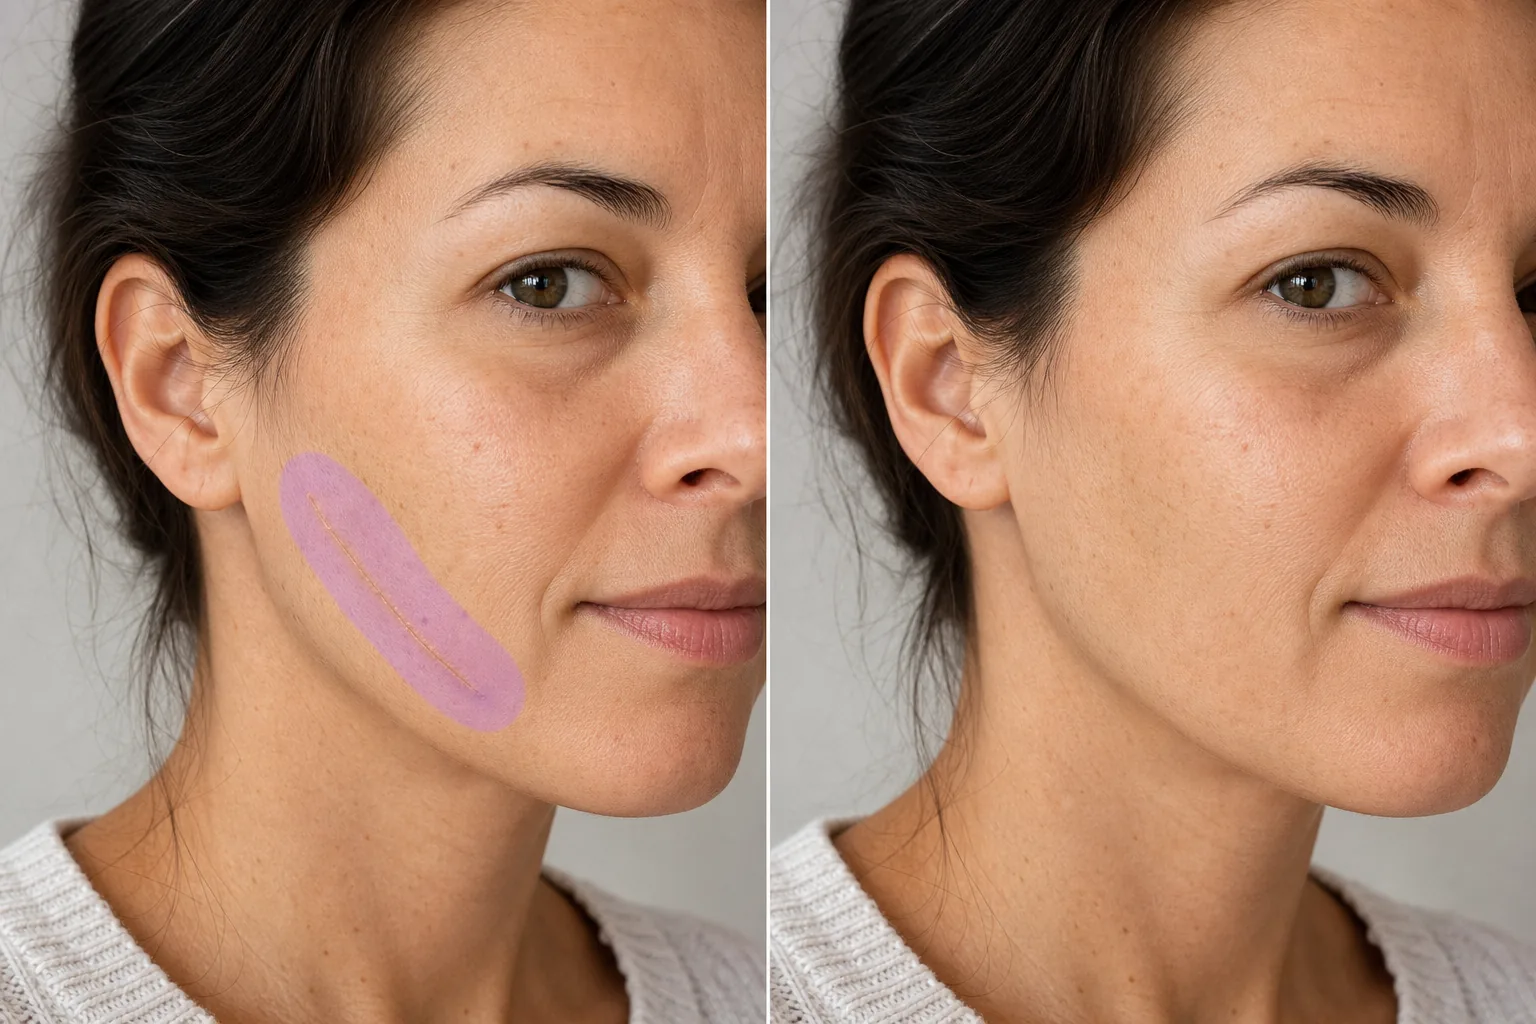
How to remove a scar from a photo
To remove a scar from a photo, open Magic Eraser on the web, iOS, or Android, brush over the scar plus a thin margin of surrounding skin, and tap Erase — the AI reconstructs natural skin tone and texture in its place. It is free with sign-in required. It reduces or hides the scar's appearance while keeping real skin texture; results are strongest on flat, discolored marks and on clear, well-lit photos. Scars tell stories, but in professional headshots, modeling portfolios, and formal portraits, they can become the focal point instead of the person. A surgical scar across a forehead, acne scarring on cheeks, or an injury mark on an arm pulls the viewer's eye away from the expression and composition the photographer intended. Clients regularly request scar reduction or removal in their retouched photos — not because they're ashamed, but because they want the image to represent how they see themselves, not a single moment of their medical history. Magic Eraser's AI analyzes the scar texture (raised, indented, discolored, or smooth) and the surrounding healthy skin, then reconstructs the area with natural skin that matches in tone, texture, pore pattern, and lighting. The result preserves the natural look of the skin without the over-smoothed appearance of heavy retouching.
Remove a scar in three steps
- 1
Upload your photo
Open Magic Eraser on the web, iOS, or Android and upload the portrait or photo containing the scar you want to remove.
- 2
Brush over the scar
Paint over the scar tissue with a brush that covers the full width of the scar plus a small margin of healthy skin. For long scars, brush along the entire length in one stroke for consistent reconstruction.
- 3
Erase and verify
Tap Erase and the AI replaces the scar with natural skin texture. Zoom in to confirm the reconstructed area blends seamlessly with surrounding skin — check for consistent tone, texture, and lighting. Export the retouched photo.
Best for
- Professional headshots where clients request scar removal
- Modeling portfolios requiring clean skin presentation
- Wedding and event portraits with retouching requests
- Acting headshots for roles requiring a specific appearance
- Corporate team photos with uniform retouching standards
- Social media profile photos with a polished look
- Dermatology and cosmetic surgery before/after documentation
- Photo restoration where scars appeared after the original photo
Tips for natural scar removal
Scar removal quality depends on the type of scarring. Flat, discolored scars (lighter or darker than surrounding skin) are the easiest to correct — the AI matches the surrounding tone and the result is virtually invisible. Raised scars (keloid or hypertrophic) cast subtle shadows that the AI also removes, but include the shadow area in your brush selection for a complete correction. Indented scars (atrophic, like ice-pick acne scars) require the AI to reconstruct both the skin surface and the texture depth — results are best when surrounding skin provides a clear reference. For large scar areas covering significant skin surface, work in sections and verify that skin tone stays consistent across sections. The AI produces results that preserve natural skin texture including pores and fine lines, avoiding the plastic-smooth look that aggressive beauty filters create.
Frequently asked questions
- Can it remove large surgical scars?
- Yes. Brush over the full length and width of the scar. The AI reconstructs natural skin across the entire area. Very large scars on contoured body areas (like a curved torso) may benefit from processing in sections.
- Does it work on acne scars?
- Yes. Both raised and indented acne scars are correctable. For scattered acne scarring across a face, brush over each scarred area. The AI reconstructs smooth skin with natural pore texture.
- Will the result look airbrushed?
- No. The AI preserves natural skin characteristics — pores, fine lines, and color variation. The corrected area matches the surrounding skin's real texture rather than producing a smooth, filtered appearance.
- Is scar removal free?
- Yes. Magic Eraser's free tier covers scar removal from portraits. Upload your photo, brush over the scar, and export the retouched result at no cost.
- Is this a free scar removal photo editor I can use online?
- Yes. Magic Eraser runs in the browser as a limited free edits after sign-in scar removal editor — no download, sign-in required, and no watermark on the result. Open it on the web, upload your photo, brush over the scar, and tap Erase. The same tool is available as iOS and Android apps if you prefer editing on your phone. Free-tier editing covers scar retouching from portraits and body photos.
- Can I remove a scar from an old or printed picture?
- Yes. Scan or photograph the printed picture, then upload the scan and brush over the scar as usual. The AI rebuilds skin from the surrounding area, so results depend on how sharp and well-lit the scanned skin is. Soft focus, film grain, or low resolution gives the AI less texture to match, so retouched areas on old photos can look slightly smoother than the rest of the picture.
- Does removing the scar change the rest of the photo?
- No. Magic Eraser only edits the area you brush — the rest of the picture, including the face, lighting, and background, stays untouched. Nothing is altered until you brush and tap Erase, and you keep your original file, so you can compare before and after or redo the edit. This makes it practical for before/after documentation where only the marked region should change.