Rimuovi le parentesi graffe dalle foto
Due o tre anni di trattamento ortodontico non dovrebbero cancellare due o tre anni di foto importanti. L'intelligenza artificiale di Magic Eraser rimuove gli attacchi metallici, gli apparecchi ortodontici in ceramica, l'hardware linguale, i fili di contenzione e i bordi visibili degli allineatori dai ritratti scolastici, dalle foto di famiglia, dagli scatti del giorno del matrimonio, dai ritratti professionali e dalle foto degli anziani, ricostruendo i denti sottostanti puliti e dall'aspetto naturale in pochi secondi.
Ultimo aggiornamento
Apri la gomma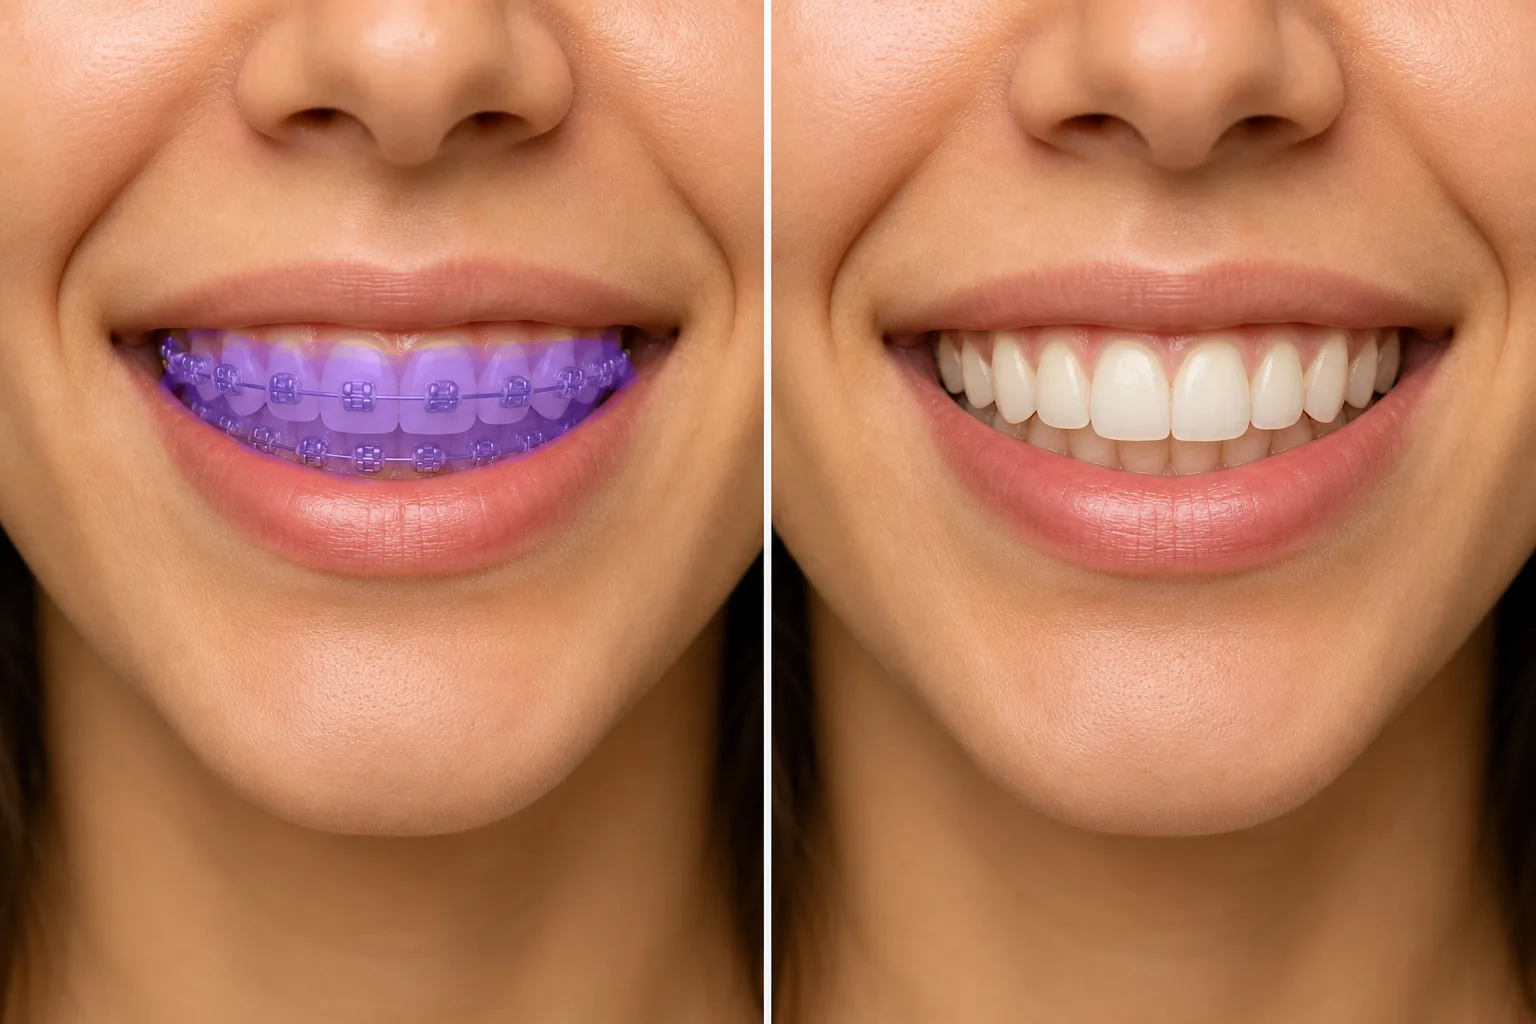
Come togliere l'apparecchio dai denti in una foto
Per rimuovere l'apparecchio da una foto, apri Magic Eraser sul web, su iOS o Android, carica la foto, passa il brush sui denti dove si vedono attacchi e filo, e lascia che l'AI ricostruisca denti puliti al di sotto. È gratis, senza registrazione. Il risultato è un sorriso dall'aspetto naturale ricavato dai bordi visibili dei denti — una ricostruzione plausibile, non un'anteprima dei tuoi denti reali a fine trattamento, quindi non considerarlo una previsione ortodontica. Funziona meglio su un sorriso nitido e frontale; per un ritratto o una foto di matrimonio visti a dimensioni di stampa, passa il brush in 2-3 passate e controlla da vicino. Mantieni un risultato in cui sei chiaramente riconoscibile, soprattutto per le foto legate all'identità. Il trattamento ortodontico medio dura dai 18 ai 36 mesi e sempre più spesso questa finestra include il trattamento degli adulti per i professionisti che lavorano così come i più tradizionali anni di trattamento degli adolescenti. L'American Association of Orthodontists ha riferito negli ultimi anni che circa 4 milioni di persone negli Stati Uniti sono in trattamento ortodontico in un dato momento, e circa 1 su 4 di questi sono adulti, il che significa ritratti scolastici, foto di senior, foto di balli studenteschi e di ritorno a casa, foto di laurea, vacanze in famiglia, matrimoni (la sposa, lo sposo, la festa nuziale, i genitori di), colpi alla testa di LinkedIn, ritratti di relatori professionisti e pagine di team aziendali catturano regolarmente persone con hardware ortodontico attivo visibile nei loro sorridere. Riprendere le riprese dopo la fine del trattamento di solito non è un'opzione: lauree e matrimoni avvengono nelle date del calendario, i ritratti scolastici avvengono negli orari scolastici e le foto di gruppo familiare irripetibili non possono essere rimesse in scena due anni dopo. La rimozione manuale degli apparecchi ortodontici in Photoshop è un lavoro difficile perché gli apparecchi ortodontici si trovano sulla faccia anteriore di ogni dente visibile, gli attacchi ortodontici occludono il colore e la forma naturali del dente, l'arco di collegamento attraversa ogni dente nel sorriso e la ricostruzione richiede lo strumento timbro clone per produrre una forma realistica del dente, colore del dente, bordo della linea gengivale e ombra tra i denti, il tutto preservando la forma unica del dente della persona specifica (non un modello di dente generico). L'intelligenza artificiale di Magic Eraser gestisce la geometria deducendo la struttura del dente dai bordi visibili non bloccati (linea gengivale, bordo mordente, il piccolo frammento di dente naturale visibile sopra e sotto ciascun attacco) e utilizzando segnali del contesto facciale per generare denti puliti che corrispondano al resto del viso. Per la maggior parte dei casi di ritratti scolastici e foto di famiglia, un singolo passaggio di pennello produce una modifica invisibile; per i colpi alla testa professionali e il lavoro di qualità nuziale in cui la modifica deve sopravvivere a un'ispezione ravvicinata delle dimensioni di stampa, un flusso di lavoro in 2-3 passaggi con perfezionamento AI Enhance è il percorso più pulito.
Cancella le parentesi graffe in tre passaggi
- 1
Carica la foto
Apri Magic Eraser sul Web, iOS o Android. Inserisci il ritratto scolastico, la foto del matrimonio, la foto di gruppo familiare, il ritratto professionale o qualsiasi foto in cui l'apparecchio è visibile nel sorriso. JPEG, PNG, HEIC e WebP sono tutti supportati. Per ottenere i migliori risultati, l'originale dovrebbe essere un primo piano o uno scatto medio ben messo a fuoco in cui il sorriso è chiaramente a fuoco; anche le foto di gruppo fortemente ingrandite funzionano ma con meno dettagli da ricostruire.
- 2
Spennellare gli apparecchi ortodontici e l'arco
Dipingi sopra gli attacchi in metallo o ceramica su ciascun dente, l'arco di collegamento che attraversa orizzontalmente il sorriso, eventuali elastici o ganci visibili e qualsiasi filo di ritenzione se presente. Copri ciascuna staffa più un piccolo margine attorno ai bordi per catturare la clip di collegamento e le linee d'ombra. Per gli allineatori trasparenti e gli apparecchi ortodontici in ceramica (che sono meno visibili del metallo), spazzola più leggermente e lascia che sia l'intelligenza artificiale a gestire la correzione delicata: una spazzolatura eccessiva su hardware già sottile può produrre un aspetto innaturalmente liscio. Per gli apparecchi per tutta l'arcata con hardware su ogni dente visibile, un passaggio continuo dello spazzolino su tutto il sorriso è in genere più veloce che picchiettare ciascun attacco individualmente.
- 3
Tocca Cancella e perfeziona
L'intelligenza artificiale ricostruisce la superficie naturale del dente sotto ciascun attacco, adattandosi al colore visibile dei denti circostanti, alla forma della linea gengivale, al contorno del bordo del morso e al modello di ombra tra i denti. Per lavori di livello professionale (riprese alla testa, album di nozze, ritratti di anziani), segui con un passaggio AI Enhance per rendere più nitidi i dettagli dei denti e recuperare la struttura naturale della superficie dei denti che la levigatura AI a volte può appiattire. Esporta alla massima risoluzione: JPEG per social ed e-mail, PNG per stampa, WebP per caricamento web.
Meglio per
- Ritratti scolastici e foto di anziani scattati durante il trattamento ortodontico attivo, dove la foto rimarrà negli annuari, nelle esposizioni di laurea e negli album di famiglia per decenni
- Foto di matrimonio in cui la sposa, lo sposo, gli invitati al matrimonio, i genitori o altri membri chiave della famiglia sono a metà del trattamento il giorno del matrimonio
- Riprese professionali per LinkedIn, pagine di team aziendali, biografie di relatori e programmi di conferenze in cui la foto rappresenterà la persona per anni dopo la fine del trattamento
- Foto di vacanze in famiglia e di eventi importanti (lauree, primo giorno di scuola, foto di fratelli, ritratti delle vacanze) in cui la data del calendario non può essere spostata e non è possibile ripetere le riprese
- Foto di balli di fine anno, ballo di fine anno e ballo in cui gli studenti sono a metà del trattamento ma desiderano che le foto formali corrispondano all'occasione formale
- Modellazione, recitazione e ritratti di pazienti ortodontici adulti i cui ritratti in carriera devono rappresentare il loro aspetto post-trattamento
- Pazienti ortodontici adulti tra i 20 e i 40 anni che desiderano foto professionali e personali della finestra di trattamento di 1,5-3 anni che assomiglino al loro sorriso post-trattamento
- Pulitura storica dell'album di famiglia per le foto più vecchie in cui sono visibili gli apparecchi ortodontici, ma il soggetto è ormai decenni nella sua vita adulta post-trattamento
Casi limite e punte
La rimozione degli apparecchi ortodontici funziona meglio quando la foto mostra un sorriso chiaramente a fuoco e i denti circostanti (sopra e sotto gli attacchi, i denti posteriori ai bordi del sorriso) sono visibili senza hardware: quel dente visibile fornisce all'intelligenza artificiale un riferimento sufficiente per ricostruire colore, forma e traslucenza realistici. Quattro casi richiedono un approccio diverso. Innanzitutto, gli allineatori trasparenti a copertura totale (Invisalign, ClearCorrect) in cui ogni superficie del dente è coperta da un vassoio trasparente: i vassoi sono abbastanza discreti da non essere notati dalla maggior parte degli spettatori, ma per i colpi alla testa in cui la modifica è importante, il riempimento AI con un messaggio di testo ("pulire i denti naturali, nessun hardware ortodontico, corrispondente al labbro circostante e alla linea gengivale") produce risultati più puliti rispetto alla gomma per pennello perché non c'è alcun riferimento del dente esposto da cui lo spazzolino possa estrapolare. In secondo luogo, casi gravi di disallineamento pre-trattamento in cui i denti sottostanti (sotto gli attacchi) sono significativamente storti o aperti: l'intelligenza artificiale ricostruirà i denti così come sono sotto, il che potrebbe non corrispondere all'aspetto post-trattamento visibilmente corretto verso cui il paziente si sta muovendo. Per i modelli di sorriso post-trattamento idealizzati (visualizzazioni della consultazione dell'ortodontista), AI Fill con un messaggio che descrive la forma del sorriso target funziona meglio della gomma da cancellare. Terzo, apparecchi linguali (montati sulla parte posteriore dei denti, non sulla parte anteriore): in genere non visibili nelle foto standard e non richiedono modifiche, ma negli scatti di risate a bocca larga in cui la parte posteriore dei denti superiori cattura la luce, sfiora leggermente l'hardware visibile. In quarto luogo, i fili di contenzione visibili dopo la rimozione dell'apparecchio (comune durante la fase di ritenzione post-trattamento di 6-12 mesi): si comportano come gli apparecchi completi ma si aspettano una modifica più leggera e veloce perché i fili di contenzione sono più sottili degli archi ortodontici attivi. Per i ritratti degli anziani e le foto degli annuari utilizzati negli annuari scolastici, in genere non è richiesta alcuna divulgazione perché la modifica è cosmetica e il soggetto ha acconsentito all'utilizzo della foto; per il giornalismo, la fotografia documentaristica e qualsiasi contesto in cui la foto non modificata fa parte di un documento fattuale, le norme sulla divulgazione variano a seconda della pubblicazione.
Domande frequenti
- È gratuito rimuovere l'apparecchio da una foto?
- SÌ. Il livello gratuito di Magic Eraser copre la pulizia degli apparecchi con limiti di utilizzo giornaliero. L'aggiornamento a Premium ($ 29,99/anno) rimuove i limiti e sblocca esportazioni a risoluzione più elevata, utile per stampe di ritratti senior, album di nozze e ritratti professionali in cui la piena risoluzione è importante su display e dimensioni di stampa di grandi dimensioni.
- I denti ricostruiti sembreranno naturali o evidentemente modificati?
- Per la maggior parte dei casi di ritratti scolastici, foto di famiglia e ritratti casuali, l'intelligenza artificiale produce un risultato invisibile alle dimensioni di visualizzazione tipiche (telefono, laptop, stampa standard). Per le stampe di album di nozze di dimensioni 8x10 o più grandi e per i ritratti professionali che verranno ingranditi sullo schermo di una conferenza o stampati in una pubblicazione, pianifica un passaggio di perfezionamento AI Enhance dopo la rimozione iniziale dell'apparecchio per rendere più nitidi i dettagli dei denti e recuperare la struttura naturale: il primo passaggio dell'intelligenza artificiale a volte può produrre denti leggermente troppo lisci che sembrano modificati su schermi di grandi dimensioni. Per i colpi alla testa di modellazione di livello professionale e le foto di concorsi in cui la modifica deve sopravvivere all'ispezione professionale, un flusso di lavoro ibrido (Magic Eraser per la geometria, perfezionamento manuale della corrispondenza dei colori in un editor desktop) gestisce i casi limite.
- Può rimuovere anche gli apparecchi trasparenti o in ceramica?
- SÌ. Gli allineatori trasparenti (Invisalign, ClearCorrect) e gli apparecchi ortodontici in ceramica (attacchi del colore dei denti con un sottile filo di collegamento) sono meno visibili degli apparecchi metallici, ma vengono comunque registrati come hardware visibile nei colpi alla testa illuminati in studio e nelle foto ravvicinate. Scorri i contorni visibili della staffa e il filo di collegamento e lascia che l'intelligenza artificiale gestisca la correzione sottile: in questi casi, la spazzolatura insufficiente è solitamente un punto di partenza migliore rispetto alla spazzolatura eccessiva perché l'intelligenza artificiale estrapola bene dai suggerimenti minimi quando l'hardware sottostante è già sottile.
- Che ne dici delle foto in cui qualcuno ride e l'apparecchio è molto prominente?
- Le grandi risate a bocca aperta sono il caso più difficile perché l'hardware visibile è massimizzato e il riferimento dei denti circostanti è ridotto al minimo: l'intelligenza artificiale ha meno denti non bloccati da cui estrapolare e le linee di contesto delle labbra e della lingua cambiano con la forma della bocca. Il flusso di lavoro più pulito per questi scatti è un approccio a due passaggi: il primo passaggio dei pennelli sugli attacchi e sull'arco (l'intelligenza artificiale ricostruisce la struttura visibile del dente), quindi un secondo passaggio su tutte le aree in cui l'ombra tra i denti o il contorno del morso risulta piatto. Per gli scatti divertenti in cui la ricostruzione deve essere di livello archivistico (album di nozze, foto di famiglia importanti), 5-10 minuti di perfezionamento dopo il passaggio dell'IA di solito producono risultati invisibili.
- Posso farlo sulle foto dei bambini?
- Sì, con le avvertenze standard che si applicano a qualsiasi modifica fotografica che coinvolga minorenni. Per gli album di famiglia e per uso personale, la rimozione dell'apparecchio sui ritratti scolastici dei bambini e sulle foto di famiglia è una modifica estetica di routine. Per la pubblicazione negli annuari, nei siti web scolastici e per qualsiasi uso commerciale delle foto dei bambini, le politiche del distretto scolastico in genere richiedono il consenso dei genitori per la foto originale e non affrontano specificamente la modifica tramite intelligenza artificiale, ma le pratiche di consenso per le somiglianze modificate tramite intelligenza artificiale si stanno evolvendo e rendere pubblica la modifica (o chiedere il permesso prima di modificarla) è l'impostazione predefinita più sicura per qualsiasi foto di un minore che verrà pubblicata al di fuori dell'album di famiglia. Magic Eraser non conserva le foto degli utenti oltre la sessione di modifica.
- La mia foto alla testa professionale sembrerà autentica dopo la rimozione dell'apparecchio?
- Per le foto del profilo LinkedIn, i ritratti delle pagine dei team aziendali e le biografie dei relatori delle conferenze, il risultato modificato dall'intelligenza artificiale è in genere indistinguibile da un sorriso naturale per gli spettatori che non ti conoscono e la modifica viene letta come un'autentica foto professionale. Per colleghi e clienti che sanno che sei attualmente in cura, la modifica si legge come se fossi in una data futura piuttosto che come una falsa rappresentazione dello stato attuale, allo stesso modo in cui i headshot professionali utilizzano abitualmente luci, trucco e ritocchi che non sopravviverebbero a un'attenta ispezione di persona. Per le professioni di modella, recitazione e davanti alla telecamera in cui il colpo alla testa è lo strumento di casting, il flusso di lavoro più cauto è quello di mantenere entrambe le versioni (con e senza apparecchio) e scegliere in base al contesto, poiché alcune chiamate di casting richiedono specificamente foto dello stato attuale.
- Posso modificare in batch un album di nozze in cui sono in cura più persone?
- Sì, ma pianifica il lavoro per foto anziché una singola azione batch perché le parentesi graffe appaiono con angoli, dimensioni e livelli di visibilità diversi su foto diverse. Il flusso di lavoro più pulito per un album di nozze con più soggetti: estrai le 20-50 foto degli eroi in cui gli apparecchi ortodontici sono chiaramente visibili, modifica ciascuna con Magic Eraser in 30-90 secondi per foto, quindi esegui un passaggio di coerenza finale per assicurarti che il sorriso modificato venga letto come la stessa persona su tutte le foto. Per le foto di gruppo della festa nuziale in cui 2-3 persone sono in trattamento contemporaneamente, modifica ciascun viso come un passaggio Magic Eraser separato in modo che l'intelligenza artificiale gestisca la forma e il colore specifici dei denti di ciascun sorriso in modo indipendente.