Supprimer les grains de beauté des photos
Effacez les grains de beauté, les grains de beauté, les acrochordons et les taches brunes des portraits, des portraits et des photos professionnelles. Magic Eraser supprime la marque et reconstruit la texture et le teint naturels de la peau en dessous – suffisamment subtils pour que la modification soit invisible.
Dernière mise à jour
Ouvrir Magic Eraser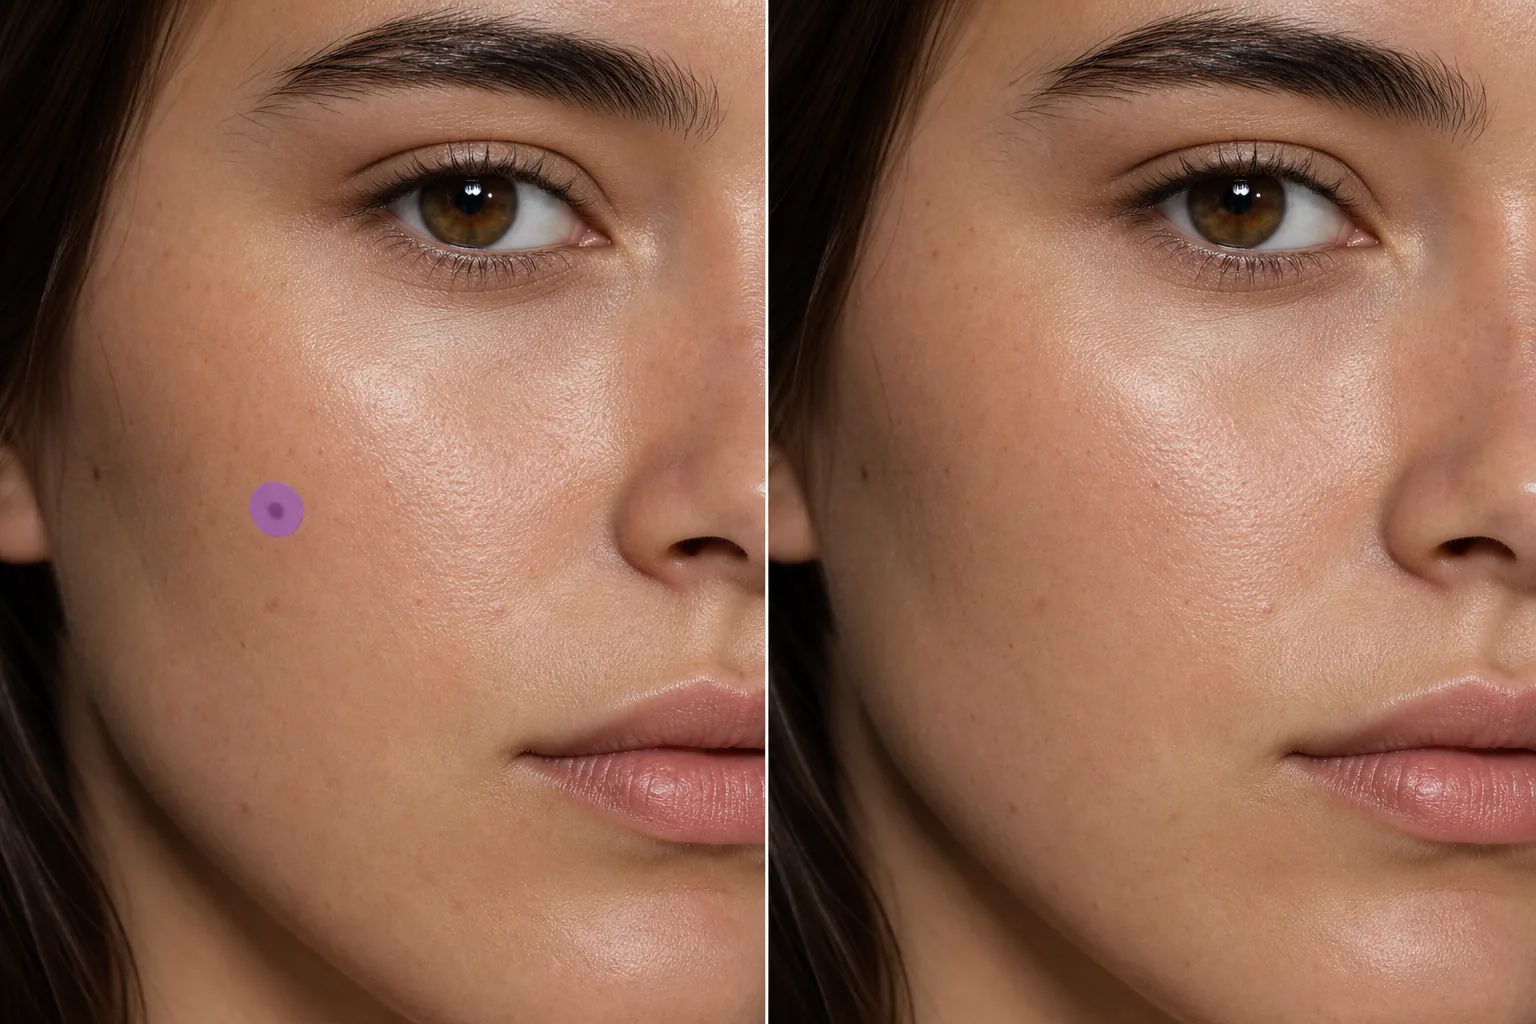
Comment enlever un grain de beauté sur une photo
Pour retirer un grain de beauté sur une photo, ouvrez Magic Eraser sur le web, iOS ou Android, importez le portrait, passez la brush sur le grain de beauté, puis tapez sur Effacer. L'IA reconstruit la peau en dessous en s'accordant à la texture, au teint, aux pores et à la lumière environnants — le résultat ressemble à une peau naturellement nette, et non à une zone lissée. C'est gratuit, sans inscription. Cela modifie uniquement l'apparence de la marque sur la photo ; cela n'a aucun rapport avec le grain de beauté sur votre peau, et tout grain de beauté qui évolue ou qui vous inquiète relève d'un médecin, pas d'un éditeur de photos. La retouche de portraits comprend souvent des demandes visant à supprimer ou à réduire l’apparence des grains de beauté, des grains de beauté et des taches cutanées proéminentes. Un grain de beauté sur le nez ou la joue peut parfaitement convenir en personne, mais peut devenir un point focal visuel sur une photographie haute résolution sous un éclairage de studio. Les retoucheurs professionnels utilisent des outils d'estampage de clones et de guérison pour résoudre ces problèmes - un processus qui nécessite une attention particulière à la texture de la peau, au motif des pores et à la direction de l'éclairage pour éviter la zone lisse révélatrice qui crie « éditée ». L'IA de Magic Eraser gère cela automatiquement : passez le pinceau sur la marque et l'IA reconstruit la peau qui correspond à la zone environnante en termes de texture, de ton, de motif de pores et d'éclairage. Le résultat ressemble à une peau naturellement claire, et non à une zone floue ou lissée.
Supprimer un grain de beauté en trois étapes
- 1
Téléchargez votre photo
Ouvrez Magic Eraser sur le Web, iOS ou Android et téléchargez le portrait ou la photo de la tête. Les images haute résolution produisent la reconstruction cutanée la plus naturelle.
- 2
Badigeonner le grain de beauté
Peignez le grain de beauté ou la marque avec un pinceau légèrement plus grand que la marque elle-même. Un pinceau serré préserve les détails les plus environnants. Pour plusieurs marques sur la même photo, appliquez-les toutes avant de les effacer.
- 3
Effacer et vérifier
Appuyez sur Effacer et l'IA remplace le grain de beauté par une texture de peau naturelle. Effectuez un zoom avant pour vérifier que le teint et la texture de la peau correspondent à la zone environnante : il ne doit y avoir aucune zone lisse ni changement de couleur visible. Exportez le portrait retouché.
Idéal pour
- Portraits professionnels où les clients demandent un nettoyage de la peau
- Portefeuilles de modélisation nécessitant une présentation cutanée propre
- Portraits de mariage avec demandes de retouches subtiles
- Photos d'école et d'annuaire avec retouches cohérentes
- Des portraits d'acteur où la clarté de la peau est importante pour le casting
- Photos de profil sur les réseaux sociaux avec un look soigné
- Emballage du produit avec visages de modèles (exigence de transparence sur la peau)
- Photos d'équipe d'entreprise avec des normes de retouche uniformes
Conseils pour éliminer les grains de beauté invisibles
Utilisez le plus petit pinceau qui recouvre entièrement la marque. Les pinceaux surdimensionnés suppriment plus de texture de peau environnante que nécessaire, rendant la zone d'édition légèrement plus lisse que le reste du visage. Pour les grains de beauté en relief qui projettent une petite ombre, incluez l’ombre dans votre sélection de pinceau – cela évite un artefact d’ombre résiduel qui n’aurait pas l’air naturel sur une peau plate. Si le grain de beauté se trouve sur une ligne de contour (mâchoire, bord de la joue, arête du nez), l'IA prend en compte le dégradé tonal sur cette zone. Plusieurs petites marques (amas de taches de rousseur, taches de vieillesse) peuvent être supprimées simultanément : brossez-les toutes avant d'appuyer sur Effacer pour un traitement cohérent. Pour les affections cutanées généralisées plutôt que pour les marques isolées, les outils de rehaussement peuvent produire un résultat global plus naturel que l'élimination point par point.
Questions fréquemment posées
- Le retrait aura-t-il l’air naturel de près ?
- Oui. L'IA reconstruit la texture réelle de la peau, y compris les pores et les variations naturelles de couleur. À haute résolution, le résultat est impossible à distinguer d’une peau claire et naturelle plutôt que de la zone floue produite par les outils de guérison de base.
- Puis-je supprimer les taches de rousseur de la même manière ?
- Oui. Badigeonnez les taches de rousseur ou les grappes individuelles. Pour les taches de rousseur légères, l’IA produit une peau propre ; pour les champs de taches de rousseur denses, travailler par petites sections donne le résultat le plus naturel.
- Est-ce que ça marche sur les peaux foncées ?
- Oui. L’IA correspond au teint environnant, quel que soit le teint. Il analyse le ton, la nuance et l'éclairage spécifiques de la peau autour de la marque et reconstruit en conséquence.
- L’élimination des taupes est-elle gratuite ?
- Oui. Le niveau gratuit de Magic Eraser couvre l’élimination des marques cutanées. Téléchargez votre portrait, balayez les marques et exportez gratuitement le résultat retouché.
- Comment retirer un grain de beauté sur une photo depuis mon téléphone ?
- Ouvrez Magic Eraser dans n'importe quel navigateur mobile ou dans l'application iOS ou Android, chargez le portrait depuis votre pellicule, puis pincez pour zoomer sur le grain de beauté. Passez la brush sur la marque uniquement avec votre doigt, puis tapez sur Effacer. Le zoom vous permet de couvrir le grain de beauté avec précision sans toucher la peau, les lèvres ou les sourcils autour. Le résultat est identique à la version ordinateur et s'enregistre directement dans vos photos.
- Puis-je atténuer un grain de beauté au lieu de le retirer complètement ?
- Magic Eraser efface ce que vous brossez, donc pour un résultat plus doux, passez la brush légèrement ou seulement sur une partie de la marque et vérifiez l'aperçu. Beaucoup préfèrent atténuer un grain de beauté visible plutôt que d'effacer entièrement une marque emblématique — effacez, observez à 100 %, et si le rendu paraît trop net, annulez et couvrez une zone plus petite pour un résultat plus naturel et authentique.
- Le retrait d'un grain de beauté laissera-t-il une zone lisse ou floue ?
- En principe non — l'IA reconstruit la peau avec des pores, une texture et des ombres assortis au lieu d'étaler la zone, et c'est ce qui la distingue d'un simple outil de flou. Si une zone paraît trop lisse, c'est généralement qu'une ombre ou une zone trop large a été brossée en même temps que le grain de beauté ; annulez, zoomez et passez la brush uniquement sur la marque elle-même pour un rendu plus net.