Eliminar arrugas de las fotos.
Suaviza las líneas de la frente, las patas de gallo, los pliegues nasolabiales y los pliegues del cuello en fotografías de retratos mientras mantienes la piel con un aspecto natural y texturizado. Magic Eraser reduce las arrugas sin crear la apariencia plástica y demasiado suavizada que produce el retoque agresivo: el resultado se parece al sujeto en un día bien descansado, no a una figura de cera.
Última actualización
Abrir Magic Eraser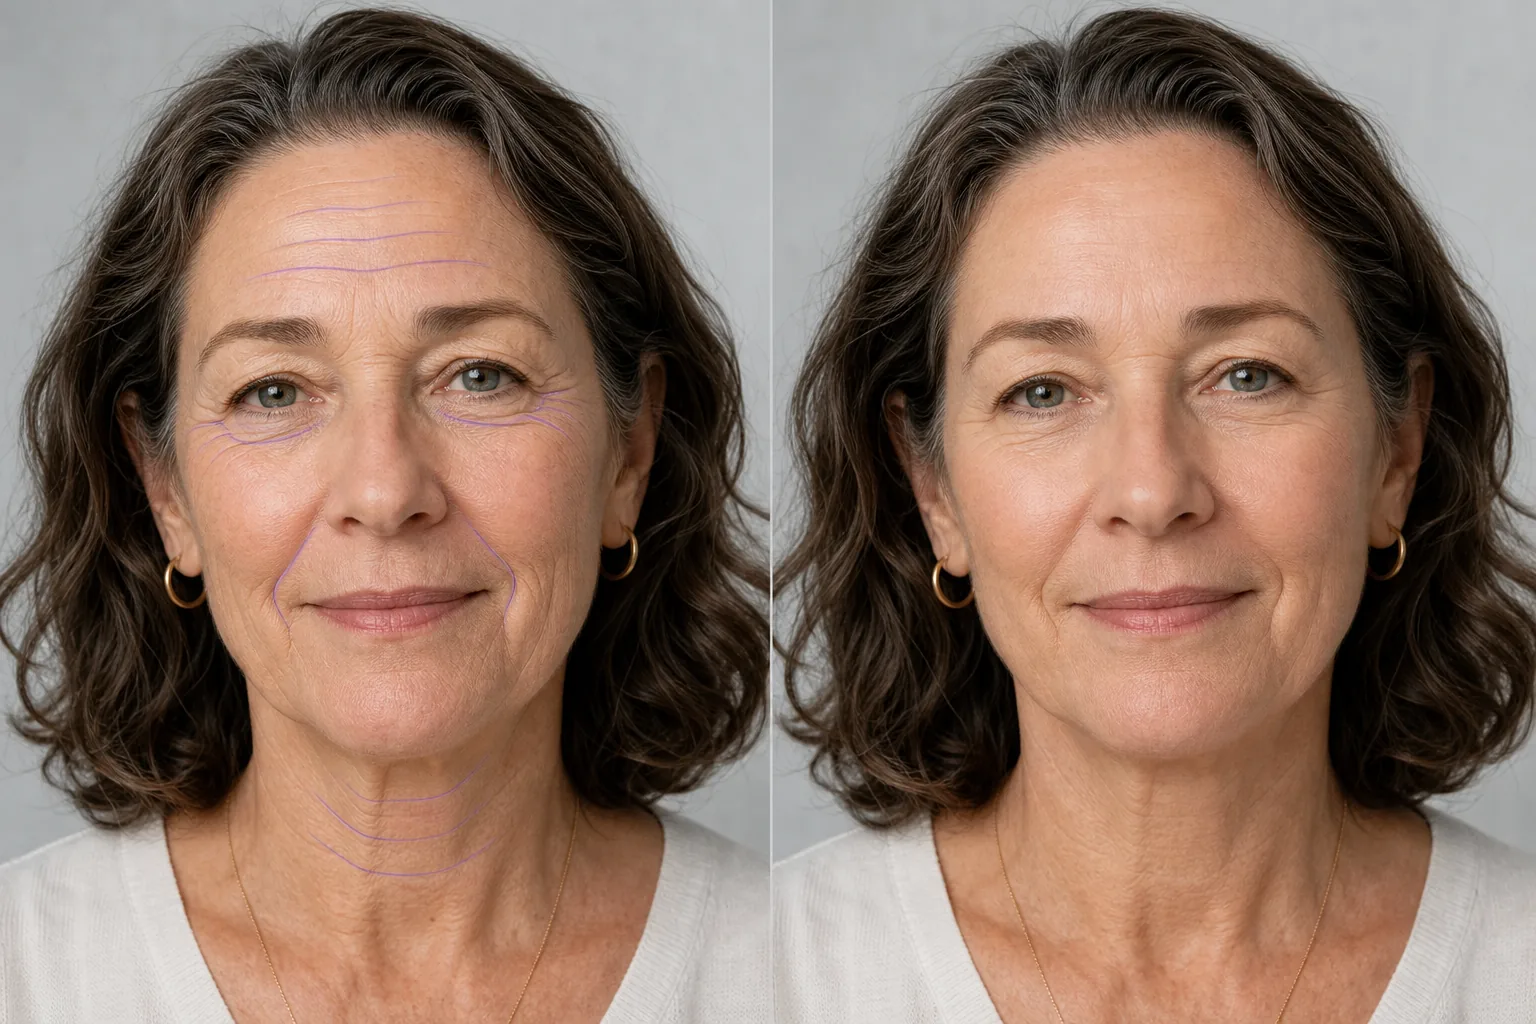
Cómo eliminar las arrugas de una foto
Para quitar las arrugas de una foto, abre Magic Eraser en la web, iOS o Android, sube tu retrato, pinta con el brush sobre las líneas que quieras suavizar —líneas de la frente, patas de gallo, surcos nasogenianos o pliegues del cuello— y toca Erase. La IA reduce la profundidad de las arrugas conservando la textura de la piel, los poros y la iluminación natural, para que el rostro luzca descansado en lugar de retocado. Es gratis, sin registro y sin marca de agua. Las arrugas siguen los contornos naturales del rostro e interactúan con la iluminación, la expresión y la textura de la piel. Al clonar el pliegue de la frente se reemplaza la arruga con la piel cercana, pero el gradiente de iluminación rara vez coincide: el resultado es una mancha visible que se ve peor que la arruga original. Los retocadores profesionales utilizan técnicas de separación de frecuencias que tardan entre 10 y 15 minutos por retrato. Magic Eraser utiliza IA que comprende la estructura facial y la iluminación para reducir las arrugas y al mismo tiempo preservar la textura natural de la piel, los poros y los gradientes de luz que hacen que un retrato parezca auténtico. La IA distingue entre arrugas (que desea reducir) y líneas de carácter (que contribuyen a la expresión), aplicando un suavizado gradual en lugar de un borrado total.
Elimina las arrugas en tres pasos
- 1
Sube tu retrato
Abra Magic Eraser en la web, iOS o Android y cargue la foto de rostro, la foto de grupo o el retrato. Se aceptan JPEG, PNG, HEIC y WebP. Para obtener mejores resultados, utilice una imagen bien iluminada donde las arrugas que desea reducir sean claramente visibles.
- 2
Cepilla las zonas arrugadas.
Utilice la herramienta Pincel para pintar sobre las arrugas que desea reducir: líneas de la frente, patas de gallo alrededor de los ojos, pliegues nasolabiales, pliegues del cuello o líneas de expresión entre las cejas. Trabaje un área a la vez para obtener resultados más naturales. Cepille un poco más que la arruga misma para que la IA tenga contexto para la piel circundante.
- 3
Borrar y ajustar
Toque Borrar y la IA suavizará las arrugas seleccionadas mientras preserva la textura de la piel y el gradiente de iluminación natural del rostro. Acérquese al 100% para verificar el resultado: si alguna arruga se redujo de manera demasiado agresiva o no lo suficiente, realice una segunda pasada en esas áreas específicas. Exporte a resolución completa para fotografías de rostros, perfiles de LinkedIn, fotografías de aplicaciones de citas o imprima.
Lo mejor para
- Fotografías profesionales en las que la reducción moderada de las arrugas se ve pulida sin parecer artificial.
- Fotos de LinkedIn y de equipos corporativos que necesitan una apariencia consistente y bien cuidada
- Fotos de perfil de citas donde el sujeto quiere una apariencia natural y favorecedora.
- Fotografía de bodas y eventos donde la pareja quiere un alisado sutil de la piel.
- Retratos de anuario y escolares donde los padres solicitan ligeros retoques
- Fotografías de rostros de agentes y autores de bienes raíces utilizadas en materiales impresos y sitios web
- Sesiones de retratos familiares donde los abuelos quieren un modesto retoque
- Fotografías de antes/después de hacer ejercicio o bienestar que muestren una apariencia renovada.
Consejos para eliminar las arrugas de forma natural
El objetivo es la reducción, no la eliminación. Borrar por completo todas las arrugas del rostro de una persona de 60 años parece asombroso: los espectadores lo perciben como artificial incluso si no pueden explicar por qué. La mejor práctica es reducir la profundidad de las arrugas entre un 50 y un 70 % en lugar de un 100 %. La IA de Magic Eraser tiende naturalmente a este enfoque gradual, pero si la primera pasada elimina demasiado, deshaga y use una pincelada más ligera. Preste especial atención alrededor de los ojos: las patas de gallo están estrechamente ligadas a la expresión y suavizarlas demasiado hace que el sujeto parezca vacío. Para fotografías grupales, haga coincidir el nivel de retoque en todos los sujetos: un rostro muy suavizado junto a rostros envejecidos naturalmente crean un contraste obvio. Al retocar para contextos profesionales (fotos de rostros, sitios corporativos), trate de que el sujeto se parezca a él mismo en un buen día, no a una persona diferente.
Preguntas frecuentes
- ¿Es gratis eliminar las arrugas de una foto?
- Sí. El nivel gratuito de Magic Eraser cubre la eliminación de arrugas con límites de uso diario. Premium ($29,99/año) elimina los límites y desbloquea exportaciones de mayor resolución para fotografías de rostros con calidad de impresión.
- ¿El resultado parecerá natural o demasiado procesado?
- Magic Eraser preserva la textura de la piel, los poros y la iluminación natural mientras reduce la profundidad de las arrugas. La IA aplica un suavizado gradual en lugar de un borrado total, lo que produce resultados que parecen renovados en lugar de retocados. Para obtener mejores resultados, trabaje un área facial a la vez y verifique con un zoom del 100%.
- ¿Puedo reducir las arrugas sin eliminarlas por completo?
- Sí. Utilice una pincelada más clara o haga una selección más pequeña. La IA ajusta la intensidad de la reducción de arrugas en función del área cepillada: selecciones más pequeñas y precisas producen resultados más sutiles. Siempre puedes realizar una segunda pasada si quieres una mayor reducción.
- ¿Funciona en fotos grupales con varias caras?
- Sí. Cepille las arrugas de cada rostro individualmente. Para fotografías de grupo, aplique retoques consistentes en todos los sujetos para que ninguna cara luzca obviamente más suave que las demás. La IA se adapta a la iluminación y al tono de piel de cada rostro de forma independiente.
- ¿Qué pasa con las arrugas del cuello y las manos?
- Magic Eraser funciona en cualquier superficie de la piel, no solo en el rostro. Cepille los pliegues del cuello, el pecho o las manos y la IA los suaviza preservando la textura subyacente de la piel. Las áreas del cuello y las manos responden bien porque la textura de la piel suele ser lo suficientemente uniforme para una reconstrucción limpia.
- ¿Cómo quito las líneas de la frente y las líneas del entrecejo de una foto?
- Pinta con el brush sobre las arrugas horizontales de la frente y las líneas verticales del entrecejo (las '11') entre las cejas, y luego toca Erase. La piel de la frente suele ser una superficie amplia y con iluminación uniforme, así que la IA la reconstruye de forma limpia y la reducción se ve natural. Trabaja las líneas horizontales y las del entrecejo en pasadas separadas si una zona necesita más suavizado que la otra, y revisa con zoom al 100% para que la frente no acabe pareciendo plana o brillante.
- ¿Puedo reducir las patas de gallo alrededor de los ojos sin que la cara parezca congelada?
- Sí, y esta es la zona en la que conviene ser más suave. Las patas de gallo se mueven con cada sonrisa, así que borrarlas por completo se ve artificial y deja la expresión vacía. Usa un brush más pequeño y una sola pasada ligera para reducir la profundidad de las líneas en lugar de eliminarlas: el objetivo es un aspecto descansado que aún se marque de forma natural cuando la persona sonríe.
- ¿Funciona con las líneas de sonrisa y los surcos nasogenianos?
- Sí. Pinta con el brush sobre los surcos nasogenianos que van desde la nariz hasta las comisuras de la boca. Estos se forman tanto por la estructura facial como por la edad, así que redúcelos parcialmente en lugar de borrarlos: aplanarlos por completo puede cambiar la forma del rostro. Una reducción del 50-70% suaviza el surco mientras la sonrisa y el contorno de la mejilla siguen pareciendo los de la persona real.
- ¿Puedo suavizar las arrugas y las bandas del cuello en un retrato?
- Sí. Pinta con el brush sobre los pliegues horizontales o las bandas verticales del cuello y toca Erase. La piel del cuello suele tener un tono y una textura más uniformes que la del rostro, así que normalmente se reconstruye de forma muy limpia. Iguala el nivel de suavizado del cuello al que aplicaste en la cara: un cuello impecable bajo un rostro ligeramente retocado es una señal habitual de que la foto fue editada.