How to upscale an image with AI
Low-resolution photos look pixelated when printed or displayed on high-DPI screens. AI upscaling enlarges images to 2x or 4x their original resolution while adding genuine detail — not just making pixels bigger, but generating the fine detail that wasn't in the original.
Last updated
Upscale now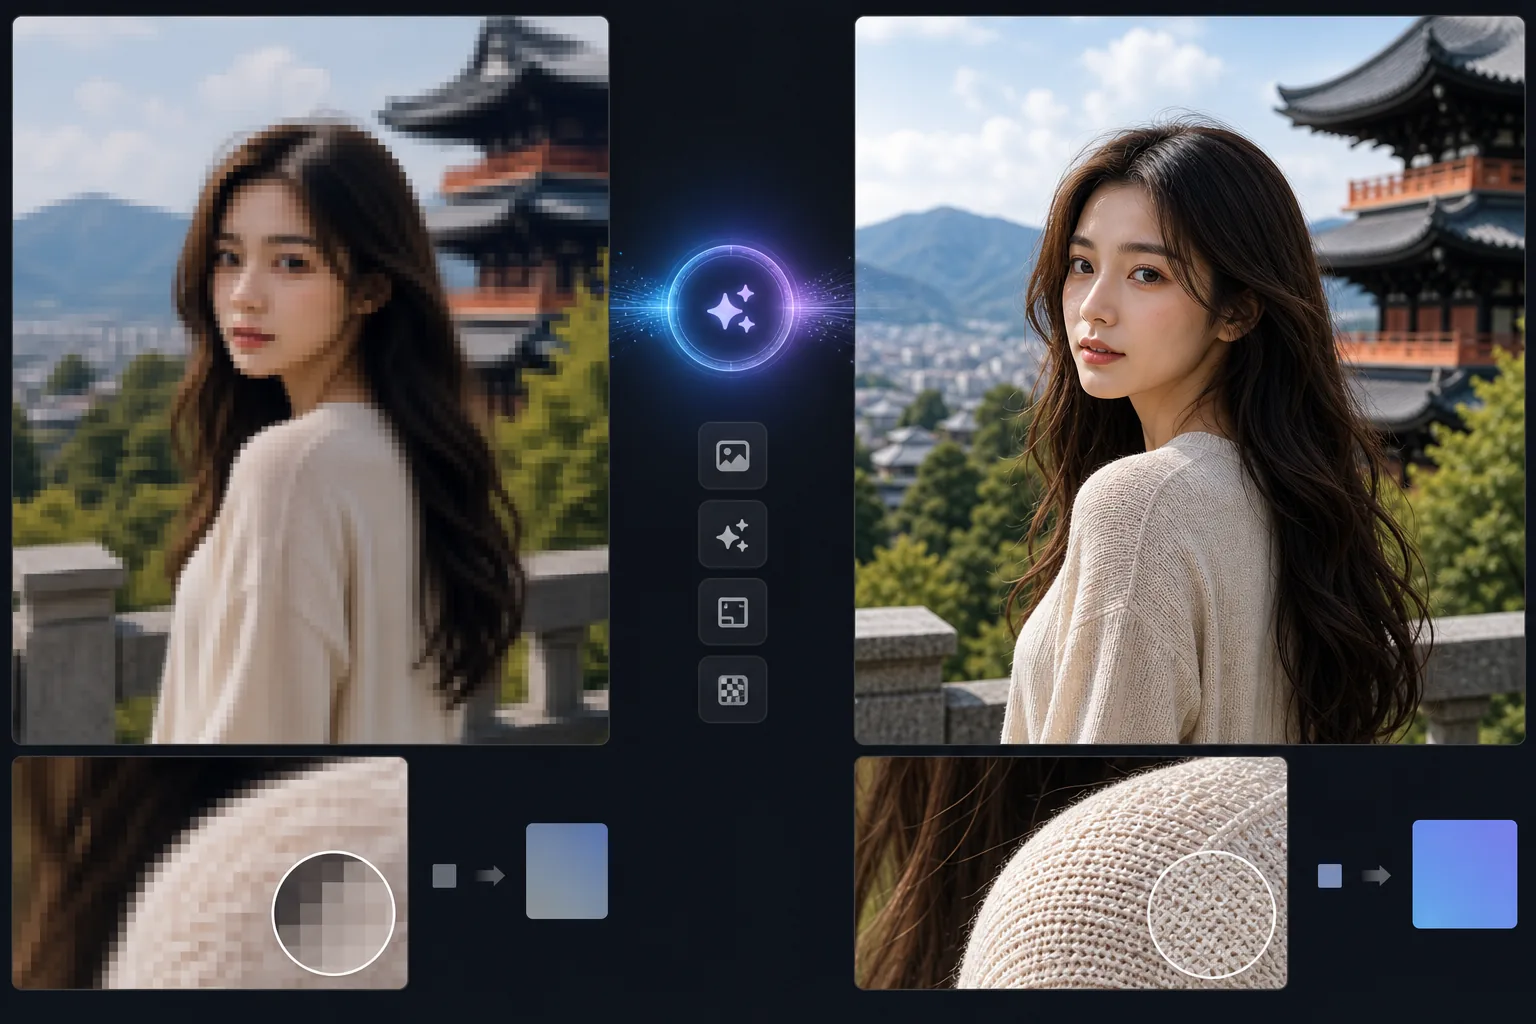
How to upscale an image with AI
To upscale an image, open Magic Eraser on the web, iOS, or Android, upload your low-resolution photo, pick an upscale factor (2x or 4x), and download the larger version — the AI adds genuine fine detail instead of just stretching pixels. It includes limited free edits after sign-in. The higher the factor, the more detail the AI has to invent rather than recover, so a 2x upscale of a decent photo stays closest to reality, while large jumps look sharp but drift further from the true original. Start from the best copy you have, and treat heavy upscaling as a plausible enlargement, not a recovered one. Traditional image upscaling (bicubic, bilinear interpolation) simply averages neighboring pixels to fill the gaps when enlarging. This produces blurry, soft images because no new detail is created — the algorithm just smooths between existing pixels. AI upscaling uses deep learning models trained on millions of high-resolution images to understand what fine detail should exist at higher resolution. When the AI upscales a face, it adds skin texture, eyelash detail, and hair strands that weren't visible at the original resolution. When it upscales text, it sharpens letter edges into crisp, readable forms. The result is an image that looks like it was originally captured at the higher resolution.
Upscale in three steps
- 1
Upload the image
Open Magic Eraser on web, iOS, or Android. Upload the low-resolution image you want to enlarge — a web download, an old phone photo, a cropped image, or a small thumbnail. JPEG, PNG, and WebP supported.
- 2
Choose upscale factor
Select 2x or 4x upscaling. 2x doubles both dimensions (a 500x500 image becomes 1000x1000). 4x quadruples them (500x500 becomes 2000x2000). Higher factors work best on photos; 2x is safer for graphics and text.
- 3
Process and download
The AI analyzes the image content and generates the high-resolution version with added detail appropriate to each region — skin texture on faces, fabric weave on clothing, leaf detail on foliage, sharp edges on architecture. Download the upscaled image at the new resolution.
Best for
- Printing old or low-resolution digital photos at large sizes without pixelation or blur
- Enlarging cropped photos that lost resolution when you zoomed into a specific area of a larger image
- Improving old phone photos (early smartphone cameras captured at much lower resolutions than modern devices)
- Preparing web images for high-DPI retina displays where standard resolution looks soft
- Upscaling thumbnails or social media images back to usable resolution for reprinting or archiving
Tips for best results
Start with the best source material available. If you have both a thumbnail and a medium-resolution version, use the medium — the AI has more data to work with. For photos, 4x upscaling works well because the AI understands natural textures and can generate convincing detail. For graphics, logos, and text, stick with 2x — the AI may introduce unwanted texture on flat-color regions at 4x. JPEG compression artifacts get amplified by upscaling, so if possible, start with a PNG or high-quality JPEG. For severely compressed images, use the enhancement tool first to reduce artifacts before upscaling.
Frequently asked questions
- Does AI upscaling add real detail?
- Yes. Unlike traditional interpolation that just blurs between pixels, AI upscaling generates plausible fine detail — skin texture, hair strands, fabric weave, leaf patterns — based on what the AI has learned about how high-resolution versions of similar content look.
- What's the maximum upscale factor?
- 4x is the maximum in a single pass. For larger enlargements, you can upscale in stages (2x then 2x again), though quality decreases with each pass.
- Can I upscale a screenshot or graphic?
- Yes, but results vary. Screenshots with text upscale well at 2x — the AI sharpens letter edges. Complex UI screenshots with gradients and icons may introduce slight texture. For logos and simple graphics, vector redrawing may produce cleaner results than AI upscaling.
- Is upscaling free?
- Yes. AI upscaling is available on the free tier with daily usage limits. Premium plans remove limits and allow batch upscaling.
- What's the difference between 2x, 4x, and higher upscaling?
- The number is how much each dimension is enlarged: 2x doubles width and height (4x the total pixels), 4x quadruples each side (16x the pixels). The key trade-off is that the bigger the factor, the more detail the AI has to invent rather than reconstruct from what's actually there. 2x stays closest to the real image and is the safest choice for faces and anything you need to look accurate. 4x and beyond (reached by upscaling in stages) make the file large and sharp but increasingly interpreted, so fine details may not match the true subject. Pick the smallest factor that meets your output size — there's no benefit to upscaling past the resolution you'll actually display or print at.