How to enlarge a photo without losing quality
Need to print a small photo large or crop tightly without pixelation? Magic Eraser's AI super-resolution enlarges photos up to 4x while generating sharp, natural detail that never existed in the original pixels.
Last updated
Enlarge photo now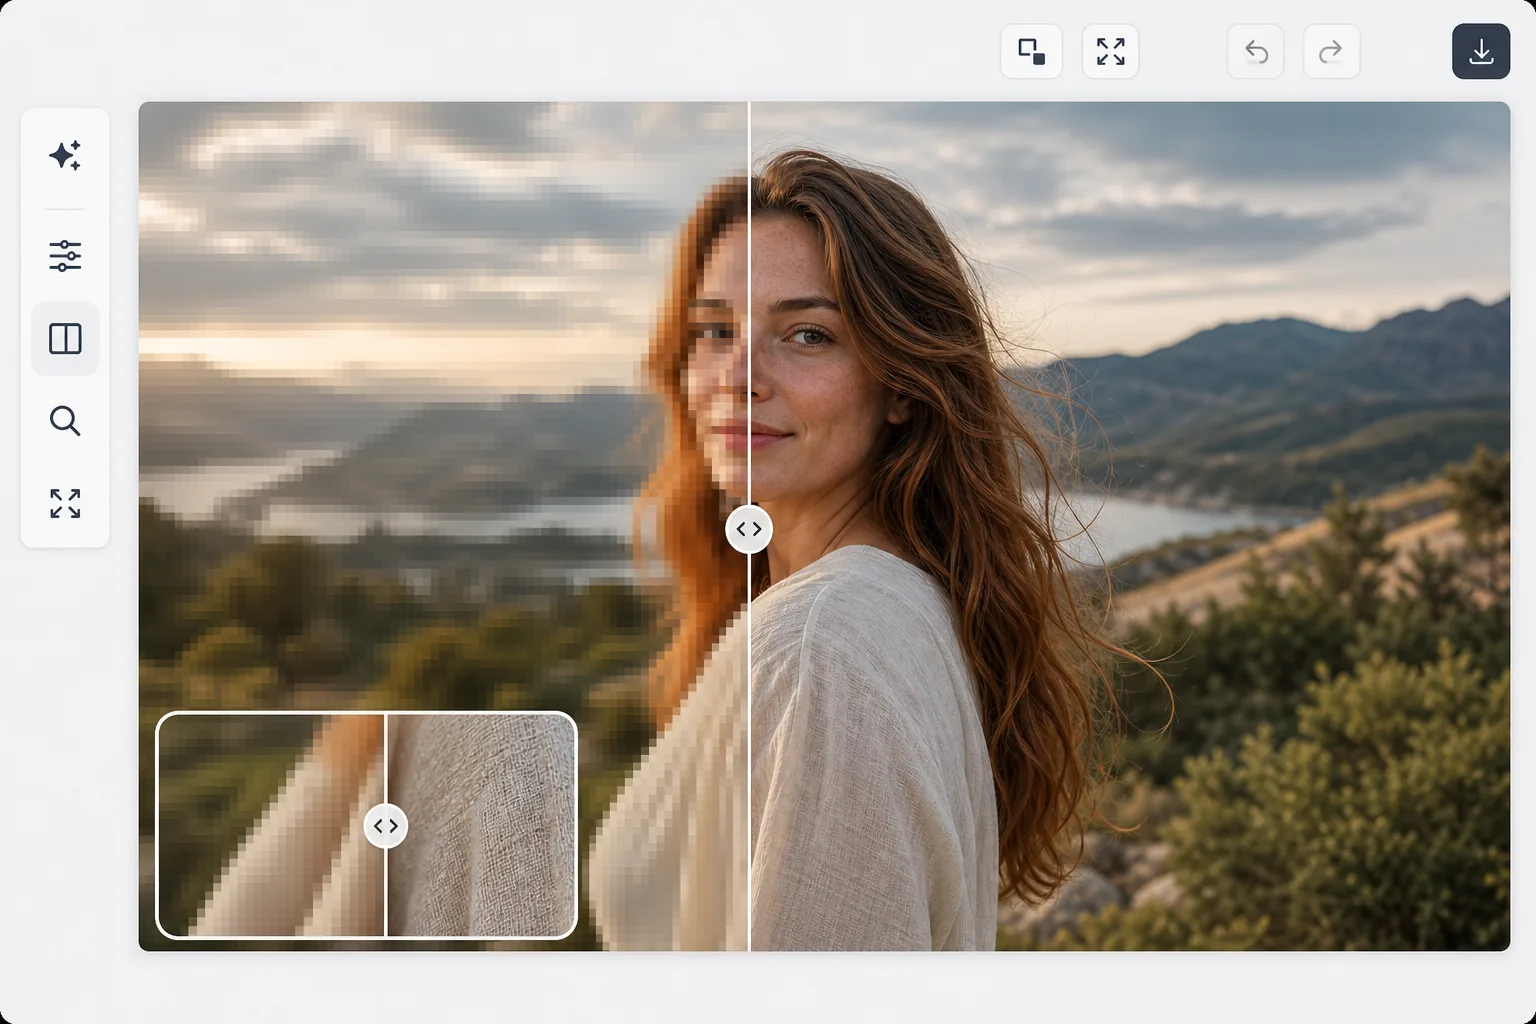
How to enlarge a photo without losing quality
To enlarge a photo without losing quality, open Magic Eraser on the web, iOS, or Android, select AI Enhance, upload the image, and pick a 2x or 4x scale — the AI super-resolution adds genuine new detail (sharper edges, clearer text, defined texture) instead of just stretching the pixels into a blur. It includes limited free edits after sign-in. 2x is the sweet spot for most photos, especially faces; 4x suits very small sources like thumbnails. Start from the best original you have, since upscaling amplifies flaws as well as detail — denoise or sharpen first if needed. When you enlarge a photo by stretching its pixels, traditional algorithms (bilinear, bicubic, Lanczos) interpolate between existing pixels, producing a blurry, soft image. There is no actual new detail — just smoothed-out pixels. AI super-resolution is fundamentally different: trained on millions of image pairs (low-res input, high-res ground truth), the neural network has learned what detail should exist between pixels. It generates genuine new detail — sharper edges, clearer text, defined textures, and facial features — that makes the enlarged image look like it was captured at the higher resolution. A 2x upscale quadruples the pixel count; a 4x upscale produces 16 times the original pixels.
Enlarge a photo in three steps
- 1
Upload the photo
Open Magic Eraser on web, iOS, or Android and select AI Enhance. Upload the photo you want to enlarge. Any format and any starting resolution works, though higher-quality originals produce the best enlarged results.
- 2
Choose your upscale factor
Select 2x (double the dimensions), 3x, or 4x enlargement. For most use cases, 2x provides excellent results with minimal AI artifacts. 4x is best reserved for small crops or thumbnails that need dramatic enlargement. The tool shows the output dimensions so you can verify the result meets your size requirements.
- 3
Review detail and export
Zoom into the enlarged image to inspect generated detail. Check faces, text, edges, and textures for natural appearance. The before/after comparison shows exactly what detail the AI added. Export at the new resolution for print, web, or any other use.
Best for
- Printing photos larger than the original resolution allows — poster-size prints from phone photos
- Cropping and enlarging a distant subject without losing detail
- Preparing social media images for large display formats (banners, covers, projected slides)
- Restoring small or low-resolution historical and archival photos for modern displays
- E-commerce sellers needing larger product images from small source photos
Tips for best results
Start with the best quality original available — AI upscaling amplifies both quality and flaws. If the original is noisy, denoise before upscaling. If it is slightly blurry, sharpen before upscaling. For photos you plan to print, upscale to at least 300 DPI at the target print size. A 1000x1500 phone photo at 2x becomes 2000x3000 — large enough for a 6.7x10 inch print at 300 DPI. For faces, 2x upscaling produces the most natural results; higher factors may smooth skin texture or subtly alter features. Text and graphics (logos, documents) upscale cleanly at any factor because their patterns are simple and predictable.
Frequently asked questions
- Can I upscale a screenshot or cropped photo?
- Yes. Screenshots, cropped photos, thumbnails, and any other image can be upscaled. The AI works with whatever pixels exist, adding appropriate detail for the content type — faces get facial detail, text gets sharper edges, and textures get appropriate patterns.
- Is 4x upscaling realistic?
- For most photos, 2x produces excellent results. 4x is best for very small source images (thumbnails, avatars) where dramatic enlargement is needed. At 4x, the AI generates significant amounts of detail, which is usually convincing but represents the model's learned prediction rather than ground truth.
- Is photo enlargement free?
- Yes. AI Enhance including upscaling is available in the free tier with daily usage limits. Premium removes limits and adds batch processing for enlarging entire photo collections.
- How do I enlarge a photo without losing quality on my phone?
- Open Magic Eraser in any mobile browser or the iOS or Android app, load the photo from your camera roll, and select AI Enhance. Choose 2x or 4x and the AI upscales it right on your phone, then saves the larger, sharper version back to your camera roll. It works the same as the desktop version, with no app install required if you use the browser — handy for rescuing a small or cropped phone photo on the spot.
- How big can I print an enlarged photo?
- Work back from 300 DPI, the standard for sharp prints. A 1000×1500 phone photo upscaled 2x becomes 2000×3000 — enough for a crisp 6.7×10 inch print; at 4x it reaches 4000×6000, good for roughly a 13×20 inch print. Text and logos hold up at any scale because their shapes are simple, while faces look most natural at 2x. If a print still looks soft, step down one scale factor or start from a higher-resolution original.