How to add a background to a photo
Replace a boring background with something better — a studio backdrop for professional headshots, a scenic location for creative portraits, or a branded background for marketing materials. Magic Eraser handles removal and replacement in one workflow.
Last updated
Add background now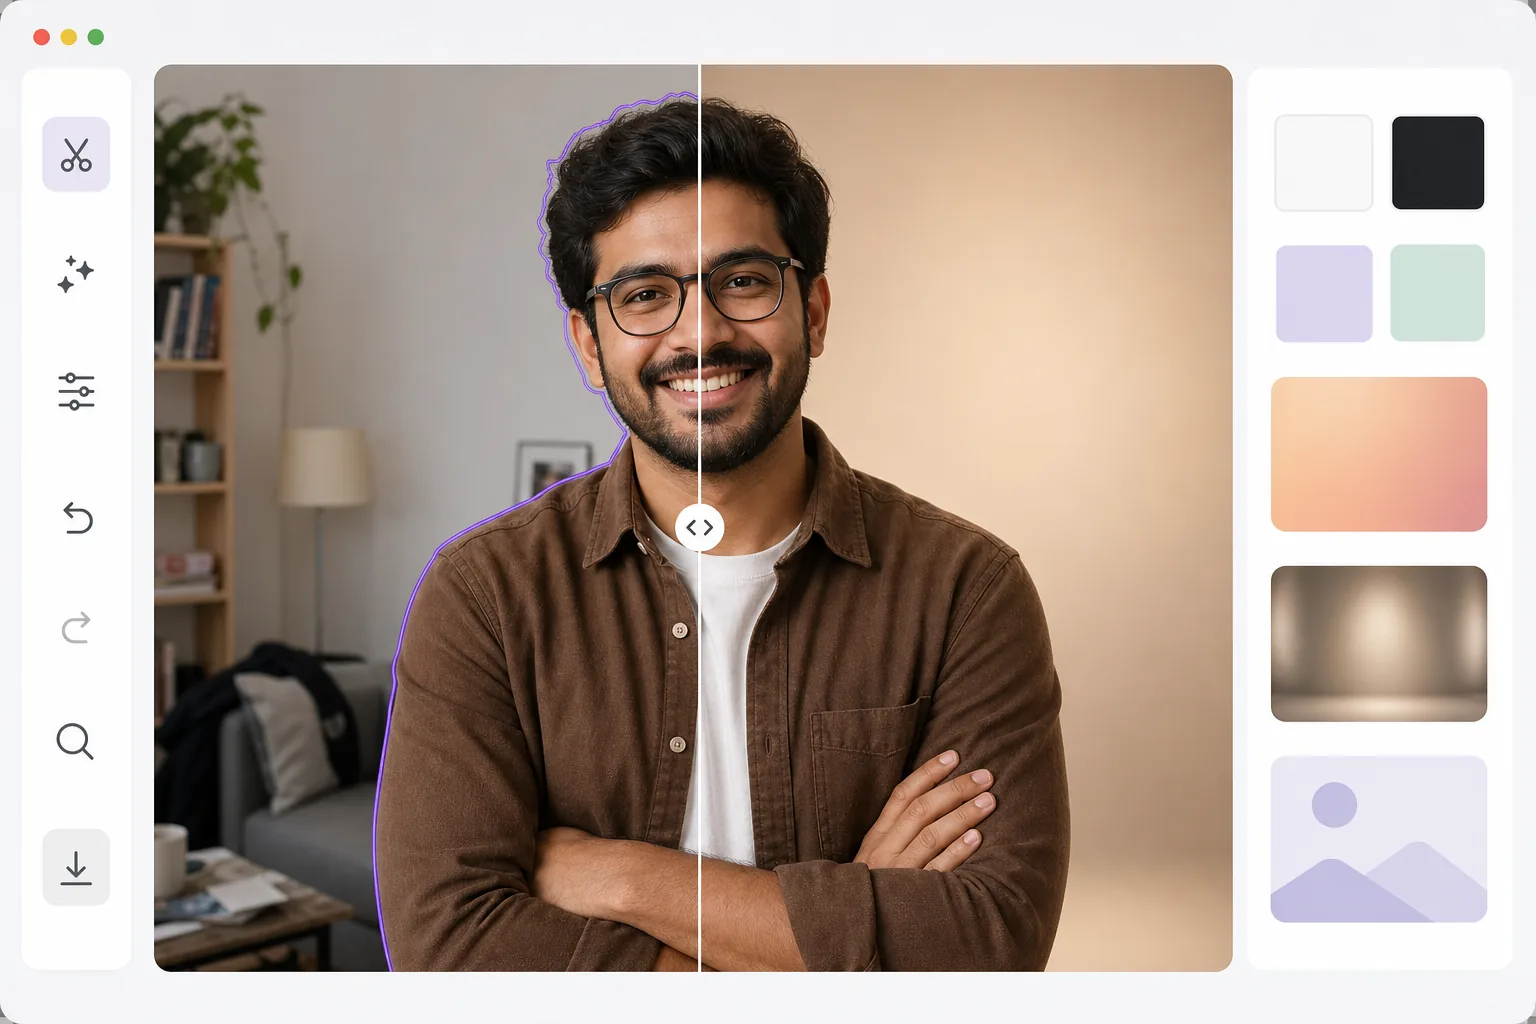
How to add a background to a photo
To add a background to a photo, open Magic Eraser on the web, iOS, or Android, upload the image, let the AI remove the existing background, then drop the subject onto a new one — a solid color, a gradient, a studio backdrop, or your own uploaded image. It includes limited free edits after sign-in. The AI extracts the subject with clean edges (hair, glasses, fine detail), so the cutout sits on the new background instead of a white box. For a believable result, pick a background whose lighting direction matches the subject and add a soft ground shadow. The background sets the mood, context, and professionalism of any photo. A product on a white background says 'e-commerce.' A headshot against a blurred office says 'corporate.' A portrait against a sunset says 'lifestyle.' Background replacement lets you control this narrative after the photo is taken. The process involves two AI steps: first, precise subject extraction with edge preservation; second, compositing onto the new background with matching color temperature, lighting direction, and shadow placement. The result should look like the subject was actually photographed in that environment — not pasted on top of it.
Add a background in three steps
- 1
Upload and remove the original background
Open Magic Eraser on web, iOS, or Android and select the Background Eraser. Upload your photo and let the AI remove the existing background. The subject is extracted with precise edges — hair, glasses, and fine details are preserved.
- 2
Choose your new background
Select from solid colors (white, black, custom), gradients, preset studio backdrops, or upload your own image as the new background. Position and scale the subject on the new background. Adjust the crop to frame the composition.
- 3
Adjust and export
Fine-tune the composite: adjust brightness to match the background lighting, add a subtle shadow for grounding, and tweak edge softness for natural blending. Export at your desired resolution for web, print, or social media.
Best for
- Creating professional headshots by replacing home backgrounds with studio backdrops
- E-commerce product photography with consistent white or branded backgrounds
- Social media content creators placing themselves in creative or aspirational settings
- Marketing teams producing campaign visuals with branded backgrounds
- Video call backgrounds — creating a professional still image for virtual meeting profiles
Tips for best results
Match the lighting direction between subject and background — if the subject is lit from the left, choose a background with similar lighting. Mismatched lighting is the most common giveaway of composited photos. Add a subtle drop shadow or ground shadow to anchor the subject to the new background. For professional headshots, solid colors or simple gradients always look more polished than scenic backgrounds. When using a custom background image, slightly blur it (simulating shallow depth of field) to keep the subject as the clear focal point.
Frequently asked questions
- Can I use my own image as a background?
- Yes. Upload any image as the replacement background. The tool composites your extracted subject onto the new image with proper scaling and positioning.
- Does it match lighting between subject and background?
- The tool preserves the subject's original lighting. For the most natural results, choose backgrounds with similar lighting direction and color temperature.
- Is background replacement free?
- Yes. Background removal and replacement are available in the free tier with daily usage limits. Premium removes limits and adds batch processing.
- How do I add a background to a photo on Android or iPhone?
- Open Magic Eraser in any mobile browser or the iOS or Android app, load the photo from your camera roll, and let the AI remove the existing background. Then pick a new one — a solid color, a preset backdrop, or an image from your photos — and pinch to scale and position the subject. Export and the finished photo saves straight back to your camera roll. It works the same as the desktop version, with no app install required if you use the browser.
- What's the difference between adding a background and a transparent PNG?
- Removing the background leaves the subject on transparency — a PNG with nothing behind it, ready to drop into a design. Adding a background goes one step further: it places the subject onto a new visible backdrop (a color, gradient, or image) and exports a finished, flattened photo. If you want a cutout to reuse elsewhere, export the transparent PNG; if you want a complete picture in a new setting, add the background and export as JPG or PNG.