如何去除照片中的瑕疵
丘疹、斑点和小痕迹等暂时性瑕疵并不代表一个人平时的样子。人工智能瑕疵去除功能可以立即清除这些痕迹,同时保留自然的皮肤纹理,使肖像看起来更真实。
Last updated
立即去除瑕疵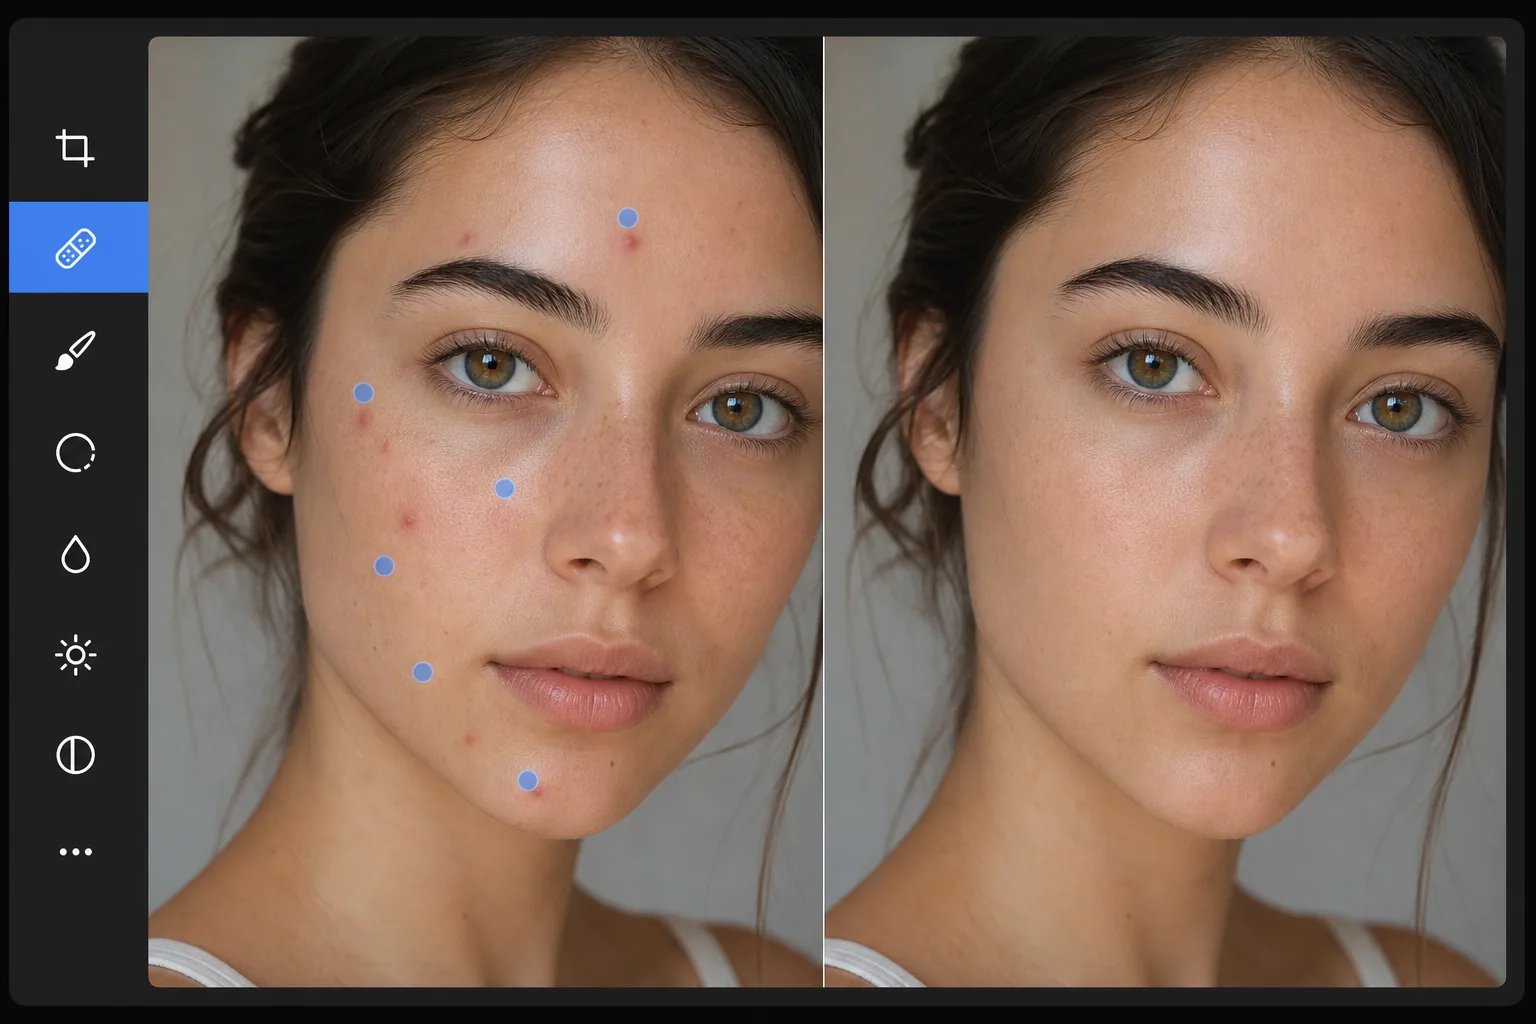
快速去除瑕疵与过度修饰
想去除照片里的瑕疵,只需在网页版、iOS 或 Android 上打开 Magic Eraser,上传人像照片,用小号笔刷轻点每一处瑕疵,再点击 Erase。AI 会用瑕疵周围采样到的肤色来填补每一颗痘痘、斑点或划痕,让毛孔质感和肤色依然吻合,效果就像皮肤状态好的一天,而不是磨皮过度的假面感。它完全免费,无需注册。逐个处理瑕疵,效果最自然;像雀斑、美人痣这类本来就有的特征,除非你真的想去掉,否则建议保留。 去除瑕疵的目的是让人们看到他们平时的样子——没有照片当天碰巧出现的暂时缺陷。丘疹、唇疱疹、抓痕、瘀伤和类似的临时标记会分散拍摄对象的注意力,并且不能代表其典型外观。关键是去除这些临时痕迹,同时保留永久特征和自然皮肤纹理。过度修饰——平滑所有皮肤纹理,消除所有变化——会产生不可思议的“杂志喷枪”效果,让拍摄对象看起来很人造。 Magic Eraser 的人工智能精确针对单个瑕疵,用周围皮肤的自然纹理图案替换每个瑕疵。
三步消除瑕疵
- 1
上传肖像
在 Web、iOS 或 Android 上打开 Magic Eraser。上传需要去除瑕疵的肖像或照片。支持 JPEG、PNG、HEIC 和 WebP。更高的分辨率为 AI 提供了更多的皮肤纹理参考,以实现自然的替换。
- 2
用刷子轻拍每个瑕疵
使用小号刷子,分别轻拍或轻拍每个瑕疵。对于丘疹和斑点,以标记为中心轻轻拍打一次通常就足够了。对于较大的瑕疵(划痕或瘀伤),请刷整个区域。系统地在脸部(前额、脸颊、下巴、鼻子)上进行操作,以捕捉所有临时痕迹。
- 3
点击删除并查看
人工智能会用与周围区域的纹理、颜色和照明相匹配的干净皮肤替换每个瑕疵。结果看起来就像一个人在干净的皮肤日 - 自然,没有修饰。在全变焦下检查是否有任何剩余点,并在需要时进行第二次检查。以全分辨率导出。
最适合
- 肖像和爆头摄影,拍摄对象有暂时性的瑕疵,无法代表其正常外观
- 学生可能有痤疮的学校和年鉴照片,他们不希望出现在永久照片中
- 婚纱摄影中,新娘、新郎或婚礼派对上出现与压力有关的痘痘或轻微痕迹
- 企业网站、LinkedIn 和企业简介的专业头像
- 社交媒体照片中,暂时的瑕疵会影响原本精彩的照片
获得最佳结果的技巧
使用能够覆盖每个瑕疵的最小尺寸的刷子。太大的刷子会不必要地去除周围的皮肤细节,而恰到好处的刷子只会去除瑕疵并用周围的纹理替换它。对于成群的瑕疵(脸颊上的痤疮),单独处理每个斑点,而不是在整个区域上涂抹 - 单独定位会产生更自然的结果,因为人工智能会用紧邻其周围的干净皮肤替换每个斑点。对于面部特征附近的瑕疵(眼睛附近或唇线处的丘疹),请务必精确,以避免影响特征本身。留下美丽的痕迹和雀斑,除非对象特别要求去除——这些永久特征是该人身份的一部分。
常见问题
- 看起来会很自然吗?
- 是的。人工智能会用从周围皮肤采样的纹理来替换每个瑕疵,并匹配毛孔图案、颜色和照明。结果看起来像透明的皮肤,而不是喷枪或平滑的皮肤。
- 可以大面积祛痘吗?
- 是的。单独点击每个点,人工智能就会将它们一一清理。对于密集的痤疮,请分段工作并在各遍之间进行检查。即使去除许多斑点,人工智能也能保持自然的皮肤变化。
- 它可以去除雀斑吗?
- 只有当你刷过它们时。人工智能会删除你的目标。为了在去除斑点的同时保留雀斑,只需避免刷雀斑——只针对暂时的痕迹。
- 祛斑是免费的吗?
- 是的。 Magic Eraser 的免费套餐包括用于去除瑕疵的画笔工具,并具有每日使用限制。 Premium 消除了专业修饰工作流程的限制。
- 在 Android 或 iPhone 上怎么去除照片里的瑕疵或痘痘?
- 在任意手机浏览器中打开 Magic Eraser,或使用 iOS、Android 应用,从相册载入人像照片,双指放大对准面部。用小号笔刷,用手指逐颗轻点每一处痘痘或斑点,再点击 Erase。AI 会在你的手机上用瑕疵周围的肤色逐个修掉,并把成品保存回相册。它和桌面版的用法一样,如果用浏览器,还无需安装任何应用。