كيفية تشويه الصورة
غالبًا ما تحتوي الصور الملتقطة في إضاءة منخفضة، أو عند حساسية ISO عالية، أو بكاميرات قديمة على ضوضاء مرئية - بقع ملونة، وحبيبات، وملمس يشبه ورق الصنفرة مما يؤدي إلى انخفاض جودة الصورة. يعمل تقليل الضوضاء بالذكاء الاصطناعي على إزالة الضوضاء مع الحفاظ على التفاصيل الحقيقية الموجودة تحتها.
Last updated
دينواز الآن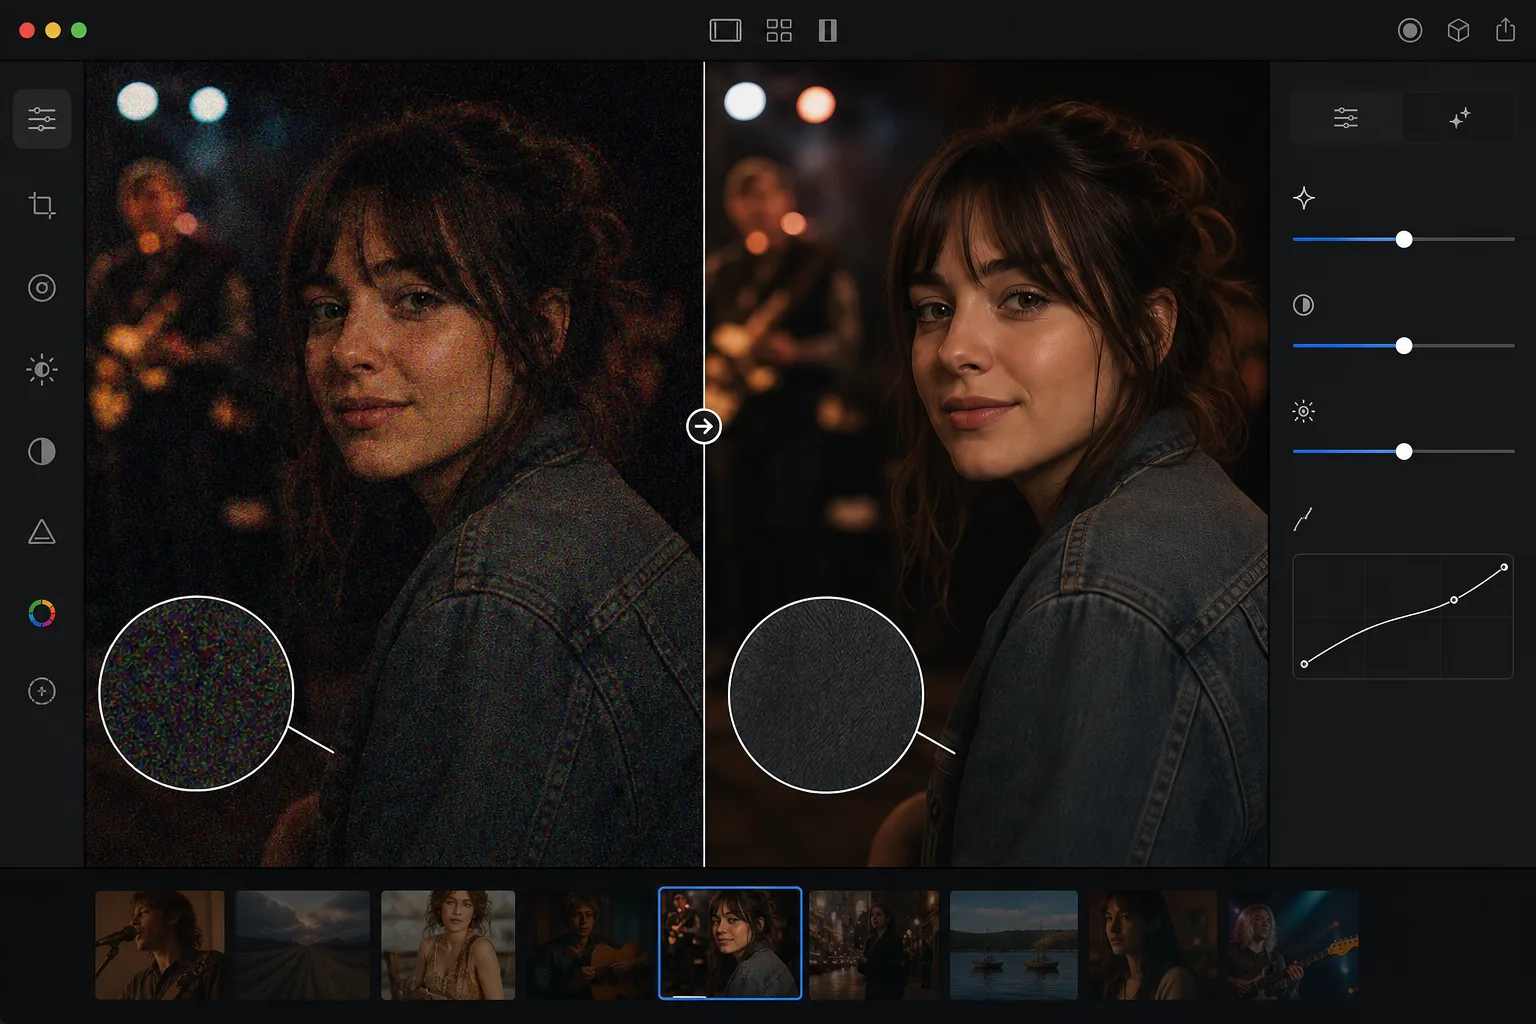
ما الذي يسبب ضجيج الصورة ولماذا يؤدي إلى انخفاض الجودة
لإزالة التشويش من صورة، افتح Magic Eraser على الويب أو iOS أو Android، اختر AI Enhance، ارفع الصورة المشوّشة، ودع الذكاء الاصطناعي ينظّفها — فهو يميّز البقع العشوائية عن التفاصيل الحقيقية، فيزيل تشويش الألوان (chroma) والتشويش الحبيبي في الإضاءة (luminance) مع الحفاظ على الحواف والشعر والملمس كما هي. الأداة مجانية وبدون تسجيل. تعطي أفضل النتائج مع التشويش المعتدل (حوالي ISO 1600–6400)؛ أما اللقطات شديدة التشويش فتتحسّن لكنها قد تبقى ناعمة قليلاً. أزل التشويش قبل أي تحسين للحدّة أو تعديل للتباين، لأن هذه التعديلات تضخّم التشويش وتجعل فصله عن التفاصيل أصعب. تأتي ضوضاء الصورة الرقمية من مستشعر الكاميرا الذي يعمل على تضخيم إشارات الضوء الضعيفة. في الإضاءة المنخفضة، يحتاج المستشعر إلى تضخيم أعلى (ISO أعلى) لإنتاج صورة مرئية، وهذا التضخيم أيضًا يسبب ضوضاء إلكترونية عشوائية. والنتيجة هي بقع ملونة (ضوضاء اللون) وملمس محبب (ضوضاء النصوع) متراكبة على محتوى الصورة الفعلي. تنتج الكاميرات القديمة وأجهزة الاستشعار الأصغر (كاميرات الهاتف والكاميرات المدمجة) مزيدًا من الضوضاء عند إعدادات ISO المكافئة. عادةً ما ينتج عن التصوير الفوتوغرافي الليلي والأحداث الداخلية والحفلات الموسيقية وأي حالة إضاءة منخفضة صورًا مزعجة. يؤدي تقليل الضوضاء التقليدي (التمويه Gaussian، الفلتر المتوسط) إلى تقليل الضوضاء ولكنه يدمر أيضًا التفاصيل الدقيقة - يصبح الشعر وملمس القماش والرموش والنص ناعمًا. يعمل تقليل التشويش بالذكاء الاصطناعي على التمييز بين التشويش والتفاصيل، وإزالة البقع العشوائية مع الحفاظ على محتوى الصورة الأصلي.
إزالة الضوضاء في ثلاث خطوات
- 1
قم بتحميل الصورة الصاخبة
افتح Magic Eraser على الويب أو iOS أو Android. قم بتحميل الصورة المزعجة — لقطة في الإضاءة المنخفضة، أو صورة ذات حساسية ISO عالية، أو صورة كاميرا قديمة، أو أي صورة ذات حبيبات أو بقع مرئية. دعم JPEG، PNG، HEIC، وWebP.
- 2
تطبيق تقليل الضوضاء AI
حدد أداة تقليل التشويش أو التحسين. يقوم الذكاء الاصطناعي بتحليل نمط التشويش عبر الصورة - وتحديد الاختلافات التي تمثل تشويشًا (بقع عشوائية) وأيها تمثل تفاصيل حقيقية (الملمس والحواف والميزات الدقيقة). يزيل الضوضاء مع الحفاظ على المحتوى الحقيقي.
- 3
المراجعة والتصدير
تحقق من النتيجة بتكبير كامل — يجب أن تكون المناطق الملساء (السماء والجدران والجلد) نظيفة بدون بقع، بينما يجب أن تحتفظ المناطق التفصيلية (الشعر والنسيج وأوراق الشجر) بملمسها وحدتها. يجب أن تبدو الصورة العامة أنظف وأكثر احترافية. تصدير بدقة كاملة.
الأفضل ل
- تصوير الأحداث في الإضاءة المنخفضة (الحفلات الموسيقية، وحفلات الزفاف، والمناسبات الداخلية) تم التقاطه بحساسية ISO عالية
- التصوير الفوتوغرافي الليلي والتصوير الفلكي حيث تؤدي التعريضات الضوئية الطويلة أو حساسية ISO العالية إلى إنشاء الحبوب
- تم التقاط الصور بكاميرا الهاتف في ظروف معتمة حيث يحد حجم المستشعر من الأداء في الإضاءة المنخفضة
- صور الكاميرا الرقمية القديمة حيث أنتجت تقنية الاستشعار ضوضاء أكثر من الكاميرات الحديثة
- لقطات إطار الفيديو التي تكون بطبيعتها أكثر ضوضاءً من الصور الثابتة المخصصة
نصائح للحصول على أفضل النتائج
يعد تقليل الضوضاء باستخدام الذكاء الاصطناعي أكثر فعالية في الضوضاء المعتدلة. قد تفقد الصور شديدة الضجيج (ISO العالي جدًا، والتعرض الناقص للغاية) بعض التفاصيل الدقيقة حتى مع تقليل التشويش بالذكاء الاصطناعي لأن التشويش يطغى على المحتوى الأساسي. للحصول على أفضل النتائج، قم بتطبيق تقليل التشويش قبل أي معالجة أخرى - يعمل تقليل التشويش بشكل أفضل على الصورة الأصلية المشوشة، وليس بعد زيادة الوضوح أو تحسين التباين (الذي يؤدي إلى تضخيم التشويش). بالنسبة للصور التي تحتوي على تشويش وتمويه، قم بإزالة التشويش أولاً، ثم قم بتطبيق الوضوح أو التحسين. يتعامل الذكاء الاصطناعي مع كل من ضوضاء اللون (البقع الملونة) وضوضاء النصوع (نسيج الحبوب). من الأسهل إزالة ضوضاء Chroma لأن نمط الألوان الخاص بها يختلف بشكل واضح عن محتوى الصورة. تعد ضوضاء النصوع أكثر صعوبة لأنها تشبه الملمس الحقيقي، حيث يتفوق الذكاء الاصطناعي في التمييز بين الاثنين.
الأسئلة المتداولة
- هل يؤدي تقليل الضوضاء إلى تقليل حدة الصورة؟
- الحد الأدنى من التأثير. يؤدي تقليل التشويش التقليدي إلى تشويش الصورة لتقليل التشويش. يعد تقليل الضوضاء بالذكاء الاصطناعي أكثر دقة - فهو يستهدف نمط الضوضاء العشوائي مع الحفاظ على الحواف والملمس والتفاصيل الدقيقة. قد يتم تخفيف بعض التفاصيل الدقيقة جدًا قليلاً في الصور شديدة الضوضاء.
- هل يمكن إصلاح الصور المزعجة للغاية؟
- إنه يعمل على تحسينها بشكل كبير، لكن الصور شديدة الضوضاء (ISO 12800+، التعرض الناقص الشديد) قد تحتفظ ببعض النعومة لأن الضوضاء طغت على الكثير من التفاصيل الأصلية. الضوضاء المعتدلة (ISO 1600-6400) تعطي نتائج ممتازة.
- هل يجب علي تقليل الضوضاء قبل التعديلات الأخرى أم بعدها؟
- قبل. يعمل تقليل الضوضاء بشكل أفضل على الصورة الأصلية المزعجة. يؤدي تطبيق الوضوح أو التباين أو عمليات التحرير الأخرى قبل تقليل التشويش إلى تضخيم التشويش ويجعل فصله عن التفاصيل الحقيقية أكثر صعوبة.
- هل تقليل الضوضاء مجاني؟
- نعم. يتوفر تقليل الضوضاء باستخدام الذكاء الاصطناعي من خلال أداة التحسين الموجودة على الطبقة المجانية مع حدود الاستخدام اليومي. يزيل Premium حدود المعالجة المجمعة لمجموعات الصور المزعجة.
- كيف أزيل التشويش من صورة على Android أو iPhone؟
- افتح Magic Eraser في أي متصفح على هاتفك أو عبر تطبيق iOS أو Android، حمّل الصورة المشوّشة من معرض الصور، واختر AI Enhance. يكتشف الذكاء الاصطناعي التشويش وينظّفه مباشرة على هاتفك — دون حاجة إلى كمبيوتر — ثم يحفظ النسخة الأوضح في معرض الصور لديك. تعمل الأداة تمامًا مثل نسخة سطح المكتب، دون الحاجة إلى تثبيت أي تطبيق إذا استخدمت المتصفح، وهو أمر عملي لتحسين صور الإضاءة المنخفضة أو لقطات الحفلات مباشرة من هاتفك.