Fotoğraflardan fotoğraf bombalarını kaldırın
Çekmek istediğiniz fotoğrafı çekin; pastanın arkasından el sallayan yabancı, arka planda zıplayan çocuk veya mümkün olan en kötü anda çerçeveyi incelemeye karar veren köpek olmadan. Magic Eraser'ün yapay zekası fotobombacıyı kaldırır ve saniyeler içinde arkalarındaki sahneyi yeniden oluşturur.
Son güncelleme
Silgiyi aç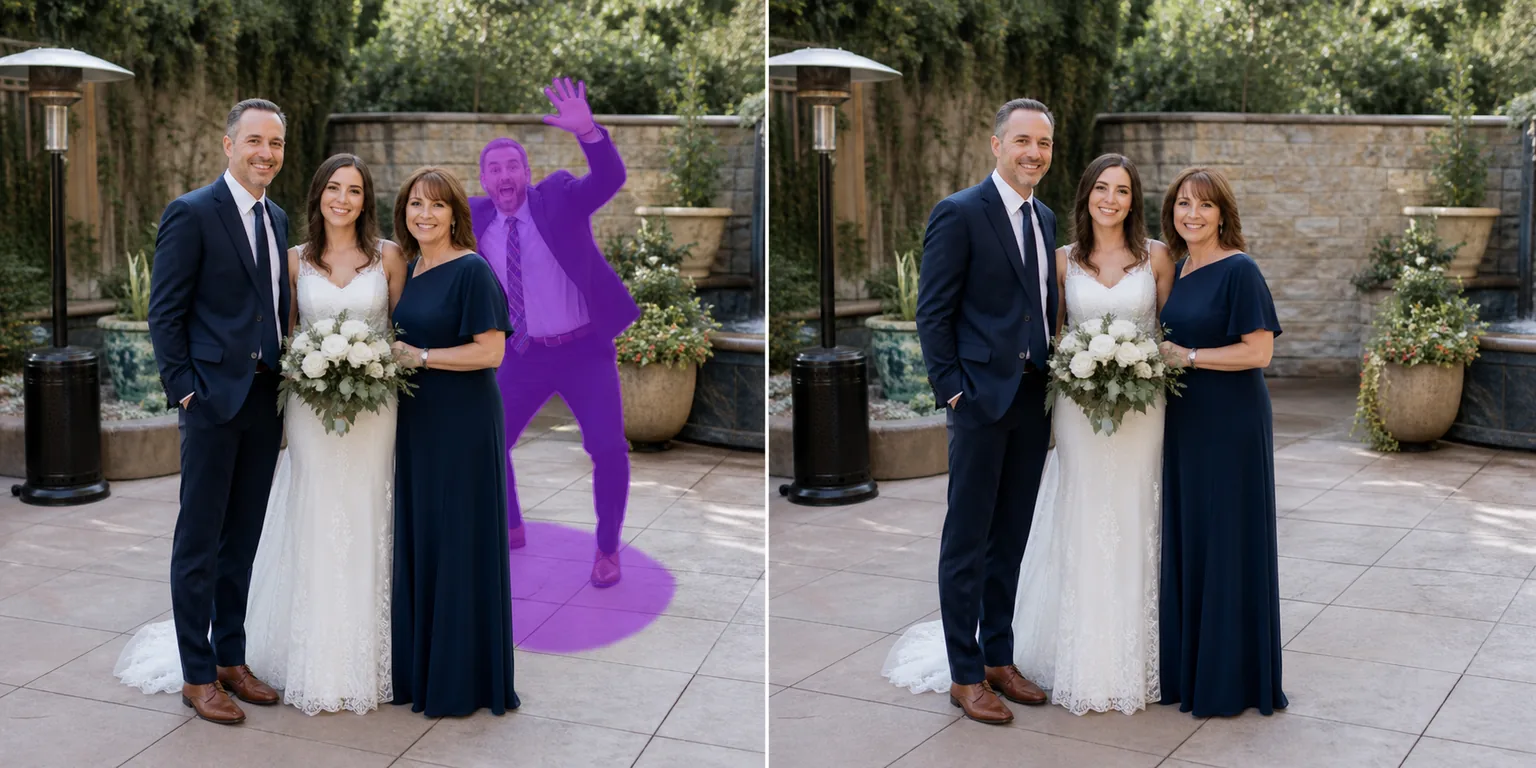
Fotoğraf bombacısını fotoğraftan nasıl kaldırırsınız
Bir fotoğraftaki kadraja sızan kişiyi kaldırmak için Magic Eraser'ı web'de, iOS'ta veya Android'de açın, fotoğrafı yükleyin, arka plana giren kişiyi, hayvanı ya da nesneyi fırçayla boyayın ve Erase'e dokunun — AI, çevredeki piksellerden yararlanarak onların arkasındaki sahneyi yeniden oluşturur. Ücretsizdir, kayıt gerektirmez. Açık ya da tekrar eden arka planlarda kadraja sızan kolayca temizlenir; bir yüzün, mimarinin ya da ince ayrıntının üzerine bindiklerinde ise AI, gizli kalan sahnenin birebir aynısını değil, inandırıcı bir benzerini doldurur. Fotobomblar, grup fotoğrafçılığının benzersiz başarısızlık durumudur: kadraj doğru, ışık doğru, konular harika görünüyor, ancak arka planda tek bir kişi veya nesne mümkün olan en kötü anda ortaya çıkıyor. Klasik desenler (düğün pastası kesme çekiminin arkasında odanın diğer ucundan el sallayan yabancı, ailenin Noel fotoğrafının arkasından koşan çocuk, balo çiftinin arkasına surat çizen fotobombacı, nişan çekimi sırasında piknik battaniyesini inceleyen köpek) hepsi aynı sorunu paylaşıyor: yeniden çekim olarak ön plan kurtarılamaz (an gitti) ve düzeltilebilir tek unsur arka plandır. Bir fotobombacının siluetinin manuel olarak klonlanması zahmetlidir çünkü istenmeyen kişi genellikle elle ikna edici bir şekilde yeniden inşa edilmesi 20-40 dakika süren yüksek bilgi içeren arka plan bölgelerini (mimari, kalabalığın yüzleri, desenler) işgal eder. Magic Eraser'ün yapay zekası, foto bomba temizleme olayını doğrudan ele alıyor: foto bombacının üzerini fırçalayın ve model, çevredeki pikselleri referans olarak kullanarak arka planı yeniden oluşturuyor. Aynı yaklaşım, fotobombacının bir insan, bir köpek, yoldan geçen bir araba ya da çerçevenin kenarına uzanan bir el olmasına bakılmaksızın işe yarar.
Bir fotoğraf bombasını üç adımda silin
- 1
Fotoğrafı yükle
Magic Eraser web, iOS veya Android'de açın. Aile fotoğrafını, düğün fotoğrafını, parti fotoğrafını veya bir bombacının kaybolması gereken herhangi bir fotoğrafı ekleyin. iPhone Live Photos ve Android hareketli fotoğraflar da dahil olmak üzere JPEG, PNG, HEIC ve WebP'nin tümü desteklenir.
- 2
Fotobombalayıcının üzerini fırçalayın
İstenmeyen kişinin, hayvanın veya nesnenin üzerini boyayın. Oluşturdukları gölge veya yansıma da dahil olmak üzere siluetin tamamını örtün. Ana konuları (düğün çifti, aile, doğum günü kişisi) tamamen göz ardı edin; yapay zeka yalnızca işaretlediğiniz şeyi yeniden oluşturur.
- 3
Sil ve hassaslaştır'a dokunun
Yapay zeka, alttaki arka planı saniyeler içinde yeniden oluşturuyor. Eskiden fotobombalayıcının bulunduğu dikişi inceleyin; yeniden yapılanmaların çoğu ilk geçişte temizdir; tekrarlanan sıkı desenler veya kalabalığın olduğu bölgeler, küçük eserler üzerinde rötuş yapılmasına ihtiyaç duyabilir. Baskılar, çerçeveler veya paylaşım için tam çözünürlükte dışa aktarın.
Şunun için en iyisi:
- Bir konuğun önemli bir çekimin arka planına girdiği düğün töreni ve resepsiyon fotoğrafları
- Yan masadan el sallayan bir yabancıyla birlikte Noel, Şükran Günü ve doğum günü fotoğrafları
- Sınıf arkadaşlarının konunun arkasında yüzler çizdiği balo ve mezuniyet fotoğrafları
- Başka bir turistin selfie çubuğunun veya pozunun kompozisyonunuzu böldüğü tatil çekimleri
- Bir köpeğin veya kedinin en kötü anda çerçeveyi incelemeye karar verdiği evcil hayvan fotoğrafları
- Arka plandan geçen yabancılarla parklarda ve turistik mekanlarda grup fotoğrafları çektirildi
- Bir hakemin, su soğutucusunun veya saha ekibi üyesinin karede yer aldığı spor fotoğrafları
Edge vakaları ve ipuçları
Fotobomb temizleme, fotobombalayıcının arkasındaki arka plan aynı karede başka bir yerde göründüğünde en iyi şekilde çalışır (bir duvar parçası, gökyüzünün bir bölümü, bir yaprak şeridi, zemin deseninin bir devamı). Yapay zeka, kapsanan bölgeleri yeniden inşa etmek için açıkta kalan bölgeleri kullanır. İki durum daha zordur: doğrudan ana konuların önünde duran fotobombardımancılar (kişinin vücudunun bir kısmı artık kapatılmıştır ve sadece arka planla doldurmak yerine yeniden yapılandırılması gerekir) ve arkalarındaki her pikselin farklı bir yüz olduğu dar kalabalık çekimlerdeki fotobombardımancılar. Tıkanma durumlarında AI Doldurma özelliği, yeniden oluşturma işlemini standart silgi fırçasından daha iyi gerçekleştirir çünkü orada ne olması gerektiğini açıklayan bir metin istemini kabul eder. Yoğun kalabalık durumlarda, tek bir büyük seçim yerine 3-4 fırçalanmış geçişle çalışın; geçiş başına daha küçük yeniden oluşturulan bölgeler, modelin üzerinde çalışacak daha fazla referans pikseli olduğu anlamına gelir. 3-5 saniye aralıklarla seri çekim yaptıysanız, seri çekim karelerini referans olarak kullanmak daha da temiz bir seçenektir: Yapay zeka, içinde hiç fotobombacı bulunmayan bir kompozit oluşturmak için boş kapıyı kare 1'den ve boş duvar bölümünü kare 4'ten çekebilir. Gazetecilik, mahkeme kanıtları veya yarışma başvuruları için yapay zeka temizliğini açıklayın. Kişisel albümler ve sosyal paylaşımlar için açıklama isteğe bağlıdır ancak standart sizin aramanızdır.
Sık sorulan sorular
- Bir fotoğraftan foto bombasını kaldırmak ücretsiz mi?
- Evet. Magic Eraser'nin ücretsiz katmanı, günlük kullanım limitleriyle fotoğraf bombası temizlemeyi kapsar. Premium'a yükseltme (yılda 29,99 ABD doları) sınırları kaldırır ve daha yüksek çözünürlüklü dışa aktarmaların kilidini açar; temizlenmiş fotoğrafı basmak, çerçevelemek veya çözünürlüğün önemli olduğu bir düğün albümüne göndermek için kullanışlıdır.
- Bir hedefin önünde duran foto bombacıyı kaldırabilir miyim?
- Evet, ancak kısmi tıkanma temizliği saf arka plan temizliğinden daha zordur çünkü yapay zekanın arka planın yanı sıra ana konunun bir kısmını da yeniden yapılandırması gerekir. Bu durumlarda, standart silgi fırçası yerine AI Fill'i kullanın; AI Fill, bir metin istemini kabul eder ('gelinin sol omzunu ve arkasındaki pastayı yeniden oluşturun') ve standart arka planı yeniden oluşturma yaklaşımından daha iyi kapatma dolguları üretir.
- Bu, köpekler, arabalar veya eller gibi insan olmayan foto bombalar için işe yarar mı?
- Evet. Yapay zeka, fotobombacının ne olduğu umurunda değil; fırçaladığınız her şeyi kaldırıyor. Köpekler, kediler, yoldan geçen arabalar, çerçeveye uzanan eller, düşen nesneler, arka planda süzülen balonlar, drone'lar ve kamera dışındaki insanların gölgeleri hepsi aynı şekilde çalışıyor. Gitmesini istediğin şeyi fırçala; model arka planı yeniden oluşturur.
- Temizlenen fotoğraf açıkça düzenlenmiş gibi görünecek mi?
- Çoğu fotoğrafta hayır; yapay zeka, çevredeki sahnenin mevcut aydınlatmasını, renk sıcaklığını, grenini ve dokusunu eşleştirir. Gösterebileceği yerler, çıkarılan bir kişinin normal geometriye pek uymayan bir yama bıraktığı sıkı tekrarlanan desenler (parke taşları, mozaik fayanslar, duvar kağıdı ızgaraları, çit çıtaları) ve çıkarılan her kişinin, artık kısmen kapatılmış olan başka bir kişiyi ortaya çıkardığı kalabalık yüzler arka planlarıdır. Bu dikişlere rötuş yapmak çoğu durumu çözer. Kareye layık baskılar için, ilk AI geçişinden sonra 2-3 dakikalık iyileştirme planlayın.
- Foto bombalı, filmle taranmış eski fotoğraflarda çalışır mı?
- Evet, bazı uyarılarla. Yapay zeka, taranmış film baskıları da dahil olmak üzere her türlü dijital görüntü formatında çalışır. Eski taramalardaki zorluk gren, solma ve renk kaymalarıdır; temizlemenin dikişi daha görünür hale getirebilmesi için yeniden oluşturulan arka planın mevcut gren ve renkle eşleşmesi ve agresif tarama düzeltmelerinin (otomatik renklendirme, keskinleştirme) olması gerekir. Temizleme işlemini önce orijinal taramada çalıştırın, ardından tam görüntüye renk ve gren düzeltmelerini uygulayın; ters sıralama daha temiz sonuçlar üretme eğilimindedir.