Remova as aberturas da secadora das fotos
Apague as aberturas externas do secador, as coifas com venezianas, as abas de exaustão de plástico e as tampas de ventilação metálicas das paredes dos edifícios e áreas de fundação. Magic Eraser remove a caixa de ventilação e qualquer acúmulo de fiapos ou manchas ao redor dela e, em seguida, reconstrói o revestimento, o tijolo, o estuque ou a superfície da fundação para obter uma parede limpa e ininterrupta.
Última atualização
Remover agora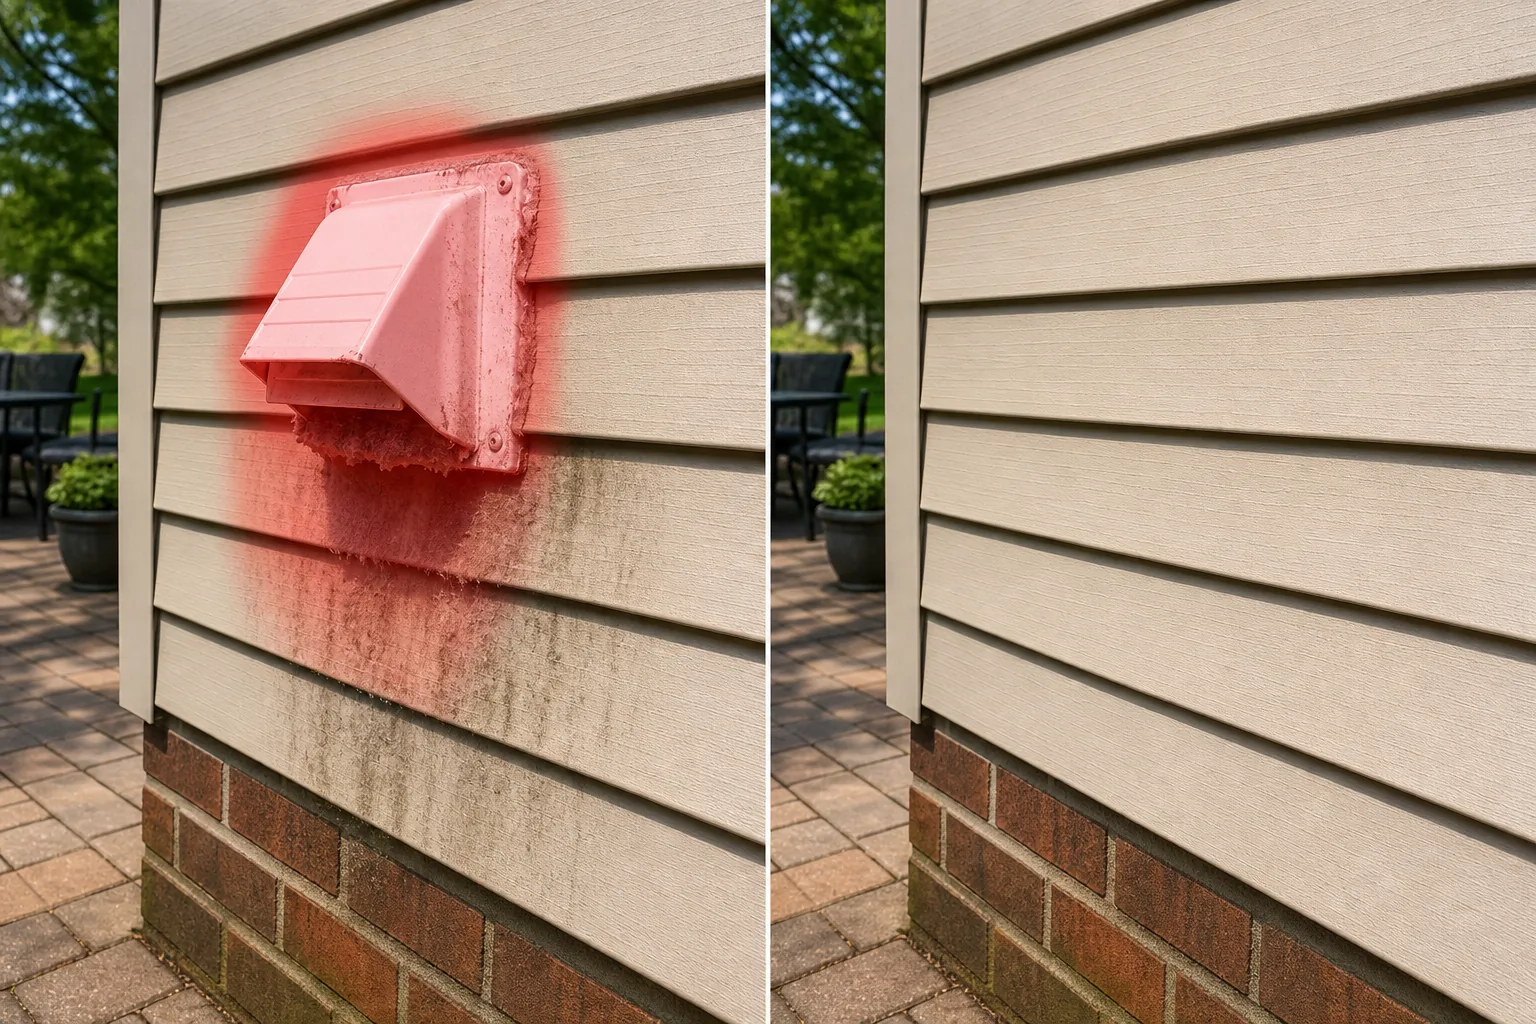
Por que as aberturas de ventilação do secador criam marcas desagradáveis no exterior dos edifícios
As aberturas de ventilação do secador são objetos pequenos, mas superam seu peso em impacto visual. Uma coifa de plástico branco em uma parede de tijolos escuros cria um ponto de alto contraste que chama a atenção. Uma ventilação com persianas de metal em estuque geralmente desenvolve um halo de acúmulo de fiapos, descoloração cinza e listras escuras abaixo da abertura, onde a umidade e a exaustão de fiapos mancharam a parede ao longo dos anos de uso. Na fotografia imobiliária, as aberturas de ventilação normalmente aparecem na lateral ou na parte traseira de uma casa - precisamente as paredes que as fotos da listagem precisam mostrar para a cobertura do quintal e do quintal lateral. Um close-up de uma área de pátio pode ser prejudicado por uma ventilação de secador bem visível na parede adjacente, completa com sua aba entupida de fiapos e manchas. A ventilação em si tem um formato simples de remover, mas os danos ao redor são o verdadeiro desafio: manchas de fiapos podem se espalhar de 15 a 30 centímetros abaixo da ventilação em um padrão de leque, a umidade pode causar descascamento da tinta ou eflorescência no tijolo, e o anel de calafetagem ao redor da penetração do tubo de ventilação geralmente racha e descolora. Magic Eraser lida com a caixa de ventilação e sua zona de danos circundantes em uma única passagem, reconstruindo a superfície limpa da parede - seja revestimento de vinil, tijolo, estuque, folheado de pedra ou madeira pintada - com juntas de cor, textura e argamassa correspondentes. O resultado é uma parede que parece que o respiradouro nunca foi instalado.
Remova as aberturas da secadora em três etapas
- 1
Envie sua foto
Abra Magic Eraser na web, iOS ou Android e carregue a foto externa do edifício mostrando a ventilação do secador. JPEG, PNG, HEIC e WebP são todos suportados. Use uma imagem de alta resolução para que a IA possa corresponder com precisão ao material da parede circundante – juntas de argamassa de tijolo, linhas laterais ou textura de estuque.
- 2
Pincele sobre a ventilação e pinte
Pinte sobre o exaustor ou tampa, incluindo qualquer tubo visível atrás da aba, o anel de calafetagem na penetração da parede e a área com manchas ou descoloração de fiapos abaixo e ao redor da ventilação. A maioria das aberturas de ventilação da secadora tem uma zona de manchas que se estende de 15 a 30 centímetros abaixo da abertura – inclua toda essa área para um resultado limpo. Se a ventilação tiver uma marca visível de gotejamento ou zona de pintura descascada, capture-a também.
- 3
Apagar e revisar
Toque em Apagar e Magic Eraser remove a caixa de ventilação e manchas na parede enquanto reconstrói a superfície limpa da parede. Verifique se as linhas laterais, as fiadas de tijolos ou a textura do estuque são contínuas na área preenchida. Verifique se não há nenhum anel de calafetagem ou sombra de tubo residual. Exporte em resolução máxima para sua listagem ou portfólio.
Melhor para
- Fotos de listagens de imóveis onde as aberturas de ventilação do secador montadas na parede e manchas de fiapos prejudicam a atratividade do meio-fio
- Fotografia arquitetônica de exteriores de casas onde penetrações de serviços públicos perturbam planos de parede limpos
- Portfólios de reformas residenciais mostrando revestimento externo acabado sem ventilação visível
- Materiais de marketing de gerenciamento de propriedades apresentando paredes de edifícios bem conservadas
- Fotos de pátios e áreas de estar externas onde uma ventilação de parede adjacente é bem visível
Dicas para remoção completa da ventilação do secador
A coifa em si é a parte fácil – a coloração ao redor é o que separa um bom resultado de um excelente. A exaustão de fiapos cria um acúmulo branco-acinzentado distinto na parede diretamente ao redor e abaixo da abertura de ventilação, geralmente com faixas de umidade mais escuras correndo verticalmente para baixo. Inclua toda esta zona de mancha na área do pincel. Para paredes de tijolo, os fiapos podem se depositar nas juntas de argamassa, criando uma zona de cor mais clara que fica visível mesmo após a remoção do respiradouro. Estenda o pincel de 15 a 30 centímetros além da borda visível da mancha para garantir que a IA tenha uma textura de parede limpa para misturar. Se a ventilação estiver localizada perto de uma janela, porta ou elemento de acabamento, seja preciso com o pincel para evitar apagar acidentalmente o recurso adjacente – a IA precisa desses pontos de referência para reconstruir o plano da parede com precisão. Para residências com múltiplas aberturas de ventilação para secadoras (comuns em edifícios com várias unidades ou residências com lavanderias separadas em andares diferentes), remova cada ventilação individualmente. As aberturas de ventilação no nível da fundação costumam ser parcialmente obscurecidas pelo paisagismo – incluem a parte visível de quaisquer arbustos ou cobertura do solo que se sobrepõem à ventilação para ajudar a IA a misturar a borda da folhagem naturalmente.
Perguntas frequentes
- Magic Eraser também pode remover manchas de fiapos ao redor da ventilação?
- Sim - e você deveria. Incluir a zona de manchas de fiapos na seleção do pincel é essencial para um resultado convincente. Uma superfície de parede limpa com um padrão visível de manchas de fiapos, mas sem ventilação, pareceria estranha. A IA preenche toda a área com material de parede limpo e correspondente – tijolo, revestimento, estuque ou qualquer que seja a superfície.
- Funciona em diferentes materiais de parede?
- Sim. A IA lida com revestimento de vinil, tijolo, estuque, folheado de pedra, ripas de madeira pintada, painéis de fibrocimento e blocos de fundação. Ele corresponde à textura, cor e padrão específicos de cada material – incluindo o espaçamento das juntas de argamassa no tijolo e a largura da linha de volta no revestimento.
- E se a ventilação estiver parcialmente escondida atrás de um arbusto ou arbusto?
- Pincele sobre a parte visível da abertura e inclua a borda da folhagem sobreposta. A IA reconstruirá a superfície da parede atrás da ventilação e a borda natural do arbusto ou arbusto. Para aberturas de ventilação muito obscurecidas, onde apenas o capô aparece acima de uma cerca viva, basta uma escovada rápida na parte visível.
- É grátis?
- Sim. O nível gratuito do Magic Eraser oferece suporte à remoção da ventilação do secador com limites de uso diário. Premium (US$ 29,99/ano) elimina limites e fornece exportações de alta resolução para fotografia profissional imobiliária e arquitetônica.