
Como Remover Aberração Cromática de Fotos — Magic Eraser
Corrija aberração cromática, franjamento roxo e franjamento de cores nas bordas das suas fotos. A correção com AI remove a distorção de cor da lente enquanto preserva a nitidez das bordas.
SEO & Growth
Revisado por Magic Eraser Editorial ·
Índice
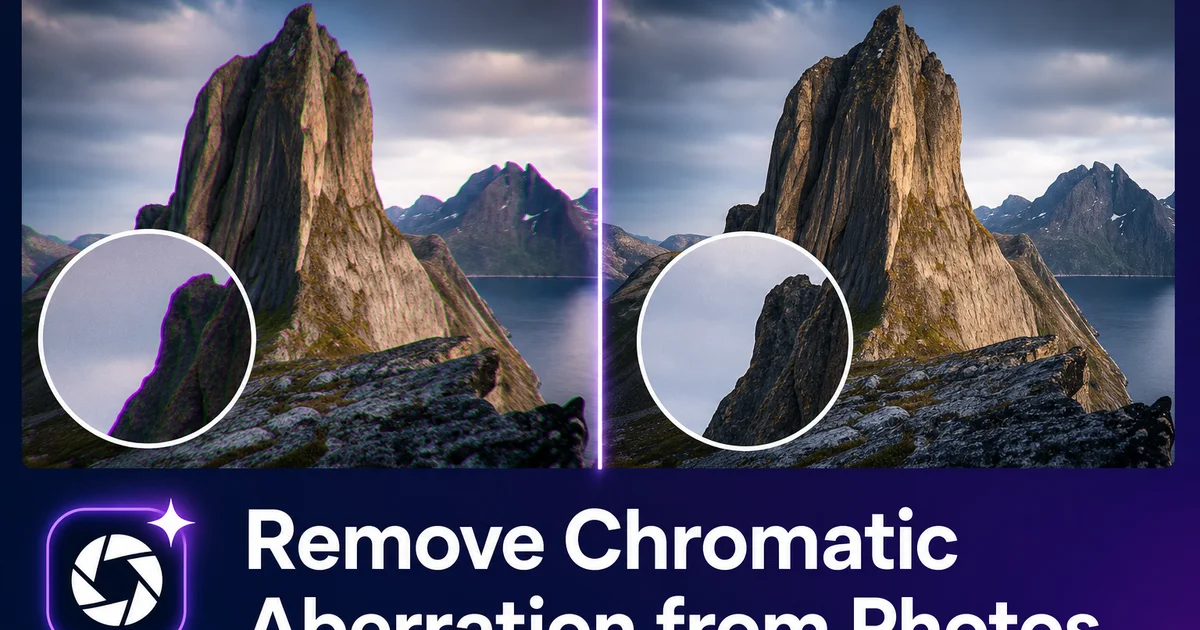
A aberração cromática é o franjamento colorido que aparece ao longo das bordas de alto contraste nas fotografias. Halos roxos ao redor de galhos de árvores contra o céu claro, contornos verdes em objetos contraluz ou divisões vermelho-ciano ao longo de linhas arquitetônicas. Isso acontece porque as lentes das câmeras curvam diferentes comprimentos de onda da luz em quantidades ligeiramente diferentes, então os componentes vermelho, verde e azul da imagem não convergem perfeitamente no sensor. Toda lente produz algum grau de aberração cromática, mas ela se torna visualmente indesejada em certas condições de fotografia.
O problema é mais visível exatamente nas situações em que os fotógrafos desejam o trabalho mais nítido: cenas de alto contraste com contraluz intensa, retratos com abertura grande e realces especulares. Fotos arquitetônicas com linhas geométricas fortes. Uma foto de paisagem com galhos de árvores intrincados contra um céu branco pode mostrar franjamento roxo em cada galho, transformando o que deveria ser uma imagem limpa e detalhada em algo com aparência defeituosa. O franjamento é frequentemente invisível em tamanhos pequenos para web, mas se torna óbvio em impressões ou visualização em tela cheia.
A correção com AI remove a aberração cromática melhor do que os métodos manuais tradicionais porque ela entende a física óptica por trás do artefato. Em vez de deslocar canais de cor globalmente, o que pode introduzir novos erros de cor, a AI identifica o padrão de franjamento e deslocamento específicos para cada região do quadro, aplicando correção direcionada que elimina a cor falsa enquanto mantém o detalhe legítimo das bordas e a precisão das cores em toda a imagem.
- A correção com AI identifica a cor do franjamento e o padrão de deslocamento específicos em diferentes regiões do quadro, aplicando correções direcionadas em vez de globais.
- Remove tanto a aberração cromática lateral (franjamento de cor nas bordas do quadro) quanto a aberração longitudinal (desvios de cor em diferentes distâncias de foco).
- Preserva a nitidez legítima das bordas e a cor — ao contrário das abordagens manuais de dessaturação que podem remover a cor desejada junto com o franjamento.
- Lida com franjamento roxo severo de lentes rápidas fotografadas com abertura máxima, que é forte demais para correção simples baseada em perfil.
- Funciona em qualquer lente sem exigir um perfil de correção específico para a lente, tornando-se eficaz para lentes vintage, lentes adaptadas e ópticas não identificadas.
O que causa a aberração cromática e por que algumas lentes são piores
A aberração cromática é uma limitação óptica fundamental, não um defeito. Quando a luz branca entra em uma lente de vidro, cada comprimento de onda refrata em um ângulo ligeiramente diferente. A luz azul se curva mais que a vermelha, com o verde no meio-termo. Isso significa que a lente cria imagens de tamanhos ligeiramente diferentes para cada canal de cor. Elas não se sobrepõem perfeitamente no sensor. O desalinhamento de cores se manifesta como franjamentos coloridos ao longo das bordas de alto contraste, onde os canais estão mais visivelmente separados.
Dois tipos distintos ocorrem nas fotografias. A aberração lateral (transversal) aumenta do centro do quadro em direção às bordas, produzindo franjamento de cor que piora nos cantos. Este é o tipo mais comum visível em fotos de paisagem e arquitetura. A aberração longitudinal (axial) ocorre em todo o quadro e se manifesta como cores diferentes focando em distâncias ligeiramente diferentes. Realces fora de foco podem mostrar franjamento verde na frente do plano de foco e magenta atrás dele. Lentes rápidas fotografadas com aberturas amplas como f/1.4 ou f/1.8 são principalmente propensas à aberração longitudinal.
O design da lente determina a severidade. Lentes simples com menos elementos de vidro apresentam mais aberração. Lentes caras usam elementos de vidro especiais de baixa dispersão (ED, LD, fluorita) e designs apocromáticos especificamente para minimizar a aberração cromática. Mas mesmo lentes premium apresentam alguma aberração em seus limites ópticos: abertura máxima, distância mínima de foco ou distâncias focais extremas. Lentes zoom geralmente apresentam mais aberração que lentes prime em distâncias focais equivalentes porque os elementos extras introduzem mais oportunidades de dispersão.
- A luz azul refrata mais que a vermelha através do vidro, criando tamanhos de imagem dependentes do comprimento de onda que não se alinham perfeitamente no sensor.
- A aberração lateral piora em direção às bordas do quadro — mais visível em paisagens e arquitetura — enquanto a aberração longitudinal afeta todo o quadro em aberturas amplas.
- Lentes rápidas em f/1.4 a f/1.8 produzem a aberração cromática longitudinal mais visível, especialmente em realces especulares e bordas de bokeh.
- Lentes zoom geralmente produzem mais aberração cromática que lentes prime em distâncias focais equivalentes devido à dispersão adicional dos elementos de vidro.
Por que os métodos tradicionais de correção são insuficientes
A correção manual mais comum para aberração cromática é dessaturar as cores roxa e verde ao longo das bordas. Isso funciona para casos leves, mas falha em franjamentos severos porque também remove a cor legítima. Uma foto de uma pessoa usando uma camisa roxa perto de galhos de árvores contraluz perderia tanto o franjamento nos galhos quanto a cor da camisa se a dessaturação roxa for aplicada globalmente. O mascaramento seletivo ajuda, mas requer trabalho manual tedioso em cada borda afetada na imagem.
A correção baseada em perfil de lente — usada pelo Lightroom e Camera Raw — aplica um mapa de correção predeterminado baseado no modelo específico de lente identificado nos dados EXIF. Isso é eficaz quando existe um perfil para sua lente exata. Falha para lentes vintage adaptadas, lentes manuais sem contatos eletrônicos ou qualquer lente que não esteja no banco de dados de correção. O perfil também representa uma correção média para aquele modelo de lente e pode não corresponder à sua cópia específica, que pode ter características de aberração ligeiramente diferentes devido à variabilidade de fabricação.
Ambas as abordagens também têm dificuldade com a aberração cromática longitudinal porque ela varia com a distância de foco e abertura, não apenas com a posição no quadro. Um perfil de lente calibrado em uma distância de foco pode supercorrigir ou subcorrigir em outra. A correção com AI evita todas essas limitações analisando a aberração real presente em cada imagem específica, em vez de depender de perfis predeterminados ou manipulação bruta de canais de cor.
- A dessaturação global roxo-verde remove a cor legítima junto com o franjamento, danificando objetos como flores, roupas e superfícies pintadas.
- A correção por perfil de lente só funciona quando existe um perfil exato — lentes vintage, adaptadas e não listadas não recebem correção alguma.
- A variabilidade de fabricação significa que os perfis de lente representam médias, não o padrão real de aberração da sua cópia específica de lente.
- A aberração longitudinal varia com a distância de foco, tornando os perfis estáticos imprecisos para a ampla gama de condições de fotografia no mundo real.
Correção com AI: como funciona e quando usar cada ferramenta
O AI Enhance realiza a passagem de correção primária analisando o padrão real de aberração cromática na sua imagem específica. Ele detecta o deslocamento de cor em nível de subpixel ao longo de cada borda de alto contraste no quadro e constrói um mapa de correção adaptado para aquela imagem exata. Diferente da correção baseada em perfil que assume aberração simétrica irradiando do centro do quadro, a AI lida com padrões assimétricos, efeitos de curvatura de campo e tipos mistos de aberração que as imagens do mundo real produzem.
O AI Filter fornece refinamento direcionado para áreas onde a correção primária deixa franjamento residual. Isso ocorre mais comumente em objetos de altíssimo contraste: galhos nus contra céu branco, realces cromados contra fundos escuros ou cercas de arame contraluz. Essas bordas de contraste extremo produzem aberração que excede o que a passagem de correção global resolve. O AI Filter permite aumentar a força de correção nessas áreas específicas sem supercorrigir o resto do quadro.
Para o franjamento mais teimoso — frequentemente um brilho roxo severo de lentes rápidas fotografadas com abertura máxima em luz contrastada — o Magic Eraser oferece precisão cirúrgica. Selecione o franjamento colorido ao longo de uma borda específica e a AI o substitui pela transição de borda correta calculada a partir do contexto da imagem ao redor. Isso é mais útil quando o franjamento é tão severo que aparece como um brilho colorido de vários pixels de largura, em vez de um fino artefato de borda, e quando a correção automatizada precisaria ser tão agressiva que correria o risco de afetar a cor legítima nas proximidades.
- O AI Enhance analisa padrões reais de aberração em cada imagem, em vez de aplicar perfis predeterminados, lidando com tipos de aberração assimétricos e mistos.
- O AI Filter fornece refinamento localizado para bordas de contraste extremo onde a passagem de correção global deixa franjamento residual.
- O Magic Eraser oferece remoção cirúrgica de brilho roxo severo que é largo demais para a correção automatizada lidar sem afetar a cor nas proximidades.
- O fluxo de trabalho de três ferramentas — correção global, refinamento direcionado, remoção cirúrgica — lida com tudo, desde franjamento leve até brilho severo de abertura grande.
Prevenindo a aberração cromática na câmera
Embora a correção com AI seja eficaz após o fato, reduzir a aberração cromática na captura produz os melhores resultados finais porque há mais dados originais para trabalhar. Reduzir a abertura em um ou dois pontos a partir da abertura máxima reduz bastante a aberração cromática longitudinal. Fotografar em f/2.8 em vez de f/1.4 pode eliminar a maioria do franjamento visível enquanto ainda proporciona profundidade de campo rasa. Esta é a mitigação mais eficaz na câmera.
Evitar contraste extremo na composição reduz a visibilidade de qualquer aberração existente. O franjamento é mais visível onde um objeto muito escuro encontra um fundo muito claro, com exemplos clássicos sendo galhos de árvores contra céu branco ou linhas de telhado escuras contra o sol direto. Ajustar a composição para incluir alguma transição de tom médio entre os elementos mais escuros e mais claros pode tornar a aberração existente muito menos perceptível sem qualquer pós-processamento.
Fotografar em RAW em vez de JPEG preserva os dados completos do canal de cor que os algoritmos de correção necessitam. A compressão JPEG introduz artefatos de cor em bordas de alto contraste que se parecem com aberração cromática e podem interferir na correção. Arquivos RAW fornecem à AI os dados mais limpos possíveis para trabalhar, produzindo remoção de aberração mais precisa com menos artefatos de correção. Se seu fluxo de trabalho suportar, a captura em RAW é sempre preferível para imagens onde a aberração cromática provavelmente será um problema.
- Reduzir a abertura em um a dois pontos a partir da abertura máxima elimina a maioria da aberração cromática longitudinal enquanto mantém o controle utilizável de profundidade de campo.
- Compor para reduzir transições de contraste extremo — evitando objetos escuros contra fundos branco estourados — minimiza o franjamento visível.
- A captura em RAW preserva os dados completos do canal de cor para correção, enquanto a compressão JPEG introduz artefatos de borda que interferem na remoção de aberração.
- As configurações de correção de lente na câmera em modelos modernos podem aplicar redução básica de aberração cromática no nível de hardware antes do arquivo ser salvo.
How to do it
- 1
Identify the type of chromatic aberration in your photo
Zoom to 100% and inspect high-contrast edges. Tree branches against sky, window frames against bright backgrounds, or dark text on light surfaces. Purple or magenta fringing indicates lateral chromatic aberration, while green-red color shifts at different focus distances indicate longitudinal chromatic aberration. The type determines the correction approach.
- 2
Upload the photo and apply AI-powered lens correction
Load the image into AI Enhance, which automatically detects and profiles the chromatic aberration pattern across the frame. The AI identifies the specific color fringe wavelengths and their displacement direction, building a correction map that addresses the aberration without affecting legitimate color in the image.
- 3
Fine-tune fringe removal on problem areas
Use AI Filter to target residual fringing in areas where the automatic correction needs refinement. High-contrast subjects like bare tree branches against bright overcast sky or backlit hair often retain subtle fringing that benefits from localized attention after the global correction pass.
- 4
Remove persistent fringing artifacts with Magic Eraser
For severe purple fringing that resists automated correction. Common with fast lenses shot wide open — use Magic Eraser to select the colored fringe along specific edges. The AI replaces the colored artifact with the correct edge transition, maintaining sharpness while eliminating the false color.
- 5
Verify correction quality and export
Check all four corners of the frame at 100% zoom, since chromatic aberration is often worst at the edges. Compare before-and-after views to confirm that the correction removed the color fringing without introducing desaturation or edge softening. Export at full resolution to preserve the corrected detail.
Fontes
- Optical Aberrations in Photographic Lenses — Edmund Optics
- Understanding Chromatic Aberration in Digital Photography — Cambridge in Colour
- Lens Correction and Aberration Removal Techniques — Imatest