
Como Criar Fotos Miniaturas Tilt-Shift com IA: Um Tutorial Completo
Aprenda a transformar fotos do mundo real em cenas miniatura tilt-shift convincentes usando desfoque de IA, ferramentas de foco e realce — desde escolher o ângulo certo até aperfeiçoar a ilusão de brinquedo.
SEO & Growth
Revisado por Magic Eraser Editorial ·
Índice
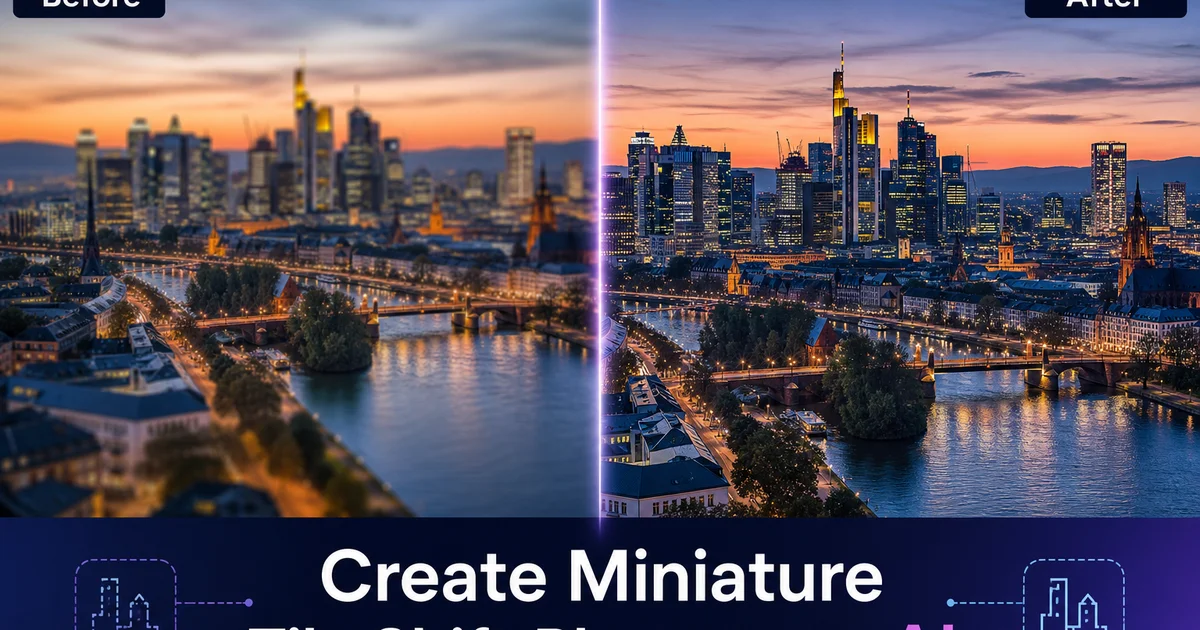
A fotografia miniatura tilt-shift é um dos efeitos visualmente mais impressionantes na fotografia criativa. Uma rua real da cidade se torna uma pequena vila de modelos. Uma praia lotada se torna um diorama de figurinhas pintadas. Um porto cheio de barcos se torna a meticulosa criação de um modelista. O efeito funciona porque explora uma peculiaridade da percepção visual humana. Associamos profundidade de campo muito rasa com a visualização de objetos pequenos de perto, então quando vemos uma foto de paisagem com desfoque semelhante ao macro, nosso cérebro interpreta a cena como miniatura, mesmo que saibamos intelectualmente que é um lugar real.
No passado, criar esse efeito exigia ou uma lente tilt-shift especializada — um pedaço caro de vidro que inclina fisicamente o plano focal em relação ao sensor — ou uma edição manual trabalhosa no Photoshop, aplicando máscaras de desfoque graduadas e gastando muito tempo para fazer as transições de desfoque parecerem naturais em vez de obviamente filtradas. Ambas as abordagens exigiam grande investimento em equipamento ou tempo. Mantinham a técnica confinada a fotógrafos que eram especificamente atraídos pelo efeito e dispostos a investir para produzi-lo.
Ferramentas de desfoque e foco alimentadas por IA tornam o efeito miniatura tilt-shift acessível a qualquer pessoa com uma foto de celular tirada do ângulo certo. A IA entende a profundidade na imagem e pode aplicar desfoque que segue a estrutura espacial real da cena, em vez de exigir pintura manual de máscaras. Combinado com o realce de IA para nitidez da banda de foco e ajustes de cor para a saturação de brinquedo, você pode produzir cenas miniatura convincentes em minutos a partir de fotos que você já pode ter tirado de mirantes, telhados, drones ou mirantes em colinas.
- O efeito miniatura tilt-shift explora a associação do cérebro entre profundidade de campo rasa e visões de perto de objetos pequenos.
- Ângulos elevados entre 30 e 60 graus voltados para baixo são essenciais — eles imitam como vemos miniaturas reais.
- Desfoque agressivo acima e abaixo de uma faixa estreita de foco simula a profundidade de campo da fotografia macro.
- Saturação e contraste aumentados imitam a aparência pintada e brilhante de edifícios e veículos modelo.
- Ferramentas de IA aplicam desfoque consciente de profundidade e nitidez seletiva que antes exigiam lentes tilt-shift caras.
A ciência por trás do funcionamento dos efeitos miniatura tilt-shift
A ilusão de miniatura tilt-shift é, em sua essência, um truque de profundidade de campo. Quando você fotografa um objeto pequeno de perto — uma moeda sobre uma mesa, um carro modelo em uma prateleira — a profundidade de campo é muito rasa. Apenas uma fina fatia do objeto está nítida. Tudo à frente e atrás dessa fatia se desfoca rapidamente. Nosso sistema visual aprendeu essa associação através de uma vida de experiência: queda de desfoque extrema significa que o objeto é pequeno e próximo. Quando você aplica esse mesmo padrão de desfoque a uma fotografia de uma paisagem real, a associação é acionada e nossa percepção muda. Os prédios, carros e pessoas parecem modelos minúsculos porque o desfoque diz ao nosso cérebro que eles devem ser pequenos.
O ângulo de visão reforça essa mudança perceptual. Olhamos para miniaturas reais e maquetes de cima, frequentemente em um ângulo de 30 a 60 graus. Vemos paisagens reais ao nível dos olhos ou de baixo. Quando uma foto combina o ângulo elevado voltado para baixo com o desfoque de profundidade de campo rasa, ambas as pistas se alinham e a interpretação de miniatura se torna dominante. É por isso que fotos ao nível da rua quase nunca produzem um efeito tilt-shift convincente, independentemente da quantidade de desfoque aplicada. O ângulo de visão contradiz a pista de profundidade, e o cérebro volta à interpretação correta de que esta é uma cena real.
A saturação de cor fornece a terceira pista perceptual. Cenários reais têm coloração complexa, variada e ligeiramente suave. A grama tem múltiplos tons de verde com marrom e amarelo misturados. Fachadas de edifícios são desgastadas e variadas. As cores dos veículos são empoeiradas e dessaturadas pela névoa da distância. Cenários de maquetes usam tinta uniforme e vívida. Um carro modelo é um vermelho saturado, uma árvore modelo é um verde brilhante, um edifício modelo é um cinza limpo. Aumentar a saturação em sua foto substitui a paleta complexa e suave do mundo real pela paleta simplificada e vívida do modelo. O cérebro adiciona isso às pistas de desfoque e ângulo para fortalecer a interpretação de miniatura.
- Queda de desfoque extrema aciona a associação do cérebro entre profundidade de campo rasa e objetos pequenos e próximos.
- Ângulos de visão elevados de 30 a 60 graus correspondem a como as pessoas veem naturalmente miniaturas e maquetes.
- Ângulos ao nível da rua contradizem a pista de miniatura independentemente da quantidade de desfoque, quebrando a ilusão.
- Saturação de cor vívida e uniforme substitui tons complexos do mundo real pela paleta simplificada de modelos pintados.
Escolhendo e compondo as fotos fonte certas
Nem toda foto elevada é um bom candidato para tilt-shift. As melhores imagens fonte têm várias características: um ângulo elevado claro olhando para baixo, assuntos a uma distância bastante consistente da câmera, objetos distintos que servem como referências de escala. Atividade visual suficiente para criar uma cena miniatura interessante. Uma vista de telhado de uma rua com carros, pedestres e fachadas de lojas tem todas essas qualidades. Uma vista aérea de um estacionamento cheio de carros funciona bem porque as formas uniformes dos carros são lidas como veículos modelo. Um mirante em uma colina com vista para um porto com barcos ancorados cria uma marina modelo convincente.
Evite fotos com grandes elementos em primeiro plano ou linhas de perspectiva fortemente recessivas. Uma foto onde um edifício preenche o terço inferior do quadro a curta distância e a paisagem urbana se estende até o horizonte cria uma contradição de profundidade. O edifício próximo precisa estar nítido porque está perto, mas o efeito tilt-shift precisa desfocar a parte inferior do quadro. Da mesma forma, uma estrada se estendendo reta em direção ao horizonte cria uma perspectiva linear que luta contra a interpretação de miniatura porque dioramas modelo raramente têm perspectiva de ponto único forte. Escolha imagens onde a cena está a uma distância média bastante uniforme, sem contrastes extremos de profundidade perto-longe.
Considere o conteúdo da cena, bem como sua geometria. Os efeitos miniatura tilt-shift são mais convincentes e divertidos quando a cena contém atividade humana. Pessoas caminhando, veículos se movendo, barcos navegando, equipamentos de construção trabalhando. O prazer do espectador vem da dissonância cognitiva de ver atividade humana aparentemente real renderizada como se fosse uma miniatura. Cenas estáticas como estacionamentos vazios, paisagens desabitadas. Paisagens urbanas noturnas podem funcionar, mas produzem menos da característica surpresa tilt-shift porque não há referências de escala humana para desencadear a reinterpretação de tamanho.
- Melhores candidatos têm ângulos elevados, distâncias consistentes dos assuntos e referências de escala reconhecíveis.
- Evite grandes elementos em primeiro plano e perspectiva de ponto único forte que contradizem a ilusão de miniatura.
- Cenas com atividade humana — pedestres, veículos, trabalhadores — produzem o efeito miniatura mais forte.
- Telhados, mirantes em colinas, fotos de drone e observatórios fornecem perspectivas fonte ideais.
Aplicando desfoque e foco para um efeito de profundidade de campo convincente
A aplicação do desfoque é a etapa mais crítica na criação de uma miniatura tilt-shift convincente. O objetivo é simular a profundidade de campo que uma lente macro produziria se esses objetos fossem realmente modelos minúsculos fotografados de perto. Na fotografia macro, a profundidade de campo é um plano fino paralelo ao sensor. Objetos na distância exata de foco estão nítidos, e a nitidez cai rapidamente na frente e atrás dessa distância. Em uma foto miniatura tilt-shift, isso se traduz em uma faixa horizontal de nitidez através da imagem com desfoque progressivo acima e abaixo.
A posição da faixa de foco é importante. Posicione-a no nível horizontal onde seus assuntos principais estão. O nível da rua em uma paisagem urbana, a linha d'água em um porto, a via em uma foto aérea de trânsito. A faixa deve ser estreita o suficiente para criar desfoque dramático, mas larga o suficiente para conter assuntos completos. Você quer carros inteiros e pedestres inteiros em foco, não meio carro nítido e metade desfocado. A transição de nítido para desfocado deve ser gradual ao longo de 10 a 15 por cento da altura da imagem em cada lado. Uma transição abrupta parece uma sobreposição de filtro em vez de um efeito óptico, quebrando a ilusão imediatamente.
A quantidade de desfoque deve ser agressiva. A profundidade de campo macro real nas escalas que estamos imitando — onde um edifício teria alguns centímetros de altura — produz desfoque dramático que reduz objetos de fundo a manchas de cor. Desfoque sutil e suave não desencadeia a percepção de miniatura porque parece com a profundidade de campo normal da fotografia de paisagem, em vez da profundidade de campo macro. Empurre o desfoque até que edifícios de fundo e áreas de primeiro plano se dissolvam em formas suaves, mantendo estrutura suficiente para que o espectador possa identificar o que são, mas não o suficiente para serem lidos como objetos reais em tamanho real. Ferramentas de desfoque de IA lidam bem com isso porque entendem a estrutura da cena e aplicam desfoque que segue a profundidade real, em vez de aplicar um gradiente uniforme.
- Posicione a faixa de foco nítida no nível horizontal dos seus assuntos principais.
- Faça a faixa estreita o suficiente para efeito dramático, mas larga o suficiente para conter assuntos completos.
- A transição de nítido para desfocado deve ser gradual ao longo de 10-15 por cento da altura da imagem em cada lado.
- Use desfoque agressivo que dissolva objetos de fundo em formas de cor — desfoque sutil não acionará a percepção de miniatura.
Cor, contraste e toques finais
Após aplicar o desfoque tilt-shift, os ajustes de cor e contraste completam a transformação de fotografia para miniatura aparente. Aumente a saturação globalmente em 20 a 40 por cento. O suficiente para empurrar os tons naturais em direção à uniformidade vívida da tinta de modelo sem entrar em território obviamente artificial. Os verdes se tornam o verde brilhante e consistente da grama de ferrovia modelo. Os vermelhos e azuis nos carros se tornam as cores primárias brilhantes de veículos de brinquedo. As superfícies dos edifícios se tornam os tons limpos e uniformes de modelos pintados. Se cores específicas estiverem estourando ou se tornando não naturais, reduza canais de cor individuais enquanto mantém a saturação geral elevada.
O ajuste de contraste amplifica o efeito miniatura imitando as condições de iluminação da fotografia de modelos. Fotógrafos de miniaturas reais usam iluminação de estúdio direcional que cria sombras nítidas e realces brilhantes. Condições que paisagens externas reais raramente exibem porque o espalhamento atmosférico suaviza sombras e reduz o contraste à medida que a distância aumenta. Ao aumentar o contraste, você remove o suavizamento atmosférico que sinaliza distância e escala real, substituindo-o pela renderização nítida de luz e sombra que sinaliza condições de estúdio de perto. Aumente os realces e aprofunde as sombras até que a imagem tenha a aparência nítida e limpa de uma fotografia de produto bem iluminada.
Aplique AI Enhance seletivamente à faixa de foco como etapa final. Os assuntos nitidamente focados dentro da faixa de foco devem parecer muito detalhados e nítidos — da maneira que um carro modelo parece quando fotografado de perto com uma lente macro. Esse contraste entre assuntos hiper-nítidos na faixa de foco e desfoque suave e sonhador fora dela é a marca registrada de um trabalho tilt-shift convincente. O resultado deve ser uma imagem onde a primeira reação do espectador é ver uma miniatura, e a segunda reação — o olhar duplo de prazer — é perceber que é uma cena real manipulada para parecer impossivelmente pequena.
- Aumente a saturação em 20-40 por cento para empurrar tons naturais em direção à vivacidade uniforme de tinta de modelo.
- Aumente o contraste para simular iluminação de estúdio direcional e remover o suavizamento atmosférico de distância.
- Aplique AI Enhance à faixa de foco para assuntos hiper-nítidos que imitam o detalhe de close-up de lente macro.
- O objetivo é uma primeira impressão de miniatura seguida pelo olhar duplo de prazer ao perceber que a cena é real.
How to do it
- 1
Select photos taken from an elevated angle looking downward
The miniature tilt-shift effect works best on photos taken from above looking down at an angle. Rooftop views of streets, aerial shots of neighborhoods, overlook perspectives of harbors and parks, and drone photos of landscapes. The elevated viewpoint is critical because it mimics the angle at which people naturally view actual miniatures and model train layouts: from above, looking down at roughly 30 to 60 degrees. Street-level photos rarely produce a convincing miniature effect because we do not view miniatures from eye level. Select images with clear subjects at a consistent middle distance. Cars, buildings, people, boats — that serve as scale references the viewer's brain interprets as tiny models.
- 2
Apply AI blur and focus tools to create a shallow depth-of-field band
The core of the tilt-shift miniature effect is a narrow band of sharp focus with heavy blur above and below it, mimicking the very shallow depth of field that macro photography produces when photographing small objects. Use AI blur and focus tools to keep a horizontal strip of the image sharp. Often centered on your main subject area — while progressively blurring the top and bottom of the frame. The transition from sharp to blurred should be gradual, not abrupt, mimicking a real lens's focus falloff. The blur amount should be aggressive. Real macro depth of field at miniature scales is paper-thin, so a subtle blur will not sell the illusion.
- 3
Boost color saturation and contrast to mimic model paint and lighting
Real miniatures and model buildings are painted with saturated, slightly unrealistic colors. Model cars are glossy primary colors. Model buildings have crisp, vivid paint. Model landscaping uses bright, uniform greens rather than the varied, muted tones of real vegetation. Increase color saturation by 20 to 40 percent to push the image toward this toy-like palette. Boost contrast so shadows are deeper and highlights are brighter, mimicking the intense, directional lighting that model photographers use. The combined effect of heavy blur and vivid color is what makes the viewer's brain flip from interpreting the scene as a real landscape to seeing it as a tabletop miniature.
- 4
Use AI Enhance to sharpen detail in the focus band
Apply AI Enhance selectively to the in-focus band of the image to make the subjects within it very crisp. In real macro photography of miniatures, the objects within the thin depth of field are rendered with remarkable sharpness because the lens is close and the subject is small. By sharpening the focused band while leaving the blurred areas soft, you amplify the depth-of-field contrast that creates the miniature illusion. The sharpened cars, buildings, and people in the focus strip look like precisely crafted models photographed at close range. The blurred surroundings recede into the out-of-focus background trait of macro work.
- 5
Export and share with context that enhances the miniature illusion
When sharing tilt-shift miniature photos, display context strengthens the effect. Square crops work well because they echo the constrained framing of macro photography and model photography. Caption the image with language that playfully reinforces the illusion. References to model building, dioramas, or miniature worlds prompt viewers to see the image as tiny before their brain has a chance to resolve it as real. Share as part of a series rather than one by one. Multiple tilt-shift images of the same area create a consistent miniature world that is more convincing than a single image viewed in isolation.
Fontes
- The Science Behind Tilt-Shift Photography and Miniature Faking — Cambridge in Colour
- Understanding Depth of Field and Bokeh in Photography — B&H Photo
- Creative Lens Effects in Digital Photography — Photography Life