
Como criar efeito 3D anaglifo com IA: fotos estereoscopicas vermelho-ciano
Crie um efeito 3D anaglifo com IA. Guia passo a passo: como funciona o 3D anaglifo, escolher a imagem fonte certa, controlar a intensidade de profundidade e otimizar para diferentes plataformas.

Product Marketing
Revisado por Magic Eraser Editorial ·
Índice
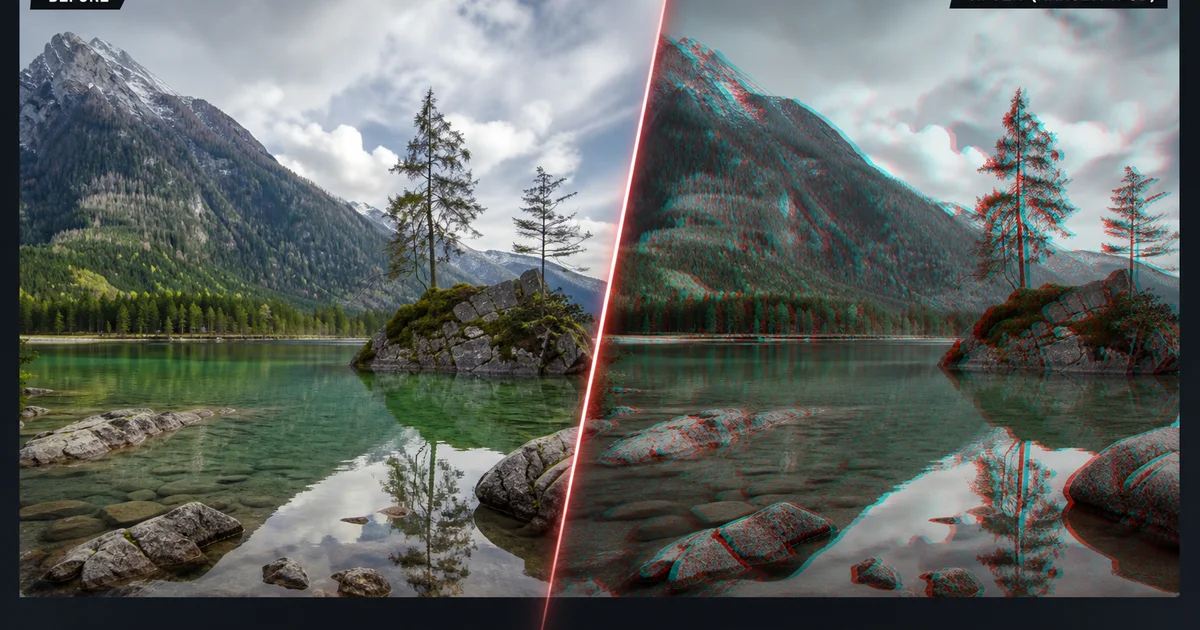
O efeito 3D anaglifo — aquelas icônicas imagens deslocadas em vermelho e ciano que saltam da tela quando vistas com óculos coloridos — passou por um enorme renascimento no design digital. Desenvolvida originalmente na década de 1850 para a fotografia estereoscópica, a técnica caiu em desuso à medida que as tecnologias 3D digitais evoluíram. Mas a inconfundível estética retrofuturista encontrou nova vida nas redes sociais, nas capas de álbuns, nos cartazes de eventos. Em campanhas de marca em que os designers querem um visual que sinalize de imediato ousadia criativa e experimentação visual.
Criar um anaglifo tradicional exigia ou duas câmeras posicionadas em ângulos ligeiramente diferentes ou uma complexa manipulação manual de canais no Photoshop. Isolar o canal vermelho, duplicar o canal ciano, deslocá-los com precisão e mesclá-los novamente sem destruir a imagem. O processo era tedioso, propenso a erros e exigia um sólido entendimento da teoria das cores e das operações de canal. Um único erro de cálculo na distância de deslocamento ou no modo de mesclagem produzia uma bagunça inutilizável de franjas de cor em vez de uma ilusão de profundidade limpa.
As ferramentas com tecnologia de IA reduziram esse processo técnico de várias etapas a um fluxo de trabalho guiado que produz anaglifos de qualidade profissional em minutos. A IA analisa a estrutura de profundidade da sua imagem e identifica as camadas de primeiro plano e de fundo. Aplica a separação de canais com mapeamento de profundidade inteligente em vez de um deslocamento plano e uniforme. O resultado é um anaglifo em que os objetos mais próximos parecem saltar para a frente mais do que os distantes. Uma ilusão de profundidade fisicamente precisa que as técnicas tradicionais de deslocamento plano não conseguem alcançar a partir de uma única fotografia 2D.
- Crie efeitos 3D anaglifos vermelho-ciano a partir de qualquer fotografia única, sem configurações de câmera dupla nem edição manual de canais.
- A análise de profundidade por IA produz uma separação estereoscópica fisicamente precisa em que os objetos do primeiro plano saltam para a frente mais do que os elementos de fundo.
- Ajuste a distância e o ângulo de deslocamento para controlar a intensidade da profundidade, de gráficos web sutis a impressões de cartazes impactantes.
- Funciona com retratos, paisagens, fotos de produto e fotos de arquitetura com forte separação entre primeiro plano e fundo.
- Exporte em PNG para preservar a separação precisa de canais, ou use a estética retrô para redes sociais mesmo sem óculos 3D.
Como funciona o 3D anaglifo e por que a IA o melhora
Um anaglifo tradicional codifica as vistas do olho esquerdo e do olho direito de uma cena em uma única imagem usando canais de cor. O canal vermelho carrega uma perspectiva enquanto o canal ciano (verde mais azul) carrega a outra. Quando você vê a imagem através de óculos vermelho-ciano, cada olho vê apenas o canal designado a ele. A lente vermelha bloqueia a informação ciano e vice-versa. Seu cérebro funde as duas vistas deslocadas em uma única imagem com profundidade percebida, assim como funde as perspectivas ligeiramente diferentes dos seus dois olhos biológicos em uma visão estereoscópica.
O fator crítico na qualidade do anaglifo é como o deslocamento de canais corresponde à profundidade real da cena. Em uma configuração ingênua, os canais vermelho e ciano são deslocados por uma distância uniforme em toda a imagem. Cada pixel se desloca pela mesma quantidade, independentemente de representar um objeto próximo do primeiro plano ou um fundo distante. Esse deslocamento plano cria uma ilusão de profundidade. Ela parece artificial porque a visão estereoscópica real produz mais paralaxe para objetos próximos e menos para os distantes. O gradiente de profundidade está errado, e seu sistema visual nota a inconsistência mesmo que você não consiga explicar por que a imagem parece estranha.
A estimativa de profundidade por IA resolve isso analisando a imagem para produzir um mapa de profundidade. Uma representação em tons de cinza de quão distante cada pixel está da câmera. Os objetos mais próximos da câmera recebem um deslocamento de canal maior, enquanto os elementos distantes recebem um deslocamento menor. O resultado é um anaglifo graduado em profundidade em que a separação estereoscópica varia naturalmente por todo o enquadramento, correspondendo a como seus olhos realmente perceberiam a cena. Essa única melhoria transforma o anaglifo de um efeito de novidade plano em uma ilusão 3D genuinamente convincente.
- Os anaglifos tradicionais usam um deslocamento plano e uniforme que aplica a mesma separação de canais a cada pixel, independentemente da profundidade.
- A estimativa de profundidade por IA produz um mapa de profundidade pixel a pixel que gradua o deslocamento com base na geometria real da cena.
- Os objetos do primeiro plano recebem mais separação de canais para um salto mais forte, enquanto os fundos recebem menos para um recuo natural.
- A abordagem graduada em profundidade produz uma ilusão estereoscópica que corresponde à visão binocular humana com muito mais precisão do que os deslocamentos planos.
Escolhendo a imagem fonte certa para efeitos anaglifos
Nem toda fotografia é uma boa candidata a anaglifo. O efeito depende da separação de profundidade, portanto imagens com forte estratificação entre primeiro plano e fundo produzem os melhores resultados. Um retrato com um sujeito no primeiro plano e um fundo desfocado ou distante é ideal. A pessoa parece saltar para a frente da cena. Fotos de produto sobre superfícies com recuo de profundidade visível também funcionam bem. Paisagens com planos de profundidade distintos — uma árvore no primeiro plano, um lago no plano médio, montanhas ao fundo — criam ricos anaglifos de várias camadas em que cada plano de profundidade fica a uma distância percebida diferente.
Imagens planas com variação mínima de profundidade produzem anaglifos fracos que mal são percebidos como tridimensionais. Uma foto da textura de uma parede, um arranjo flat-lay fotografado diretamente de cima ou um close macro recortado de perto com um único plano focal não dão nada para a IA trabalhar. Não há gradiente de profundidade a ser codificado na separação de canais. Se a sua imagem de origem parece ter sido tirada com uma teleobjetiva que comprimiu todos os planos de profundidade juntos, o anaglifo parecerá mais uma simples falha de cor do que um efeito 3D deliberado.
Imagens de alto contraste com bordas nítidas entre primeiro plano e fundo produzem os anaglifos mais limpos. Quando o limite entre as camadas de profundidade é bem definido, a IA pode aplicar diferentes quantidades de deslocamento a cada camada sem criar artefatos de franjas de cor nas bordas. Transições suaves e graduais entre camadas de profundidade ainda funcionam, mas podem mostrar um leve sangramento de cor onde os canais vermelho e ciano se sobrepõem de forma imprecisa. Para os melhores resultados, comece com imagens que tenham um claro isolamento do sujeito. As mesmas qualidades que fazem um bom retrato ou uma boa foto de produto também fazem uma boa fonte para anaglifo.
- Uma forte separação entre primeiro plano e fundo é essencial — retratos, fotos de produto e paisagens estratificadas funcionam melhor.
- Imagens planas com variação mínima de profundidade produzem efeitos fracos que parecem mais falhas de cor do que 3D intencional.
- Bordas de alto contraste entre camadas de profundidade produzem anaglifos mais limpos com menos franjas de cor nos limites.
- Cenas comprimidas por teleobjetiva carecem do gradiente de profundidade necessário para uma separação estereoscópica convincente.
Controlando a intensidade de profundidade e variacoes criativas
A distância de deslocamento entre os canais vermelho e ciano controla diretamente o quão impactante o efeito 3D aparece. Um deslocamento sutil de dois a quatro pixels cria uma suave sensação de profundidade que funciona como um tratamento visual chamativo sem sobrecarregar o conteúdo da imagem. Ideal para publicações em redes sociais, banners de site e gráficos de marca em que o anaglifo é um acento e não o ponto focal. A imagem permanece totalmente legível e esteticamente agradável mesmo sem óculos 3D, com apenas um toque de separação cromática que sinaliza uma intenção criativa.
Um deslocamento moderado de seis a dez pixels produz um efeito 3D pronunciado que se torna a característica visual dominante da imagem. Nessa intensidade, a separação vermelho-ciano é claramente visível e a ilusão de profundidade é forte o suficiente para impressionar através de óculos 3D. Essa faixa funciona bem para cartazes de eventos, capas de álbuns. Para gráficos de exibição em que o tratamento anaglifo é o conceito criativo e não um realce sutil. A imagem começa a ficar menos legível sem óculos no extremo superior dessa faixa. Considere o seu público e o contexto de visualização.
Além da combinação padrão vermelho-ciano, as ferramentas de IA oferecem pares de cores alternativos para diferentes climas estéticos. O magenta-verde produz um visual mais quente e orgânico que combina bem com a fotografia de retrato. O amarelo-azul cria um contraste marcante que parece mais moderno e menos retrô. Algumas ferramentas oferecem seleção de cores totalmente personalizada para que você possa combinar os canais do anaglifo com a paleta da sua marca. Esses pares de cores não tradicionais não funcionam com óculos 3D padrão, mas produzem efeitos visuais distintos que se destacam em portfólios de design e campanhas criativas.
- Um deslocamento de dois a quatro pixels cria uma profundidade sutil para acentos em redes sociais e gráficos de marca que permanecem legíveis sem óculos.
- Um deslocamento de seis a dez pixels produz um efeito 3D impactante adequado para cartazes, artes de álbum e gráficos de exibição.
- Os pares de cores alternativos — magenta-verde, amarelo-azul, cores de marca personalizadas — oferecem variações criativas além do clássico vermelho-ciano.
- Valores de deslocamento mais altos reduzem a legibilidade sem óculos, portanto ajuste a intensidade ao seu público e ao contexto de visualização.
Otimizando imagens anaglifas para diferentes plataformas
O formato de exportação importa muito para imagens anaglifas porque a compressão com perdas pode degradar a separação precisa dos canais de cor que cria a ilusão 3D. A compressão JPEG, que funciona fazendo a média da informação de cor em blocos de pixels, pode desfocar o limite entre os canais vermelho e ciano. Espalhando a separação limpa em um gradiente turvo que enfraquece o efeito de profundidade. Para máxima qualidade, exporte no formato PNG, que preserva cada pixel de informação de cor exatamente como foi renderizado. O tamanho do arquivo será maior, mas a qualidade do anaglifo será visivelmente melhor, principalmente em intensidades de deslocamento mais altas em que a precisão de canal é crítica.
Para plataformas de redes sociais que recomprimem as imagens enviadas, otimize sua exportação para minimizar a perda de qualidade durante o processamento da plataforma. Envie na resolução nativa da plataforma. 1080 por 1080 para publicações do Instagram, 1200 por 628 para prévias de links do Facebook, 1500 por 500 para cabeçalhos do Twitter — em vez de imagens superdimensionadas que a plataforma fará downsampling. Aplique uma sutil nitidez antes da exportação para neutralizar o amaciamento introduzido pela compressão da plataforma. E use uma intensidade de deslocamento moderada em vez de valores extremos. A compressão forte acentua os artefatos que aparecem nos limites dos canais.
Para aplicações de impressão como cartazes e folhetos em que os espectadores usarão óculos 3D reais, aumente a intensidade de deslocamento ligeiramente além do que parece ideal na tela. As distâncias de visualização na impressão costumam ser maiores do que na tela, o que reduz o efeito de profundidade percebido. Um cartaz de 30 polegadas visto a três pés precisa de mais deslocamento do que a tela de um telefone vista a 12 polegadas para produzir a mesma profundidade percebida. Exporte a no mínimo 300 DPI no formato TIFF ou PNG. Solicite uma prova de impressão para verificar o efeito de profundidade na distância de visualização real antes de se comprometer com uma tiragem completa.
- Use a exportação PNG para preservar a separação precisa de canais — a compressão JPEG desfoca o limite vermelho-ciano e enfraquece o efeito 3D.
- Envie na resolução nativa de cada plataforma social para minimizar a perda de qualidade pela recompressão durante o processamento.
- Para impressão, aumente a intensidade de deslocamento para compensar as maiores distâncias de visualização que reduzem a profundidade percebida.
- Solicite uma prova de impressão para verificar o efeito estereoscópico na distância de visualização real antes de se comprometer com uma produção completa.
How to do it
- 1
Choose a photo with strong depth and foreground-background separation
Anaglyph effects look most convincing when the source image has clear depth layers. Pick a photo with distinct foreground subjects and background elements. A portrait against a cityscape, a product on a table with a distant wall, or a landscape with trees in the front and mountains behind. Flat, uniform images produce a weak 3D illusion because there is no depth information for the offset channels to emphasize.
- 2
Apply the red-cyan channel offset using AI Filter
Open the image in AI Filter and select the anaglyph or 3D stereoscopic preset. The tool separates the red channel from the cyan (green plus blue) channels and shifts them in opposite horizontal directions. This chromatic offset is what creates the stereoscopic depth illusion when viewed through red-cyan glasses. Adjust the offset distance to control the perceived depth. A larger offset produces a more dramatic 3D pop but can become uncomfortable if pushed too far.
- 3
Fine-tune the depth intensity and offset direction
After the initial channel split, adjust the depth intensity slider to control how far apart the red and cyan layers sit. A subtle two-to-four pixel offset creates a gentle depth effect suitable for social media thumbnails and web graphics. A larger eight-to-twelve pixel offset delivers a pronounced 3D illusion ideal for poster prints and event flyers. You can also adjust the offset angle to shift the depth perception horizontally, vertically, or diagonally depending on the composition.
- 4
Enhance contrast and color vibrancy for maximum visual impact
Anaglyph effects benefit from high contrast and saturated colors because the channel separation needs strong tonal differences to produce a convincing depth illusion. Run the image through AI Enhance to boost contrast and lift midtone detail. Increase color saturation slightly so the red and cyan channels remain vivid after the split. Dark, low-contrast images produce muddy anaglyphs where the channels blend together instead of separating cleanly.
- 5
Export and share the finished anaglyph image
Save the final image at full resolution in PNG format to preserve the precise color channel separation. JPEG compression can introduce artifacts that blur the boundary between the red and cyan layers. For social media sharing, export at the platform's recommended dimensions. Include a note that the image is best viewed with red-cyan 3D glasses for the full stereoscopic experience, though the retro aesthetic works as a striking visual even without glasses.
Fontes
- Anaglyph 3D: History and Technique — Really Right Stuff
- Stereoscopic Displays and Applications — SPIE Digital Library
- Color Channel Manipulation in Digital Imaging — ACM SIGGRAPH