วิธีทำให้ภาพขาวดำมีสีสัน
ภาพถ่ายงานแต่งงานของปู่ย่าตายาย ภาพถ่ายครอบครัวในอดีต ภาพถ่ายท่องเที่ยวแนววินเทจ — ภาพขาวดำให้ความรู้สึกห่างไกล การปรับสีด้วย AI ช่วยให้รูปภาพดูมีชีวิตชีวาด้วยสีที่สมจริงและแม่นยำตามประวัติศาสตร์ ซึ่งทำให้รูปภาพเก่าๆ ให้ความรู้สึกทันทีและเป็นส่วนตัว
Last updated
ลงสีเลย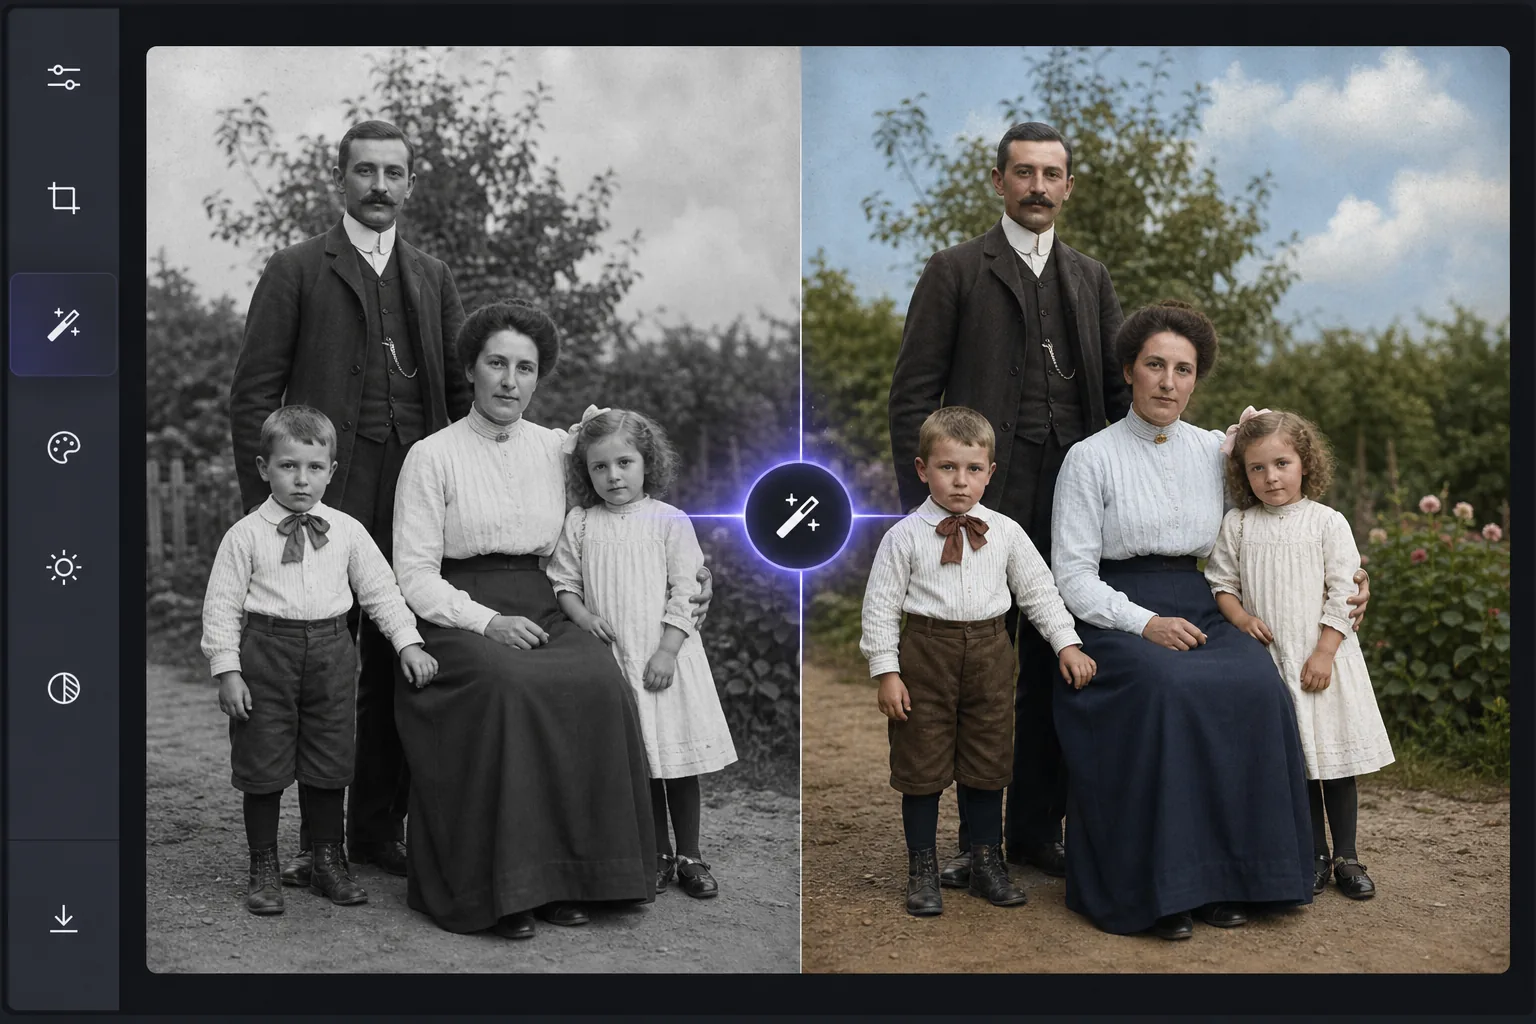
AI การให้สีทำงานอย่างไร
วิธีลงสีภาพขาวดำ ให้เปิด Magic Eraser บนเว็บ iOS หรือ Android เลือก AI Enhance อัปโหลดภาพขาวดำ แล้วให้ AI เติมสีให้ — มันจะอ่านความสว่างและพื้นผิวเพื่อคาดเดาโทนสีผิว ท้องฟ้า และต้นไม้ใบหญ้าที่ดูเป็นธรรมชาติได้ในไม่กี่วินาที ใช้ฟรี ไม่ต้องสมัครสมาชิก สีที่ได้เป็นสีที่สมเหตุสมผล แต่ไม่ได้ยืนยันความถูกต้อง: AI จะเลือกโทนสีให้เหมาะกับยุคสมัย แต่มันไม่อาจรู้สีที่แท้จริงของชุดหรือรถคันนั้น ๆ ได้ จึงควรมองว่าเป็นการตีความที่สมจริง ไม่ใช่บันทึกทางประวัติศาสตร์ ภาพสแกนที่คมชัดและความละเอียดสูงจะให้รายละเอียดมากขึ้นสำหรับ AI ทำให้ผลลัพธ์ดูเป็นธรรมชาติยิ่งขึ้น การปรับสีแบบดั้งเดิมเป็นกระบวนการที่ต้องดำเนินการด้วยตนเองที่ต้องใช้ความอุตสาหะ — ศิลปินใน Photoshop ลงสีบนภาพระดับสีเทาทีละชั้น ค้นหาสีเสื้อผ้า โทนสีผิว และเฉดสีสิ่งแวดล้อมตามช่วงเวลาที่แม่นยำ ภาพบุคคลหนึ่งภาพใช้เวลาทำงานที่มีทักษะ 2-4 ชั่วโมง การปรับสีด้วย AI ใช้โมเดลการเรียนรู้เชิงลึกที่ได้รับการฝึกจากภาพถ่ายสีหลายล้านภาพเพื่อทำความเข้าใจว่าสีใดอยู่ในที่ใด โทนสีผิวแตกต่างกันไปตามแสงและชาติพันธุ์ ท้องฟ้าเป็นไปตามรูปแบบของสภาพอากาศ หญ้าและใบไม้มีการเปลี่ยนแปลงตามฤดูกาล สีของผ้าจะเข้ากับชุดสีแฟชั่นที่เหมาะสมกับยุคสมัย AI วิเคราะห์ค่าความสว่างระดับสีเทาและรูปแบบพื้นผิวเพื่ออนุมานสีดั้งเดิมที่เป็นไปได้มากที่สุด โดยให้ผลลัพธ์ในไม่กี่วินาทีซึ่งเทียบเท่ากับชั่วโมงการทำงานแบบแมนนวล
ระบายสีในสามขั้นตอน
- 1
อัพโหลดภาพขาวดำ
เปิด Magic Eraser บนเว็บ, iOS หรือ Android อัปโหลดภาพระดับสีเทาของคุณ — ภาพถ่ายครอบครัวที่สแกน, ภาพประวัติศาสตร์, แนวตั้งแนววินเทจ หรือภาพถ่ายขาวดำใดๆ รองรับ JPEG, PNG และ TIFF การสแกนที่มีความละเอียดสูงกว่าจะให้ผลลัพธ์การปรับสีที่ดีขึ้น
- 2
เลือก ปรับสีด้วย AI
เลือกเครื่องมือกำหนดสีจากเมนูปรับปรุง AI วิเคราะห์เนื้อหาภาพ — ระบุใบหน้า เสื้อผ้า ท้องฟ้า พืช สถาปัตยกรรม และองค์ประกอบอื่นๆ — จากนั้นใช้สีที่เหมาะสมในอดีตและตามบริบทกับแต่ละภูมิภาค
- 3
ทบทวนและปรับเปลี่ยน
AI สร้างเวอร์ชันที่มีสีสมบูรณ์ภายในไม่กี่วินาที โทนสีผิว สีผ้า เฉดสีท้องฟ้า และองค์ประกอบสิ่งแวดล้อมต่างๆ จะถูกให้สีตามการวิเคราะห์เนื้อหารูปภาพของ AI ตรวจสอบผลลัพธ์และส่งออกด้วยความละเอียดสูงสุด เพื่อผลลัพธ์ที่ดีที่สุด ให้เริ่มด้วยการสแกนต้นฉบับที่มีคุณภาพสูงสุด
ดีที่สุดสำหรับ
- โครงการประวัติครอบครัว — นำภาพถ่ายครอบครัวเก่าๆ มาใช้ในงานพบปะสังสรรค์ อนุสรณ์สถาน หรืองานลำดับวงศ์ตระกูล
- เอกสารทางประวัติศาสตร์ — ระบายสีภาพถ่ายที่เก็บถาวรสำหรับพิพิธภัณฑ์ หนังสือ หรือสื่อการเรียนรู้
- โครงการบูรณะ — การเพิ่มสีสันเป็นส่วนหนึ่งของการบูรณะภาพถ่ายที่เสียหายหรือซีดจางอย่างเต็มรูปแบบ
- เนื้อหาบนโซเชียลมีเดีย — แบ่งปันภาพถ่ายวินเทจหลากสีสันที่สร้างการมีส่วนร่วมและการสนทนา
- ของขวัญแห่งความทรงจำ — การสร้างภาพพิมพ์หลากสีของบรรพบุรุษเพื่อเป็นของขวัญส่วนตัวที่มีความหมาย
เคล็ดลับเพื่อผลลัพธ์ที่ดีที่สุด
คุณภาพการสแกนมีความสำคัญอย่างมากต่อการปรับสี สแกนที่ 600 DPI หรือสูงกว่าหากเป็นไปได้ — AI ต้องการรายละเอียดเพื่อแยกแยะระหว่างพื้นผิวและพื้นผิวต่างๆ ที่ควรได้รับสีที่ต่างกัน ทำความสะอาดภาพถ่ายก่อนสแกนเพื่อกำจัดฝุ่นและเศษซาก หากงานพิมพ์ต้นฉบับซีดจางหรือคอนทราสต์ต่ำ ให้ใช้เครื่องมือ AI Enhancement ก่อนเพื่อปรับปรุงช่วงระดับสีเทาก่อนกำหนดสี ซึ่งจะทำให้ AI การปรับสีมีข้อมูลความสว่างที่ดีขึ้นในการทำงานด้วย สำหรับการถ่ายภาพกลุ่ม AI จะจัดการโทนสีผิวต่างๆ ได้อย่างแม่นยำ สำหรับทิวทัศน์ AI จะอนุมานฤดูกาลจากความหนาแน่นของใบไม้และสภาพท้องฟ้า ความแม่นยำในอดีตเป็นค่าโดยประมาณ — AI จะสร้างสีที่เป็นไปได้ตามยุคสมัยและบริบท แต่ไม่ทราบสีเฉพาะของเสื้อผ้าที่อนุมานได้
คำถามที่พบบ่อย
- สีมีความแม่นยำแค่ไหน?
- AI สร้างสีที่ดูเป็นไปได้ในอดีตและเป็นธรรมชาติ โทนสีผิว สีของท้องฟ้า และพืชพรรณมีความแม่นยำสูง สีเสื้อผ้าที่เฉพาะเจาะจงนั้นอนุมานจากบริบทและยุคสมัย — AI ไม่สามารถทราบสีที่แน่นอนของชุดนั้นๆ ได้ แต่จะกำหนดสีตามช่วงเวลาที่เหมาะสม
- มันใช้ได้กับภาพถ่ายเก่ามาก (1800) หรือไม่?
- ใช่. AI จัดการภาพถ่ายจากยุคต่างๆ ภาพถ่ายก่อนหน้านี้ (daguerreotypes,tintypes,albumin prints) อาจมีช่วงโทนสีที่แตกต่างกันซึ่งส่งผลต่อผลลัพธ์ แต่ AI จะปรับให้เข้ากับลักษณะเฉพาะของแต่ละภาพ
- ฉันสามารถปรับสีหลังการปรับสีได้หรือไม่?
- AI สร้างการประมาณการที่ดีที่สุดในรอบเดียว สำหรับการปรับสีเฉพาะ (ทำให้ท้องฟ้าหรือชุดเดรสเป็นสีอื่น) คุณสามารถใช้เครื่องมือแก้ไขเพิ่มเติมได้หลังจากการปรับสีครั้งแรก
- การทำสีฟรีหรือไม่?
- ใช่. การปรับสีด้วย AI มีให้บริการในรุ่นฟรีโดยจำกัดการใช้งานรายวัน แผนระดับพรีเมียมจะลบข้อจำกัดสำหรับโปรเจ็กต์การปรับสีตามปริมาตร
- ลงสีภาพขาวดำบน Android หรือ iPhone ทำยังไง?
- เปิด Magic Eraser ในเบราว์เซอร์มือถือใดก็ได้ หรือในแอป iOS หรือ Android โหลดภาพขาวดำจากคลังภาพของคุณ แล้วเลือก AI Enhance AI จะเติมสีให้บนมือถือของคุณในไม่กี่วินาที จากนั้นบันทึกภาพที่ลงสีแล้วกลับเข้าคลังภาพ ใช้งานได้เหมือนกับเวอร์ชันบนคอมพิวเตอร์ และไม่ต้องติดตั้งแอปถ้าคุณใช้ผ่านเบราว์เซอร์ ถ้าคุณกำลังลงสีภาพพิมพ์ที่สแกนมา ให้สแกนให้ใหญ่และคมชัดที่สุดก่อน — ยิ่งภาพขาวดำมีรายละเอียดมาก สีก็จะยิ่งดูเป็นธรรมชาติ